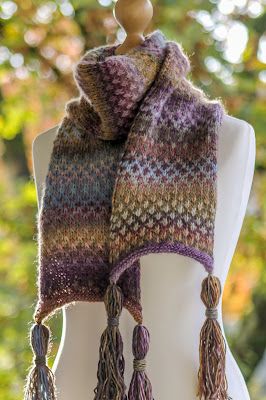
Knitted Swiss Check Scarf
Crafted with care and precision, this stylish scarf features a unique Swiss check pattern that adds a touch of sophistication to any outfit. The intricate knitting technique used to create this scarf ensures both durability and comfort, making it the perfect accessory for chilly days. The Knitted Swiss Check Scarf is a versatile piece that can be dressed up or down, making it a must-have addition to any wardrobe. Whether you're heading to the office or out for a casual weekend brunch, this scarf will keep you warm and looking effortlessly chic. Add a touch of elegance to your ensemble with this timeless accessory that is sure to turn heads wherever you go.

Yarn: Lang Yarns Viva (100% Merino Wool; 120 yards [110 meters]/50 grams); #0020 - four skeins
Needles: One pair of straight needles in size US 8
Notions: Tapestry needle
Gauge: 19 stitches = 4 inches in stockinette
And now that we've gotten the basics down, let's make a scarf! And let's begin by talking some shop: specifically, addressing the fact that this scarf is worked with two skeins of your variegated yarn at once, and that even though they're the SAME DARN COLOR (or combination of colors I suppose), I will be calling one skein A and one skein B. Of course, that's because they need to be worked alternately in order to produce the slip stitch color pattern (and for that reason I also recommend that you make sure to begin the slip stitch pattern with a portion of your skein B ball that does not match your skein A ball at whichever point in the dye you're in after the edging rows). So let's proceed as follows:
Using your skein A yarn (aka any whichever one of your skeins you pick up first), cast on 39 stitches loosely and work the edging rows as follows:
A Treasury of Knitting Patterns, and goes as follows. But before you begin, take note: the main color pattern is a slip stitch pattern, so you need to leave your yarn behind the slipped stitches quite loose. HOWEVER, the three edge stitches make a faux i-cord, so when you're directed to slip the first three and last three stitches of the row you can cinch 'em as tight as you like (without, of course, accidentally cinching together the rest of the stitches in the row!). And with that, we'll proceed like so:
Row 1 (wrong side): using skein A, purl
Row 2: using skein B, slip 3 stitches purlwise with yarn in back (sl3 wyib), k1, sl1 wyib, * k1, sl3 wyib; rep from * until you have 6 stitches left in your row; then, k1, sl1 wyib, k1, sl3 wyib
Row 3: using skein B, p4, * p3, slip 1 stitch purlwise with yarn in front (sl1 wyif) * until you have 7 stitches left in row; then, p7
Row 4: using skein A, sl3 wyib, k2, * sl1 wyib, k3 * until you have 6 stitches left in row; then sl1 wyib, k2, sl3 wyib
Row 5: using skein A, purl
Row 6: using skein B, * sl3 wyib, k1 * until you have 3 stitches left in row; then sl3 wyib
Row 7: using skein B, p5, * sl1 wyif, p3 * until you have 6 stitches left in row; then sl1 wyif, p5
Row 8: using skein A, sl3 wyib, k4, * sl1, k3, * until you have 4 stitches left in row; then, k1, sl3 wyib
Knit rows 1 - 8 until scarf measures roughly 56" and you've just finished row 1 or row 5 of the pattern. Clip your skein B yarn, and we'll work another edging in skein A as follows:
Edging Row 1 (right side): purl
Edging Row 2: knit
Edging Row 3: purl
Edging Row 4: knit
Edging Row 5: purl
Complete edging rows 1 - 5 and bind off loosely. Block scarf, and finish with 4 roughly 7" tassels, one affixed at each end of the edging! :)