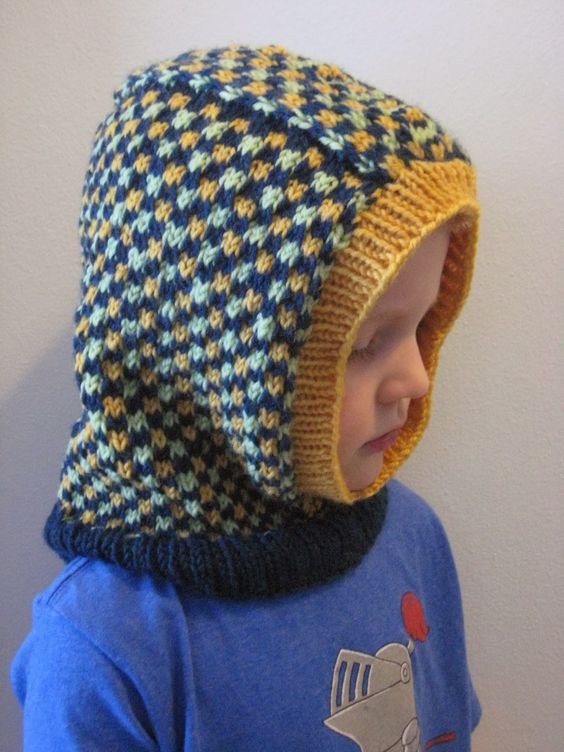
Knitted Kids' Dice Check Balaclava
Imagine a cozy winter day, with kids playing outside in the snow, their cheeks rosy and noses cold. Now picture them wearing adorable knitted balaclavas that not only keep them warm but also add a fun element to their outfits. These balaclavas are not just any ordinary winter accessory - they are designed with playful dice patterns that make them stand out from the rest. The intricate knitting work ensures that these balaclavas are not only stylish but also functional, providing the much-needed warmth and protection from the chilly weather. Made with high-quality yarn, these balaclavas are soft against the skin and comfortable to wear for extended periods. The dice check pattern adds a whimsical touch to the design, making it a fun accessory that kids will love to wear. Whether they are building snowmen, sledding down hills, or having a snowball fight, these balaclavas will keep them warm and cozy throughout their winter adventures. Upgrade your child's winter wardrobe with the Knitted Kids' Dice Check Balaclava and watch them stay stylish and snug all season long.
Sizes: Ages 18 months - 3 years (4 - 7 years)
Yarn: Cascade 220 Superwash (100% Superwash Wool; 220 yards [200 meters]/100 grams); #1924 Midnight Heather – one skein (color A), #1942 Mint - one skein (color B), and #821 Daffodil - one skein (color C) (all sizes)
Needles: Two circular needles in size 6, one of them 16", and one of them 24" or longer; another 16" circular needle in size 5
Notions: Tapestry needle, 3 stitch markers, stitch holder
Gauge: 22 stitches = 4 inches in stockinette on size 6 needles
Before we get to the pattern, let me outline how the thing is constructed. First, then, we'll knit a strip which will end up being the top of the head, and then we'll pick up stitches along both sides of the strip, to create the sides and back of the hood. Next, once we've knit the entire head-covering part, we'll join the thing in a round and knit the neck portion. Lastly, we'll pick up stitches around the face hole to create a ribbing. And now that we know where we're going with this thing, let's get started!
A Second Treasury of Knitting Patterns. Using one of your size 6 circular needles, cast on 21 stitches in color A (this is the same for both sizes). Furthermore, although we're using a circular needle, we will be knitting back and forth. Thus, we'll prepare for the pattern by purling one row in color A (this is your wrong side). On this row, we'll also place one marker after 9 stitches, and the other marker 3 stitches later (so your two markers should mirror each other across the center of the piece). Furthermore, as a note, although we will be changing colors with this pattern, I'm not going to cut my tails, but simply carry each color of yarn from row to row as I need it, mostly because I know I'm going to pick up stitches along both edges, so any weird-looking stitches that this creates will be covered up anyway. If you'd rather clip all of your tails, of course that's your choice. Anyway, let's continue as follows:
Row 1 (right side): using color B, k1, slip 1 with yarn in back (sl1 wyib), k2, s2 wyib, k2, sl1 wyib, slip marker, k3, slip marker, sl1 wyib, k2, sl2 wyib, k2, sl1 wyib, k1
Row 2: using color B, p1, slip 1 with yarn in front (sl1 wyif), p2, sl2 wyif, p2, sl1 wyif, slip marker, p3, slip marker, sl1 wyif, p2, sl2 wyif, p2, sl1 wyif, p1
Row 3: using color A, knit, slipping markers when you come to them
Row 4: using color C, (p2, sl2 wyif) twice, p1, slip marker, p3, slip marker, p1, (sl2 wyif, p2) twice
Row 5: using color C, (k2, sl2 wyib) twice, k1, slip marker, k3, slip marker, k1, (sl2 wyib, k2) twice
Row 6: using color A, purl, slipping markers when you come to them
For the smaller size, knit rows 1 - 6 seven times, and then knit rows 1 - 5 once more. For the larger size, knit rows 1 - 6 nine times, and then knit rows 1 - 5 once more. For both sizes, clip ends when you've got this all knit (so this piece won't be attached to any yarn balls any more) and transfer live stitches to a stitch holder or a scrap of yarn to hold stitches. Keep your stitch markers in place.
Using your color A yarn and your at-least-24" circular needle in size 6, and beginning at the bottom righthand corner of the strip you've knitted (so about where you originally joined your color B yarn, at the cast-on edge), pick up 33 (41 for the bigger balaclava) stitches along the edge of the piece. Space these stitches evenly along the edge, so that they go all the way to your live stitches. Also, pick up these stitches an entire knit stitch away from the edge of the piece, to hide the color-change mess. Next, knit about halfway across live stitches, slipping the first stitch marker, and then knitting one more stitch. Then, using your second size 6 circular needle, knit across the rest of the live stitches, slipping the second marker when you come to it. Pick up another 33 (41) stitches along the other long edge of piece. And in case you're wondering, we're using two circular needles to get around the very tight corners we've created - as the piece gets bigger, you will get to a point where you can knit back and forth on one needle alone; until then, you'll work with two to get around the bend (you can do this in any way that seems to work for you, but I knit the stitches on my smaller needle with the other half of my smaller needle, and I knit the stitches on my larger needle with other other half of my larger needle). No matter how you decide to do it, however, it's time to begin working the back and sides of the balaclava, in the pattern I've given below. Also, don't forget to switch to knitting this on one needle alone, once you're ready (this happened about two times through the following six rows, for me) (and you'll want to use your at-least-24" needle once you're down to one needle, just so you don't have stitches falling off of both ends).
Row 1 (wrong side): using color A, purl, slipping stitch markers when you come to them
Row 2: using color B, k2, sl1 wyib, * k2, s2 wyib; rep from * until you're three stitches from first marker, k2, sl1 wyib, slip marker, k3, slip marker, sl1 wyib, k2, * sl2 wyib, k2 * until you're three stitches from end of row; sl1 wyib, k2
Row 3: using color B, p2, sl1 wyif, * p2, s2 wyif * until you're three stitches from first marker, p2, sl1 wyif, slip marker, p3, slip marker, sl1 wyif, p2, * sl2 wyif, p2 * until you're three stitches from end of row; sl1 wyif, p2
Row 4: using color A, knit, slipping markers when you come to them
Row 5: using color C, p1, * p2, sl2 wyif * until you're one stitch from marker, p1, slip marker, p3, slip marker, p1, * sl2 wyif, p2 * until you're one stitch from end of row, p1
Row 6: using color C, k1, * k2, sl2 wyib * until you're one stitch from marker, k1, slip marker, k3, slip marker, k1, * sl2 wyib, k2 * until you're one stitch from end of row, k1
Knit rows 1 - 6 ten times through (twelve times through if you're knitting the bigger size). Then, transfer piece to your size 6 16" circular needle, place row marker, and join in round. As you'll notice, we would be beginning on a wrong-side row if we were still knitting back and forth, but now that we're starting to knit in the round, we will be knitting the right side of the piece, beginning from the other end of the row. And here's how we'll be knitting from here on out (taking care to note the yo increases in row 2 and row 5):
Row 1: using color A, knit, slipping extra markers when you come to them
Row 2: using color B, k2, sl1 wyib, * k2, s2 wyib * until you're three stitches from first marker, k2, sl1 wyib, slip marker, k1, yo, knit until you're one stitch before next marker, yo, k1, slip marker, sl1 wyib, k2, * sl2 wyib, k2 * until you're three stitches from end of row; sl1 wyib, k2
Row 3: using color B, k2, sl1 wyib, * k2, s2 wyib * until you're three stitches from first marker, k2, sl1 wyib, slip marker, knit until next marker, slip marker, sl1 wyib, k2, * sl2 wyib, k2 * until you're three stitches from end of row; sl1 wyib, k2
Row 4: using color A, knit, slipping extra markers when you come to them
Row 5: using color C, k1, * k2, sl2 wyib * until you're one stitch from marker, k1, slip marker, k1, yo, knit until you're one stitch before next marker, yo, k1, slip marker, k1, * sl2 wyib, k2 * until you're one stitch from end of row, k1
Row 6: using color C, k1, * k2, sl2 wyib * until you're one stitch from marker, k1, slip marker, knit until next marker, slip marker, k1, * sl2 wyib, k2 * until you're one stitch from end of row, k1
For both sizes, knit rows 1 - 6 three times, and then clip the tails of accent yarns B and C. Using color A, knit 1 row around, removing extra stitch markers when you come to them. Then, knit three quarters of an inch (1.5 inches for the larger size) in a * k1, p1, k1* ribbing (use a * k1, p1, k1, p1, k1 * ribbing for the larger size). Bind off loosely in pattern. Finally, using your size 5 16" circular needle and whatever color you desire, pick up 92 stitches (100 stitches for the larger size) around face opening. These will be spaced widely, and it is very important to space them evenly, or your ribbing around the face will look goofy. Knit 3/4" in a k1, p1 ribbing and bind of loosely in pattern. Tuck in ends.