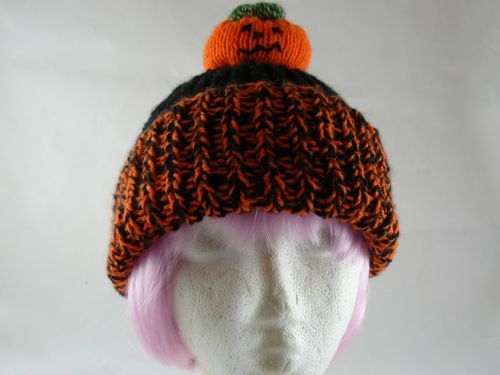
Knitted Adult's Pumpkin Bobble Hat
Crafted with care and attention to detail, this cozy pumpkin bobble hat for adults is hand-knitted using high-quality yarn. The vibrant orange color of the hat is reminiscent of a ripe pumpkin, making it a perfect accessory for the fall season. The bobble on top adds a fun and playful touch to the design, giving the hat a whimsical and charming look. This stylish and unique hat is not only fashionable but also functional, keeping you warm and toasty during chilly days. The intricate knit pattern adds texture and depth to the hat, making it stand out from the crowd. Whether you're out for a walk in the crisp autumn air or simply running errands around town, this pumpkin bobble hat is sure to turn heads and keep you looking chic and on-trend.
Requirements:
- 1x 100g double knitting yarn (Black)
- 1x 50g double knitting yarn (Bright Orange)
- 1x 25g double knitting yarn (Green)
- 1 pair of 5.5 mm knitting needles.
- 1 pair of 4 mm knitting needles.
- Needle for embroidering features and sewing up.
- A small amount of polyester stuffing.
Abbreviation and Meaning
sts Stitches
K Knit (number after it refers to how many stitches to knit)
P Purl (number after it refers to how many stitches to purl)
M1 Make a stitch by knitting into front and back threads of next stitch
M2 Make two stitched in the next stitch by knitting into the front top and back of next stitch
K2tog Knit next two stitches together as one stitch (decreases the number of stitches by 1)
K3tog Knit next three stitches together as one stitch (decreases the number of stitches by 2)
P2tog Purl next two stitches together as one stitch (decreases the number of stitches by 1)
[ ] Repeat instructions within [ ] as specified by the instruction directly following the bracket
Pattern:
To make hat (make 1):
Using 5.5mm needles cast on 74 stitches, using a strand of black and a strand of orange yarn together.
Row 1: [K1, P1] to end
Row 2: [K1, P1] to end
Repeat these 2 rows, until work measures 12 cm.
Break off the strand of orange yarn and replace it with a second strand of black wool. Continue working the pattern until work measures 23 cm.
Shape Crown:
Row 1: K1, P1, [K2tog, K1, P1, K1, P1, K1, P1] repeat to end (65 sts)
Row 2: [K1, P1, K1, P1, K1, P2] repeat to end
Row 3: K1, P1, [K2tog, P1, K1, P1, K1, P1] repeat to end (56 sts)
Row 4: [K1, P1] repeat to end
Row 5: K1, P1, K1, P1, K1 [P2tog, P1, K1, P1, K1] repeat to last 3 stitches, P2 tog, P1 (47 sts)
Row 6: [K2, P1, K1, P1] repeat to last 2 stitches, K1, P1
Row 7: K1, P1, K1, P1, K1, [P2tog, K1, P1, K1] repeat to last 2 sts, P2tog (38 sts)
Row 8: [K1, P1] repeat to end
Row 9: K1, P1, [K2tog, K1, P1] (29 sts)
Row 10: [K1, P2tog] repeat to last stitch, P1 (20 sts)
Row 11: [K2tog, P2tog] repeat to end (10 sts)
Break off yarn, thread yarn through remaining stitches and secure.
To make Pumpkin (make 1):
Using 4mm needles and a single strand of orange yarn cast on 6 stitches
Row 1: [M1] repeat to end (12 sts)
Row 2: Purl to end
Row 3: [M1] repeat to end (24 sts)
Row 4: Purl to end
Row 5: [M2] repeat to end (72 sts)
Row 6: Purl to end
Row 7: Knit to end
Row 8: Purl to end
Row 9: [K2tog] repeat to end (36 sts)
Work 9 rows in stocking stitch then shape the top.
Row 1: [M1] repeat to end (72 sts)
Row 2: Purl to end
Row 3: Knit to end
Row 4: Purl to end
Row 5: [K3 tog] repeat to end (24 sts)
Row 6: Purl to end
Row 7: [K2tog] repeat to end (12 sts)
Row 8: Purl to end
Row 9: [K2tog] repeat to end (6 sts)
Cast Off
To make Stalk (make 1):
Using 4mm needles and a single strand of green yarn cast on 8 stitches
Row 1: Purl to end
Row 2: [M1] repeat to end (16 sts)
Row 3: Purl to end
Row 4: [M1] repeat to end (32 sts)
Row 5: Purl to end
Row 6: Knit to end
Row 7: Purl to end
Row 8: [K2, K2tog] repeat to end (24 sts)
Row 9: Purl to end
Row 10: [K1, K2tog] repeat to end (16 sts)
Row 11: Purl to end
Row 12: [K2tog] repeat to end (8 sts)
Break yarn and slip remaining stitches onto thread. Pull tight and secure
To make Up:
Carefully sew down back of hat ensuring that the seam cannot be seen on the outside of the hat. Remember that the inside of the hat will fold over to form a rim when on the head. Carefully sew features onto the centre of the Pumpkin using the black yarn. With right sides facing, sew up the main body of the pumpkin leaving a small hole. Turn the pumpkin the right way out and attach the pumpkin to top of the hat with the face pointing to the front of the hat. Add the stuffing and carefully sew up the remaining hole in the seam.
Sew along the cast on edge of the stalk and secure to the top of the pumpkin. Lightly stuff the stalk and carefully sew up the open edge. For effect, I have passed a length of thread secured on the inside of the hat crown, up through the top of the hat and through the center of the pumpkin and the stalk and then as a single running stitch back down through the stalk and the pumpkin into the hat. This tread can then be pulled to give the desired level of compression on the pumpkin before securing firmly on the inside of the hat.