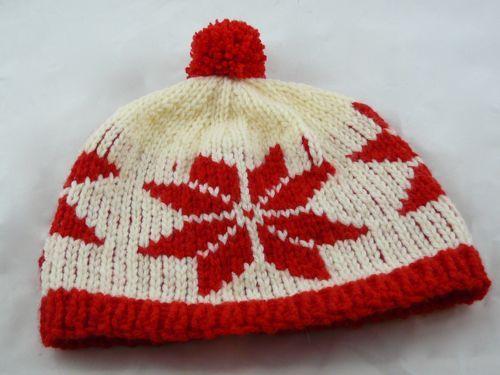
Knitted Adult's Poinsettia Bobble Hat
Crafted with care and attention to detail, this cozy winter accessory is a must-have for the holiday season. The intricate knitting technique used to create the Poinsettia design adds a touch of elegance to this classic bobble hat. The rich red color of the yarn perfectly complements the festive theme, making it a stylish addition to any winter wardrobe. Whether you're out for a stroll in the snow or attending a holiday gathering, this hat is the perfect accessory to keep you looking chic and feeling cozy all season long.
Requirements:
1 x 100g Balls of chunky knitting yarn (Red)
1 x 100g Balls of chunky knitting yarn (Cream)
1 x 5.5mm Knitting Needles
Abbreviation and Meaning
sts Stitches
P Purl (number after it refers to how many stitches to purl)
K Knit (number after it refers to how many stitches to knit)
K2tog Knit next two stitches together as one stitch (decreases the number of stitches by 1)
[ ] Repeat instructions within [ ] as specified by the instruction directly following the bracket
Pattern:
To make hat (make 1):
Using 5.5mm needles and red yarn cast on 74 stitches.
Work 5 rows in K1, P1 rib
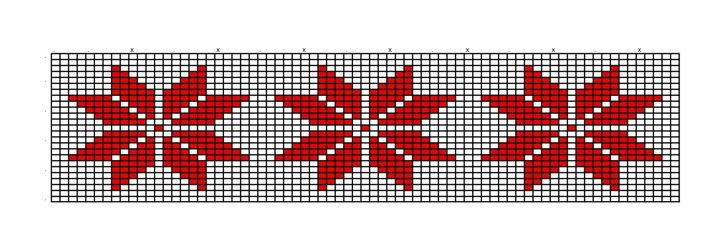
Change to the cream yarn and starting with a knit row, work 25 rows in stocking stitch following the template below. Work with the red and cream yarns as shown to create the design.
Break off the red yarn and secure. Continue to shape the crown of the hat, using the cream yarn.
Shape Crown:
Row 1: K2, [K2tog, K6 ] repeat to end (65 sts)
Row 2: Purl to end
Row 3: K2, [K2tog, K5] repeat to end (56 sts)
Row 4: Purl to end
Row 5: K5 [K2tog, K4] repeat to last 3 stitches, K2 tog, K1 (47 sts)
Row 6: Purl to end
Row 7: [K2tog, K3] repeat to last 2 sts, K2tog (37 sts)
Row 8: Purl to end
Row 9: K1, [K2tog, K2] (28 sts)
Row 10: Purl to end
Row 11: K1, [K2tog, K1] (19 sts)
Row 12: Purl to end
Row13: K1, [K2tog] repeat to end (10 sts)
Break off yarn, thread yarn through remaining stitches and secure.
To make up
Carefully sew down back of hat ensuring that the seam cannot be seen on the outside of the hat. Make a Pompom using the red yarn and attach securely to the top of the hat. The Pompom shown here was prepared by wrapping wool around my hand, tying in the center and trimming to shape.