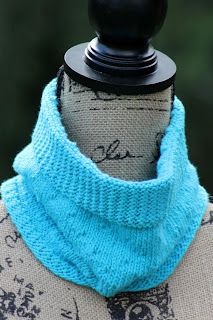
Knitted Dot Cowl
Introducing the Knitted Dot Cowl, a stylish accessory that will add a touch of elegance to any outfit. Crafted with care and precision, this cowl features a unique dot pattern that sets it apart from ordinary scarves. The intricate knitting technique used to create this piece ensures a soft and cozy feel against your skin, making it perfect for those chilly winter days. Made from high-quality yarn, this cowl is not only durable but also easy to care for. Its lightweight design makes it easy to carry around, so you can always have it on hand when the temperature drops. Whether you're heading out for a casual stroll or attending a formal event, the Knitted Dot Cowl is the perfect accessory to complete your look and keep you cozy all day long.

Yarn: Cascade Yarns Cotton Rich DK (64% Cotton, 36% Nylon; 135.60 yards [124 meters]/50 grams); #2730 - two skeins
Needles: One 16" circular needle in size US 6
Notions: Tapestry needle, stitch marker
Gauge: 22 stitches = 4 inches
So let's make a cowl! To do it, we'll cast on 114 stitches loosely, place marker, and join in round. And then we'll get to our edging stitch, which is Close Stitch from page 94 of Barbara G. Walker's A Treasury of Knitting Patterns. And it goes like so:
Edging Row 1: purl
Edging Row 2: * slip 1 with yarn in back (sl1 wyib), k1; rep from *
A Second Treasury of Knitting Patterns, except adapted for the round. But before we get to that, let's define our terminology.
dot knot (dk): insert the tip of your right-hand needle under running thread between the first and second stitches on your left-hand needle and draw a loop of yarn loosely through, as if you're knitting. Repeat the procedure above the running thread, drawing another loop loosely through. Bring yarn forward between needles and purl the first stitch from your left-hand needle. Using the tip of your left-hand needle, lift first loop from right-hand needle and pass it over the second loop and your purled stitch; then lift second loop and pass it over your purled stitch as well.
Now that that's out of the way, let's proceed like so:
Rows 1 - 3: knit
Row 4: * k1, dk, k4 *
Rows 5 - 7: knit
Row 8: * k4, dk, k1 *
Knit rows 1 - 8 until piece measures roughly 6.5" and you've just finished row 3 or row 7 of the pattern. Remove your row marker, since you'll be knitting back and forth instead of in the round from now on. As the top portion of this cowl is designed to fold over, what was our wrong side is now going to be our right side. With that in mind, we'll knit one right side row (formerly wrong side row) as a transition. And it will go like so:
Transition Row (right side): ssk, * slip 1 with yarn in back (sl1 wyib), k1; rep from *
Once that's done, we'll continue with our edging as follows:
Edging Row 1 (wrong side): knit
Edging Row 2: k1, * slip 1 with yarn in back (sl1 wyib), k1; rep from *
Knit edging rows 1 & 2 until top edging measures roughly 1.5" and you've just finished row 2 of the pattern. Bind off loosely, tuck in ends, and block. Fold over top edge to expose right side.