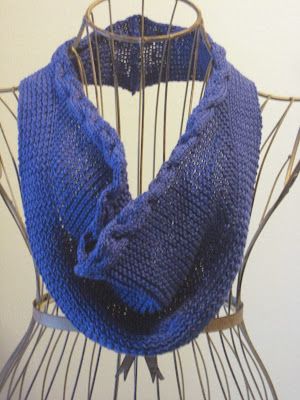
Knitted Braid-Edged Cowl
Step into the world of warmth and style with our exquisite Cozy Braided Cowl. This beautifully crafted accessory combines the timeless charm of knitting with a touch of elegance. The intricate braided edge adds a unique twist to the classic cowl design, making it a must-have for fashion-forward individuals who appreciate the finer details. Indulge in the artistry of our Woven Cowl, a true masterpiece in the realm of knitted accessories. This stunning creation showcases the skillful craftsmanship of our talented artisans, who have meticulously woven together soft yarns to create a luxurious and cozy cowl. The braid-edged design adds a touch of sophistication, elevating this accessory to a whole new level of elegance. Wrap yourself in its warmth and revel in the beauty of this unique piece that effortlessly combines fashion and comfort.
Yarn: Cascade Yarns Ultra Pima (100% Pima Cotton; 220 yards [200 meters]/100 grams); #3777 African Violet - 1 skein
Needles: Straight needles in size 6 (or a circular needle, but worked back and forth)
Notions: Tapestry needle, cable needle (cn) or extra double-pointed needle for cabling, two stitch markers
Gauge: 22 stitches = 4 inches in stockinette
First, cast on 25 stitches loosely. Also, you'll need the following notation to do the pattern:
fc (front cross): slide three stitches to cn, hold in front, and knit three. Then, knit the three stitches from your cn.
bc (back cross): slide three stitches to cn, hold in back, and knit three. Then, knit the three stitches from your cn.
Rows 1 & 3 (right side): (k1, p1) 8 times, k9
Rows 2, 4, 6, 8, 10, & 12: p9, (k1, p1) 8 times
Row 5: (k1, p1) 8 times, bc, k3
Rows 7 & 9: repeat row 1
Row 11: (k1, p1) 8 times, k3, fc
Knit rows 1 - 12 either two or three times (I recommend two if you don't want the cowl to extend too far below the bust), and then knit rows 1 - 6 once more. Now, we're going to begin adding stitches. In essence, you will maintain your rows of ribbing and keep cabling in the same pattern, but add stitches between the two that you'll work in garter stitch. More precisely, the process goes as follows:
Row 1: (k1, p1) 7 times, k1, place stitch marker, pfb, place stitch marker, k9
Rows 2, 4, 6, 8, 10, & 12: purl to first stitch marker, slip marker, purl until one stitch remains before second stitch marker, k1, slip marker, (p1, k1) 7 times, p1
Rows 3, 7, & 9: (k1, p1) 7 times, k1, slip marker, pfb, purl until next stitch marker, slip marker, k9
Row 5: (k1, p1) 7 times, k1, slip marker, pfb, purl until next stitch marker, slip marker,k3, fc
Row 11: (k1, p1) 7 times, k1, slip marker, pfb, purl until next stitch marker, slip marker, bc, k3
Knit rows 1 - 12 six times, replacing the directions for the original row 1 with the directions for row 3 in all other pattern repeats. At this point, you should have 61 stitches on your needle. Now we're going to quit adding stitches, but knit one more iteration of the pattern. Or, more explicitly:
Row 1: (k1, p1) 7 times, k1, remove marker, p1, replace stitch marker, purl until next stitch marker, slip marker, k9
Rows 2, 4, 6, 8, 10, & 12: purl to first stitch marker, slip marker, purl until second stitch marker, slip marker, (k1, p1) 8 times
Rows 3, 7, & 9: (k1, p1) 8 times, slip marker, purl until next stitch marker, slip marker, k9
Row 5: (k1, p1) 8 times, slip marker, purl until next stitch marker, slip marker,k3, fc
Row 11: (k1, p1) 8 times, slip marker, purl until next stitch marker, slip marker, bc, k3
Repeat rows 1 - 12 once. Now, we're on the reduction train. Or in pattern (but keeping your ribbing rows and cabling rows intact and decreasing just the garter rows between):
Row 1: (k1, p1) 8 times, slip stitch marker, purl until next stitch marker, slip marker, k9
Rows 2, 4, 6, 8, 10, & 12: purl to first stitch marker, slip marker, purl until there are two stitches before second stitch marker, p2tog, slip marker, (k1, p1) 8 times
Rows 3, 7, & 9: (k1, p1) 8 times, slip marker, purl until next stitch marker, slip marker, k9
Row 5: (k1, p1) 8 times, slip marker, purl until next stitch marker, slip marker,k3, fc
Row 11: (k1, p1) 8 times, slip marker, purl until next stitch marker, slip marker, bc, k3
Repeat rows 1 - 12 until you have 26 stitches left on your needle, and you've just completed a right side row of the pattern. You should be beginning your 12th pattern row now, but if you've made a small mistake with all of the increasing and decreasing and you're on a slightly different pattern row, don't fret. Simply follow the final decrease instructions, which follow, and then continue on in the pattern we began with (which I've again described below), and work until your piece appears to be symmetric. Either way, on your next wrong-side row, purl to first marker and remove it, slip one stitch in order to remove second marker, and then place slipped stitch back on your right-hand needle so that you can work it in a decrease. K2tog, (p1, k1) 7 times, p1.
Now that we've completed the decrease rows 1 - 12 six times, we're in the final stretch. And although this is exactly the same as the beginning stretch, we're also beginning from what used to be row 7, so I'm describing it again just in case. If you'd like to see the pattern again, then, here's what it looks like:
Rows 1, 3, 7, & 9 (right side): (k1, p1) 8 times, k9
Rows 2, 4, 6, 8, 10, & 12: p9, (k1, p1) 8 times
Row 5: (k1, p1) 8 times, k3, fc
Row 11: (k1, p1) 8 times, bc, k3
Repeat rows 1 - 12 two or three times (matching what you did before), and then repeat rows 1 - 4 again. Bind off loosely, seam piece at back, and tuck in ends. And you're done!