Knitted Diagonal Scarf
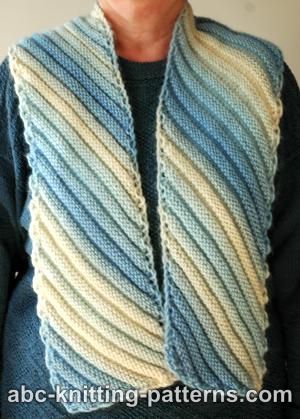
Introducing the Knitted Diagonal Scarf, a stylish and versatile accessory that will add a touch of elegance to any outfit. Crafted with care and precision, this scarf is made using the art of knitting, resulting in a unique and eye-catching diagonal pattern. The soft and cozy texture of the scarf ensures that you stay warm and comfortable, while the intricate design adds a fashionable twist to your look. Whether you drape it casually over your shoulders or wrap it snugly around your neck, this scarf is sure to turn heads and make a lasting impression. With its high-quality materials and attention to detail, the Knitted Diagonal Scarf is a timeless addition to your wardrobe that will keep you warm and stylish for years to come.
Skills Required/Techniques Used:
Difficulty Level: Easy
-Knit & purl, cast on & bind off
-Decreasing: knit 2 together (k2tog), purl 2 together (p2tog)
-Increasing: make 1 (m1)
Materials: Debbie Mumm Traditions worsted weight yarn, color Robins Egg 136 m (149 yd) / 80g - 2 skeins.
Needles: US #6 (4.0 mm) OR SIZE NEEDED TO OBTAIN GAUGE.
Gauge: 14 st = 4" (10 cm)
Notions: stitch marker, tapestry needle
Abbreviations:
K – knit
P – purl
k2tog - knit 2 sts together
p2tog - purl 2 together
St, sts – stitch, stitches
RS – right side
WS – wrong side
m 1 - make 1 increase - I used the increase described by Elizabeth Zimmerman: make a backward loop over the right-hand needle and in the next row/round purl/knit it as a regular stitch.
st, sts - stitch, stitches
Pattern Notes:
Garter Stitch Ridges
Row 1 (RS): purl
Row 2 (WS): knit
Row 3: purl
Row 4: purl
Row 5: knit
Row 6: purl
Repeat rows 1-6
Edge stitches: slip the first st and purl the last one.
Short Overview of the Pattern:
The scarf is worked sideways on a bias, in Garter Stitch Ridges pattern. The scarf begins with 5 st, then the increases (make 1) are worked in every right side row, until the required width is achieved. Then the scarf is worked with increases (make 1) at the beginning of the row and decreases (k2tog or p2tog) at the end of the row until the desired length. Lastly, the stitches are decreased (k2tog, or p2tog) at the beginning and the end of the row. The decreases are worked until there are 5 sts left. Place the stitch marker to mark the right side of the scarf.
Directions:
Cast on 5 sts.
Row 1(RS): sl1, p4.
Row 2 (WS): sl1 , k3, p1.
Rows 3-34: continue to work Garter Stitch Ridge pattern, at the same time increase 1 sts on both sides 16 times in every odd, RS, row, until you have 37 sts.
Row 3 (RS): sl1, m1, purl to last st, m1, p1.
Row 4 (WS): sl1, purl.
Row 5: sl1, m1, knit to last, m1, p1.
Row 6: like row 4
Row 7: like row 3
Row 8: sl1, knit to last, p1.
Repeat rows 3-8 four more times, repeat row 3-4 one more time.
Row 35: sl1, k to last st, m1, p1.
Row 35: sl1, purl.
Rows 37-240: continue to work Garter Stitch Ridge pattern, at the same time, in every RS row. decrease 1 st at the beginning by knitting 2 sts together (k2tog) or purling 2 sts together (p2tog) and increase 1 st (m1) at the end of the row.
Row 241: decrease 1 st at the beginning of the row.
Rows 243-258: continue to work Garter Stitch Ridge pattern, at the same time, in every RS row, decrease 1 st at the beginning and the end of the row by k2tog or p2tog. Make decreases 16 times. There will be 5 sts on the needle when all the decreases are done.
Rows 259-260: repeat rows 1-2.
Cast off.
Finishing: weave in all yarn ends.