Knitted Mesh Lace Top
Picture a delicate, intricately designed top that exudes elegance and sophistication. This piece is crafted from a combination of knitted mesh and lace, creating a unique and eye-catching texture that is sure to turn heads. The intricate patterns and details of the knitted mesh lace top add a touch of femininity and charm, making it a versatile piece that can be dressed up or down for any occasion. The knitted mesh lace top is a timeless wardrobe staple that effortlessly combines comfort with style. The lightweight and breathable fabric make it perfect for layering or wearing on its own during warmer months. Whether paired with a tailored blazer for a chic office look or with jeans for a casual weekend outfit, this versatile top is a must-have for anyone looking to add a touch of sophistication to their wardrobe.

Skill Level – Easy
Size Information
Gauge – 12 sts/14 rows in 4 inches/10 cm in pattern.
This top can be made in the following sizes…
S (M, L, XL, XXL, XXXL)
Bust Size (inches)
38 (42, 46, 51, 57, 63)
Waist Size (inches)
34 (38, 42, 47, 53, 59)
The pattern is written for all sizes, starting with the smallest size and with changes for different sizes listed in all necessary places.
To follow patterns more easily, circle or highlight all numbers pertaining to your size before beginning.
The Supplies You Need;
Yarn
- The Pima Cotton From We Are Knitters in Sand (This cotton is 100% Pima Cotton) 100g/3.05oz/232 yds/212m.
- This is an Aran/Worsted/10 Ply yarn.
For the following sizes, you will need;
- Small – 2 – (200g/464yds/424m)
- Medium – 2 – (200g/464yds/424m)
- Large – 3 – (300g/696yds/636m)
- XL – 3.5 – (350g/812yds/742m)
- XXL – 4 – (400g/928yds/848m)
- XXXL – 4.5 – (450g/1,044yds/954m)
Needles
- 5 mm (US 8) knitting needles
- The top is worked back and forth on the needles – knit flat
Notions
- Scissors
- Darning needle/yarn needle
- Tape measure
- Stitch holder
Knitting Abbreviations
- CO – Cast on
- Cont – Continue
- Dec – Decrease (cast off)
- g st – Garter stitch
- K – Knit
- K2tog – Knit the next two stitches together (decrease)
- Patt – Pattern
- P – Purl
- SKP – Slip, Knit, Pass (slip 1, K1, pass slipped stitch over)
- St(s) – Stitch(es)
- Rem – Remaining
- Rep – Repeat
- RS – Right side
- WS – Wrong side
- YO – Yarn over
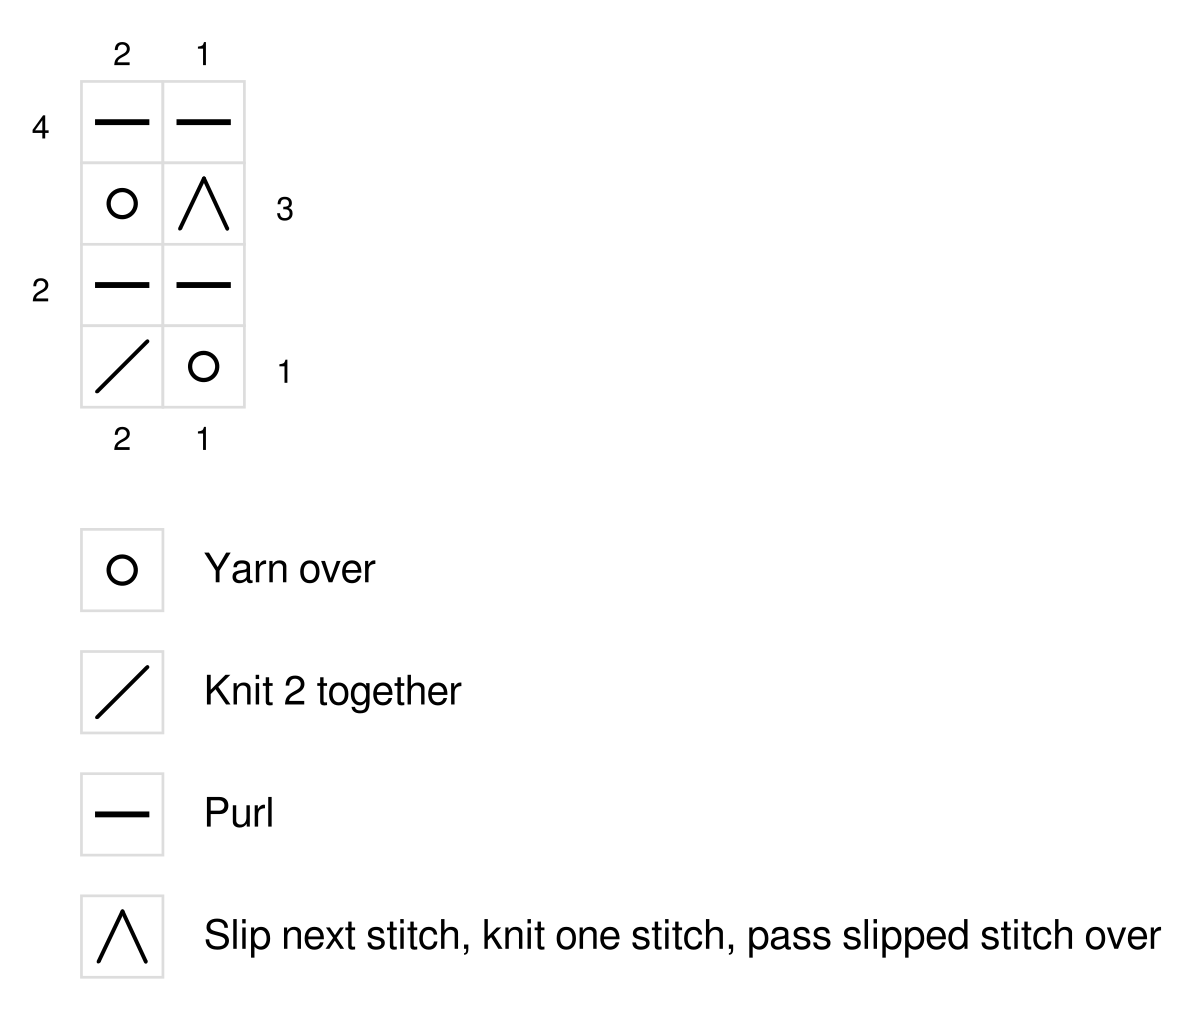
Abbreviations Chart
- Multiple of 2 stitches
- 2 stitch repeat.
- Purl on the WS – wrong side
Pattern Instructions
Worked flat knitting back and forth on two needles:
Work the Front and Back pieces the same.
Cast on 64 (72, 80, 88, 100, 112) sts.
- Row 1 (RS): *YO, K2tog; Rep from * to end.
- Row 2 (WS): Purl.
- Row 3: *SKP, YO; Rep from * to end.
- Row 4: Purl.
Cont to repeat rows 1 – 4 until your piece measures = 30 (32, 34, 36, 38, 40)cm / 11.8 (12.5, 13.3, 14.1, 15, 15.7) inches.
Shape Armholes
Row 1 (RS): Cast off 4 stitches at the beg of the row, work in patt to end.
Row 2 (WS): Cast off 4 stitches at the beg of the row, work in patt to end.
Decrease (cast off) 1st at the beg of every row until you have 32 (36, 40, 44, 48, 52) sts left on the needle.
End with a RS row.
Tip – Stay in the pattern on the RS rows when decreasing by looking for the SKP stitches and working back from those – to see which stitches you have lost and where you need to start from on that row.
Straps (Garter Stitch)
First Strap
Row 1 (RS): K4 sts, cast off the rem sts until you reach the final 4 sts at the end of the row and turn the work.
Row 2 (WS): K the 4 sts and place the other 4 sts on the other side of the work onto a stitch holder.
Cont to work in g st until the strap measures = 14, (14, 16, 16, 18, 18) cm / 5.5 (5.5, 6.2, 6.2, 7, 7) inches.
Cast off.
Second Strap
Rep with the other 4 sts, re-attach the yarn to the first stitch on the right side and knit in g st until the strap is the same length as the first one.
Cast off.
Making Up
Sew the side seams together using the mattress stitch or any seaming method of your choice.
If you wish, you can leave a 10 cm/4-inch vent on either side of the seam near the bottom.
Sew the loose ends of the straps to the coordinating points on the other piece (front or back) at the top of the work.
Finishing and Blocking
You may wish to block your top; you can do that as follows:
- Lay the item out on blocking mats, lightly stretch it into place, and pin it with blocking pins.
- Spray with cold water.
- Allow to dry completely.
- Blocking