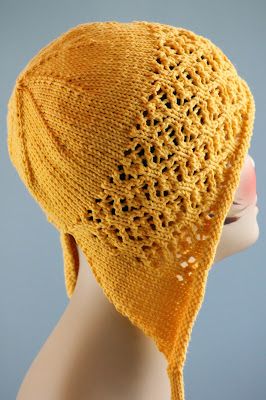
Knitted Floral Mesh Bonnet
Picture a delicate bonnet crafted from intricately knitted fabric, adorned with beautiful floral patterns. This charming accessory combines the timeless art of knitting with a touch of elegance, creating a unique and stylish piece that is sure to turn heads. The mesh design adds a modern twist to the classic bonnet style, allowing for breathability and comfort while still looking effortlessly chic. This Knitted Floral Mesh Bonnet is the perfect accessory for any occasion, whether you're looking to add a touch of whimsy to your everyday outfit or elevate your look for a special event. The floral details give the bonnet a feminine and romantic feel, while the mesh material adds a hint of playfulness. With its versatile design and intricate craftsmanship, this bonnet is a must-have for anyone who appreciates fine quality and attention to detail in their accessories.
Sizes: Child's Small (Child's Large; Teen/Adult Small; Adult Large) (as far as the child's small and the child's large are concerned - think maybe 2 - 5 years for the small, 6 - 12 or so for the large)
Yarn: Schoeller + Stahl Pantino (60% Cotton, 40% Acrylic; 98 yards [90 meters]/50 grams); #0007 Egg Yolk (that color name is still made up) - 2 skeins
Needles: Straight needles in size US 5, 16" circular needle in size US 5, and one set of dpns, also in size 5
Notions: Tapestry needle, two stitch markers
Gauge: 17 stitches = 4 inches
So let's make a hat, shall we? First, then, we'll start with the brim of this bonnet, which is knit back and forth. So, using your straight needles, cast on 84 (98; 112; 126) stitches loosely. Then we'll knit a few edging rows, as follows. Notice you'll be placing two stitch markers on your third edging row.
Edging Row 1 (right side): purl
Edging Row 2: knit
A Fourth Treasury of Knitting Patterns, as well as some decreases. I have written two sets of instructions for this pattern - Set 1 has decreases every other right side row, Set 2 has decreases every right side row. Which sets you'll be knitting and how many depend on the size of the hat you're making. See below for details.
Child's Small - Knit rows 1 - 12 of Set 1 twice
Child's Large - Knit rows 1 - 12 of Set 1 once, then knit rows 1 - 12 of Set 2 once
Adult's Small - Knit rows 1 - 12 of Set 1 twice, then knit rows 1 - 12 of Set 2 once
Adult's Large - Knit rows 1- 12 of Set 1 once, then knit rows 1 - 12 of Set 2 twice
Set 1:
Set 1 Row 1 and all wrong side rows: purl, slipping extra markers when you reach them
Set 1 Row 2: ssk, knit until you reach first marker, slip marker, k2, * k2, yo, ssk, k1, k2tog, yo, k1; rep from * until you have three stitches left before marker, k3, slip marker, knit until you have 2 stitches left in row, k2tog (-2 stitches)
Set 1 Row 4: knit until you reach first marker, slip marker, k2, * yo, slip 2 together knitwise-k1-p2sso (sl2-k1-p2sso), yo, k3, yo, k2tog; rep from * until you have three stitches left before marker, yo, ssk, k1, slip marker, knit until end of row
Set 1 Row 6: ssk, knit until you reach first marker, slip marker, k1, yo, * sl2-k1-p2sso, yo, k2tog, yo, k1, yo, ssk, yo; rep from * until you have 4 stitches left before marker, sl2-k1-p2sso, yo, k1, slip marker, knit until you have two stitches left in row, k2tog (-2 stitches)
Set 1 Row 8: knit until you reach first marker, slip marker, k2, * k1, k2tog, yo, k3, yo, ssk; rep from * until you have 3 stitches left before marker, k3, slip marker, knit until end of row
Set 1 Row 10: ssk, knit until you reach first marker, slip marker, k2, * k2, yo, k2tog, yo, sl2-k1-p2sso, yo, k1; rep from * until you have 3 stitches left before marker, k3, slip marker, knit until you have 2 stitches left in row, k2tog (-2 stitches)
Set 1 Row 12: knit until you reach first marker, slip marker, k2tog, yo, * k1, yo, ssk, yo, sl2-k1-p2sso, yo, k2tog, yo; rep from * until you have 3 stitches left before marker, k1, yo, ssk, slip marker, knit until end of row
Set 2:
Set 2 Row 1 and all wrong side rows: purl, slipping extra markers when you reach them
Set 2 Row 2: ssk, knit until you reach first marker, slip marker, k2, * k2, yo, ssk, k1, k2tog, yo, k1; rep from * until you have three stitches left before marker, k3, slip marker, knit until you have 2 stitches left in row, k2tog (-2 stitches)
Set 2 Row 4: ssk, knit until you reach first marker, slip marker, k2, * yo, slip 2 together knitwise-k1-p2sso (sl2-k1-p2sso), yo, k3, yo, k2tog; rep from * until you have three stitches left before marker, yo, ssk, k1, slip marker, knit until you have 2 stitches left in row, k2tog (-2 stitches)
Set 2 Row 6: ssk, knit until you reach first marker, slip marker, k1, yo, * sl2-k1-p2sso, yo, k2tog, yo, k1, yo, ssk, yo; rep from * until you have 4 stitches left before marker, sl2-k1-p2sso, yo, k1, slip marker, knit until you have two stitches left in row, k2tog (-2 stitches)
Set 2 Row 8: ssk, knit until you reach first marker, slip marker, k2, * k1, k2tog, yo, k3, yo, ssk; rep from * until you have 3 stitches left before marker, k3, slip marker, knit until you have 2 stitches left in row, k2tog (-2 stitches)
Set 2 Row 10: ssk, knit until you reach first marker, slip marker, k2, * k2, yo, k2tog, yo, sl2-k1-p2sso, yo, k1; rep from * until you have 3 stitches left before marker, k3, slip marker, knit until you have 2 stitches left in row, k2tog (-2 stitches)
Set 2 Row 12: ssk, knit until you reach first marker, slip marker, k2tog, yo, * k1, yo, ssk, yo, sl2-k1-p2sso, yo, k2tog, yo; rep from * until you have 3 stitches left before marker, k1, yo, ssk, slip marker, knit until you have 2 stitches left in row, k2tog (-2 stitches)
Knit the given row combination for your size. At this point, you should have two stitches before your first marker and one after your second. It's also time to join this bad boy in the round. So, transfer work to your 16" circular needle, removing your markers when you do so (to be fair, I've been using my circulars the whole time, but if you are using straight needles than it's time to switch). Place marker, and join in round. Knit for 2" (2.25"; 2"; 2.25") in stockinette. Now we're ready to begin our decreases. Again, these differ slightly for the sizes, but only because you'll be beginning on a different row for each size. See below.
Child's Small - begin on decrease row 7
Child's Large - begin on decrease row 5
Adult Small - begin on decrease row 3
Adult Large - begin on decrease row 1
And the decrease rows themselves:
Decrease Row 1: * k10, k2tog * (88 stitches)
Decrease Rows 2, 4, 6, 8, 10, 12, 14, 16, 18, & 20: knit
Decrease Row 3: * k9, k2tog * (80 stitches)
Decrease Row 5: * k8, k2tog * (72 stitches)
Decrease Row 7: * k7, k2tog * (64 stitches)
You may want to switch to your dpns about now...
Decrease Row 9: * k6, k2tog * (56 stitches)
Decrease Row 11: * k5, k2tog * (48 stitches)
Decrease Row 13: * k4, k2tog * (40 stitches)
Decrease Row 15: * k3, k2tog * (32 stitches)
Decrease Row 17: * k2, k2tog * (24 stitches)
Decrease Row 19: * k1, k2tog * (16 stitches)
Decrease Row 21: * k2tog * (8 stitches)
Knit your given start row through decrease row 21, clip yarn tail, and thread through final 8 stitches. Pull tight, thread to inside of hat, and knot. Using your dpns, pick up 5 stitches along one of the bottom corners of hat, and work an i-cord until it measures 8" (9"; 10"; 11"). Bind off and repeat on other corner. Tuck in ends and block.