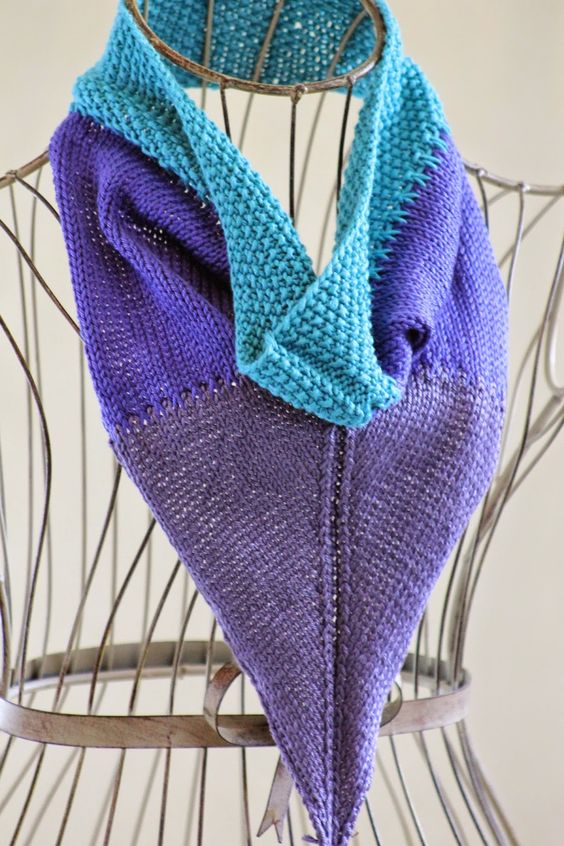
Knitted Colorblocked V Cowl
Picture a cozy, stylish accessory that combines different colors and textures in a unique way. This knitted cowl features a V shape design that adds a modern twist to a classic winter accessory. The colorblocking technique used in this piece creates a visually striking look that is sure to turn heads. This V-shaped cowl is not only fashionable but also functional, providing warmth and comfort during the colder months. The intricate knitting pattern adds depth and dimension to the piece, making it a versatile addition to any winter wardrobe. Whether you're running errands or meeting friends for coffee, this knitted colorblocked V cowl is the perfect accessory to elevate your outfit and keep you cozy at the same time.
arn: Schachenmayr smc Cotton Bamboo (75% Cotton, 50% Bamboo; 131 yards [120 meters]/50 grams); #64 Aqua - one skein (color A), Cascade Yarns Ultra Pima (100% Pima Cotton; 220 yards [200 meters]/100 grams); #3777 African Violet - 1 skein (color B); #3705 Heathered Pansy - 1 skein (Color C)
Needles: One 16" or 20" circular needle in size 6
Notions: Tapestry needle, three stitch markers
Gauge: 22 stitches = 4 inches
So let's get started! Using your color A yarn, cast on 112 stitches, place marker, and join in round (please note that this cowl, when finished, will be just over 20 inches in circumference. This should accommodate most head sizes, since knit stuff stretches and all. Anyway, then you'll knit the following row to place your extra stitch markers:
Stitch Marker Placement Row: k1, (p1, k1) 27 times, place marker, p2, place marker, k1, * p1, k1; rep from * to end of round
And now, we'll move on to a seed stitch for the top band of this cowl, like so:
Row 1: p1, * k1, p1 * to first marker, slip marker, p2, slip marker, p1, * k1, p1 * to end of round
Row 2: k1, * p1, k1 * to first marker, slip marker, p2, slip marker, k1, * p1, k1 * to end of round
Knit rows 1 & 2 until piece measures just over 2" and you've just finished Row 2 of the pattern. On the next row, you'll be binding off some stitches in the back of the piece. Let's proceed like so:
Bind-off Row: p1, * k1, p1 * to first marker, slip marker, p2, slip marker, * p1, k1 * until there are 11 stitches left before round marker. Bind off the next 11 stitches in pattern, remove row marker, and bind off the first 11 stitches of the next round. Transfer final bind off stitch to left hand needle and clip tail of color A yarn. You should now have 44 stitches on either side of the p2 stripe in the middle, and from now on you'll be working back and forth instead of in the round and with your color B yarn. And we'll begin with a few transition rows, which go like so:
Transition Row 1 (right side): k1, p1, * slip 1 with yarn in back, k1 * until you reach marker, slip marker, p2, slip marker, * k1, slip 1 with yarn in back * until there are two stitches left in row; end p1, k1
Transition Row 2: p1, k1, * slip 1 with yarn in front, p1 * until you reach marker, slip marker, k2, slip marker, * p1, slip 1 with yarn in front * until you have two stitches left in row; end k1, p1
And once we've completed these two transition rows, it's time to begin the stockinette portion of this pattern, which incorporates two decreases every four rows, and goes like this:
Row 1: k1, p1, knit until first marker, slip marker, p2, slip marker, knit until there are two stitches left in row; end p1, k1
Rows 2 & 4: p1, k1, purl until first marker, slip marker, k2, slip marker, purl until there are two stitches left in row; end k1, p1
Row 3: k1, p1, knit until you're two stitches before first marker, k2tog, slip marker, p2, slip marker, ssk, knit until there are two stitches left in row; end p1, k1
Knit rows 1 - 4 until you have 38 stitches left before your first marker and you've just finished row 4 of your pattern (so you should have 38 stitches left after your second marker as well). Now we'll begin decreasing every right side row, like so:
Row 1: k1, p1, knit until you're two stitches before first marker, k2tog, slip marker, p2, slip marker, ssk, knit until there are two stitches left in row; end p1, k1
Row 2: p1, k1, purl until first marker, slip marker, k2, slip marker, purl until there are two stitches left in row; end k1, p1
Knit rows 1 & 2 until you have 30 stitches left before your first marker and you've just finished row 2 of your pattern (so you should have 30 stitches left after your second marker as well). Clip the tail of your color B yarn, since it's time to transition to your color C yarn with the following rows:
Transition Row 1 (right side): using color C, k1, p1, * slip 1 with yarn in back, k1 * until you have two stitches left before first marker; end k2tog, slip marker, p2, slip marker, ssk, and then * k1, slip 1 with yarn in back * until you're two stitches before end of row; end p1, k1
Transition Row 2: using color C, p1, k1, * slip 1 with yarn in front, p1 * until you're one stitch before first marker, p1, slip marker, k2, slip marker, p1, * p1, slip 1 with yarn in front * until you're two stitches before end of row; end k1, p1
And now we'll resume our decrease pattern in color C, like so:
Row 1: k1, p1, knit until you're two stitches before first marker, k2tog, slip marker, p2, slip marker, ssk, knit until there are two stitches left in row; end p1, k1
Row 2: p1, k1, purl until first marker, slip marker, k2, slip marker, purl until there are two stitches left in row; end k1, p1
Knit Rows 1 & 2 until you have 8 stitches left on your needle and you've just finished Row 2 of the pattern. Then work the following three rows:
Row 1 (right side): k1, k2tog, p2, ssk, k1
Row 2: p2, k2, p2
Row 3: k2tog, p2, ssk
And once these are all done, bind off loosely in pattern and tuck in ends. Finally, block, like, for serious, 'cause this bad boy will definitely curl otherwise.
Update: It seems like there may be some demand to see this piece as an entirely back-and-forth pattern, and that's an easy conversion. So please, see below for the modified instructions for straight needles!
Using your color A yarn, cast on 112 stitches. Then you'll knit the following row to place your stitch markers:
Stitch Marker Placement Row (wrong side): k1, (p1, k1) 27 times, place marker, k2, place marker, k1, * p1, k1; rep from * to end of round
And now, we'll move on to a seed stitch for the top band of this cowl, like so:
Row 1 (right side): k1, * p1, k1 * to first marker, slip marker, p2, slip marker, k1, * p1, k1 * to end of round
Row 2: k1, * p1, k1 * to first marker, slip marker, k2, slip marker, k1, * p1, k1 * to end of round
Knit rows 1 & 2 until piece measures just over 2" and you've just finished Row 1 of the pattern. On the next row, you'll be binding off some stitches in the back of the piece. Let's proceed like so:
Bind-off Row (wrong side): bind off 11 stitches in pattern, then * p1, k1 * to first marker, slip marker, k2, slip marker, and * k1, p1 * until you have 11 stitches left in row. Bind off final 11 stitches in pattern, which should leave you with 44 stitches on either side of the p2 stripe in the middle. Switch to your color B yarn. And we'll begin with a few transition rows, which go like so:
Transition Row 1 (right side): k1, p1, * slip 1 with yarn in back, k1 * until you reach marker, slip marker, p2, slip marker, * k1, slip 1 with yarn in back * until there are two stitches left in row; end p1, k1
Transition Row 2: p1, k1, * slip 1 with yarn in front, p1 * until you reach marker, slip marker, k2, slip marker, * p1, slip 1 with yarn in front * until you have two stitches left in row; end k1, p1
And once we've completed these two transition rows, it's time to begin the stockinette portion of this pattern, which incorporates two decreases every four rows, and goes like this:
Row 1: k1, p1, knit until first marker, slip marker, p2, slip marker, knit until there are two stitches left in row; end p1, k1
Rows 2 & 4: p1, k1, purl until first marker, slip marker, k2, slip marker, purl until there are two stitches left in row; end k1, p1
Row 3: k1, p1, knit until you're two stitches before first marker, k2tog, slip marker, p2, slip marker, ssk, knit until there are two stitches left in row; end p1, k1
Knit rows 1 - 4 until you have 38 stitches left before your first marker and you've just finished row 4 of your pattern (so you should have 38 stitches left after your second marker as well). Now we'll begin decreasing every right side row, like so:
Row 1: k1, p1, knit until you're two stitches before first marker, k2tog, slip marker, p2, slip marker, ssk, knit until there are two stitches left in row; end p1, k1
Row 2: p1, k1, purl until first marker, slip marker, k2, slip marker, purl until there are two stitches left in row; end k1, p1
Knit rows 1 & 2 until you have 30 stitches left before your first marker and you've just finished row 2 of your pattern (so you should have 30 stitches left after your second marker as well). Clip the tail of your color B yarn, since it's time to transition to your color C yarn with the following rows:
Transition Row 1 (right side): using color C, k1, p1, * slip 1 with yarn in back, k1 * until you have two stitches left before first marker; end k2tog, slip marker, p2, slip marker, ssk, and then * k1, slip 1 with yarn in back * until you're two stitches before end of row; end p1, k1
Transition Row 2: using color C, p1, k1, * slip 1 with yarn in front, p1 * until you're one stitch before first marker, p1, slip marker, k2, slip marker, p1, * p1, slip 1 with yarn in front * until you're two stitches before end of row; end k1, p1
And now we'll resume our decrease pattern in color C, like so:
Row 1: k1, p1, knit until you're two stitches before first marker, k2tog, slip marker, p2, slip marker, ssk, knit until there are two stitches left in row; end p1, k1
Row 2: p1, k1, purl until first marker, slip marker, k2, slip marker, purl until there are two stitches left in row; end k1, p1
Knit Rows 1 & 2 until you have 8 stitches left on your needle and you've just finished Row 2 of the pattern. Then work the following three rows:
Row 1 (right side): k1, k2tog, p2, ssk, k1
Row 2: p2, k2, p2
Row 3: k2tog, p2, ssk
And once these are all done, bind off loosely in pattern, seam back, and tuck in ends. Finally, block like you've never blocked before.