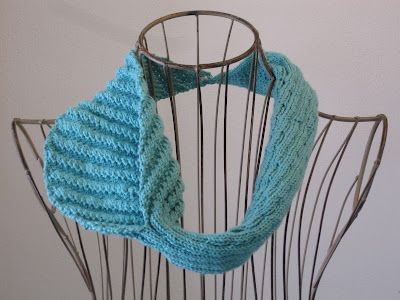
Knitted Calla Lily Cowl
Imagine wrapping yourself in a cozy, handcrafted accessory that exudes elegance and charm. The Knitted Calla Lily Cowl is a stunning piece that combines the warmth of a cowl with the delicate beauty of calla lilies. The intricate knit pattern mimics the graceful curves of the flower petals, creating a unique and eye-catching design that is sure to turn heads wherever you go. Made with soft, high-quality yarn, this cowl is not only stylish but also incredibly comfortable to wear. Whether you're dressing up for a special occasion or simply want to add a touch of sophistication to your everyday look, the Knitted Calla Lily Cowl is the perfect accessory. Its versatile design allows you to wear it in a variety of ways, whether draped loosely around your neck or pulled up over your head for extra warmth. Handmade with love and attention to detail, this cowl is a true work of art that will elevate any outfit. Make a statement with the Knitted Calla Lily Cowl and show off your unique sense of style.
Yarn: Cascade Yarns Sunseeker (47% Cotton, 48% Acrylic, 5% Metallic Yarn; 237 yards [217 meters]/100 grams); #10 Blue Turquoise - just one skein needed.
Needles: One set of double pointed needles in size 4, and a straight or circular needle in size 4 if you so desire (for when you're done knitting in the round)
Notions: Tapestry needle, 7/16" button, large darning needle, depending on button hole side
Gauge: 24 stitches = 4 inches
So let's get started! To begin, cast on 3 stitches and divide evenly between 3 double pointed-needles, join in round. By convention, we're going to call the needle with the first stitch dpn 1, the needle with the second stitch dpn 2, and the needle with the third stitch dpn 3.
Row 1: Knit
Row 2: * kfb; rep from * (6 stitches)
Row 3: Knit
Row 4: * kfb, k1 * (9 stitches)
A Treasury of Knitting Patterns.Tuber rows 1 - 5: * k3, p3; rep from *
Tuber row 6: slide first three knit stitches to dpn 3, * slide 3 purled stitches to cable needle and hold in back, k3, p3 from cable needle *, end row by sliding the final three purled stitches back to dpn 1 and continuing from there with rope row 7
Tuber row 7: * k3, p3 *, end with k3
Tuber rows 8 - 11: * p3, k3 *
Tuber row 12: * slide 3 purled stitches to cable needle and hold in back, k3, p3 from cable needle *
Continue in tuber pattern until the piece measures roughly 16 inches from tip to tail, and you've just completed tuber row 5. From now on, you will be knitting back and forth instead of in the round, in a diagonal pattern. The pattern is simple, and begins with the same k3, p3 ribbing you've been knitting in, although each stitch moves one to the right with each right side row, and stays where it is for the wrong-side row return (see below for a row-by-row description). You'll need to use the dpns to knit until your fabric opens up enough to switch to a straight needle or just one dpn, though.
Diagonal rows 1 & 2: * k3, p3 * (row 1 will be right side, or in other words, we're calling the outside of the tuber the right side)
Diagonal row 3: * k2, p3, k1 *
Diagonal row 4: * p1, k3, p2 *
Diagonal row 5: * k1, p3, k2 *
Diagonal row 6: * p2, k3, p1 *
Diagonal rows 7 & 8: * p3, k3 *
Diagonal row 9: * p2, k3, p1 * (same as row 6)
Diagonal row 10: * k1, p3, k2 * (same as row 5)
Diagonal row 11: * p1, k3, p2 * (same as row 4)
Diagonal row 12: * k2, p3, k1 * (same as row 3)
Repeat diagonal rows 1 - 12 until piece measures roughly 4.5" in new pattern. From that point forward (and from wherever you happen to be in the pattern), ssk or p2tog at the beginning of every right side row, depending on which decrease will fit in better with the overall pattern. Continue in pattern, decreasing by one stitch at the beginning of every right side row, until there are 46 stitches left. Beginning with the next right side row, continue decreasing by one stitch with a ssk or p2tog at the beginning of each right side row, and also decrease at the END of each wrong side row with a k2tog or a p2tog. Continue this way until there are 6 stitches left on your needle.
Now that you have 6 stitches left on your needle, you should be on a right side row, and it's time to work the buttonhole. Ssk or p2tog, depending on where you are in the pattern, and then ssk or p2tog again, yo, and knit or purl last two stitches on your needle. Finish the piece decreasing as you have been, simply knitting or purling the yo stitch in pattern when you get to it. When you have only one stitch left on your needle, cut the tail and knot it through the final stitch. As far as tucking in the ends is concerned, I used my tapestry needle to tuck in the end on the "lily" side, and used the cast-on end from the "tuber" side to attach my button, like so:
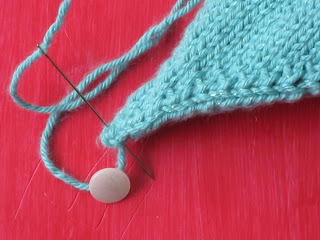
As you can see, I had to use a large darning needle to get through the hole in my button. Also, now you're done! So that should count for something.