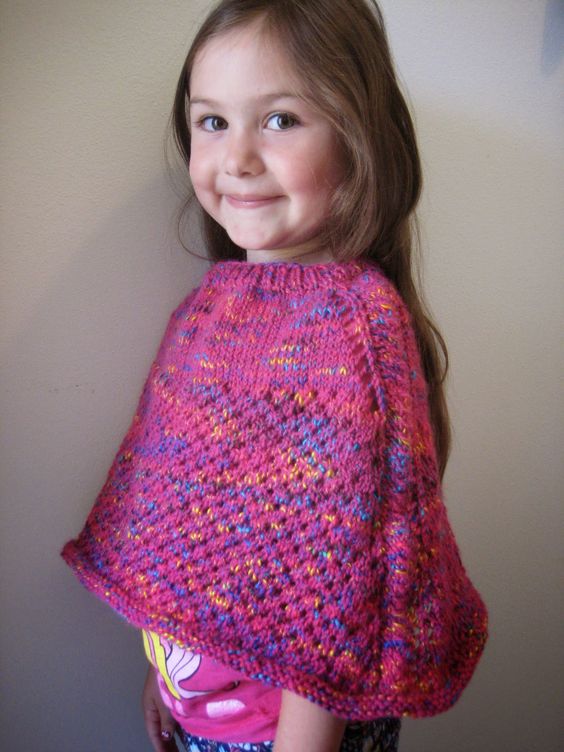
Knitted Cellular Stitch Kids' Poncho
Introducing the Knitted Cellular Stitch Kids' Poncho, a delightful and cozy garment that will keep your little ones warm and stylish. This unique poncho features a beautifully intricate cellular stitch pattern, adding a touch of elegance to their wardrobe. Crafted with love and care, this knitted poncho is designed to provide utmost comfort and durability, ensuring it will be a cherished piece for years to come. Made with high-quality materials, this poncho is soft against the skin and provides excellent insulation, keeping your child warm during chilly days. The knitted construction ensures breathability, preventing overheating and ensuring maximum comfort. The poncho's loose and relaxed fit allows for easy movement, making it perfect for active kids. The Knitted Cellular Stitch Kids' Poncho is not only practical but also versatile. It can be paired with jeans, leggings, or even a dress, making it suitable for various occasions. Whether your child wants to dress up or dress down, this poncho will effortlessly elevate their outfit.
Sizes: Toddler (2 - 3 years); Child (4 - 7 years) (the instructions for the larger size will follow the instructions for the smaller size in parentheses)
Yarn: Plymouth Yarn Jelli Beenz (75% Acrylic, 25% Wool; 214 yards [196 meters]/100 grams); #2385 Flamingo - two skeins (if you have the 50 gram skeins instead, 3 will do you)
Needles: One 16" circular needle in size 8, one 24" circular needle in size 8
Notions: Tapestry needle, four stitch markers
Gauge: 18 stitches = 4 inches
So let's begin! Using your 16" circular needle, cast on 72 stitches loosely (80 for the larger size), place marker, and join in round. Knit 1" in a k1, p1 ribbing, and then we'll knit the following addition row:
Addition Row: * k2, m1, k1 * (larger size: * k3, m1, k2; rep from *) (96 stitches, both sizes)
And once that's done, we'll knit the following transition row, in order to place our extra stitch markers. It is the same for both sizes.
A Treasury of Knitting Patterns. So let's proceed as follows:
Row 1: knit until first marker, slip marker, k1, yo, k2, sl1-k2tog-psso, k2, yo, k1, slip next marker, knit until third marker, slip marker, k1, yo, k2, sl1-k2tog-psso, k2, yo, k1
Row 2: yo, knit until first marker, yo, slip marker, k9, slip marker, yo, knit until third marker, yo, slip marker, k9
Knit rows 1 & 2 six times (nine times for larger size). You'll be able to switch to your longer needle after about three repeats. And once you're done with those increases, it's time to begin our eyelet pattern, which is Cellular Stitch from page 246 of Barbara G. Walker's A Second Treasury of Knitting Patterns (plus some more, less frequent increases). So let's proceed as follows:
Row 1: k2, * k2tog, yo, k1 * until you're one stitch before first marker, k1, and slip marker; then, k1, yo, k2, sl1-k2tog-psso, k2, yo, k1, slip next marker, k2, * k2tog, yo, k1 * until you're one stitch before third marker, k1, and slip marker; end k1, yo, k2, sl1-k2tog-psso, k2, yo, k1
Row 2: yo, knit until first marker, yo, slip marker, k9, slip marker, yo, knit until third marker, yo, slip marker, k9
Row 3: k3, * yo, k1, k2tog * until you're two stitches before first marker, k2, and slip marker; then, k1, yo, k2, sl1-k2tog-psso, k2, yo, k1, slip next marker, k3, * yo, k1, k2tog * until you're two stitches before third marker, k2, and slip marker; end k1, yo, k2, sl1-k2tog-psso, k2, yo, k1
Row 4: knit, slipping extra markers when you come to them
Row 5: k3, * k2tog, yo, k1 * until you're two stitches before first marker, k2, and slip marker; then, k1, yo, k2, sl1-k2tog-psso, k2, yo, k1, slip next marker, k3, * k2tog, yo, k1 * until you're two stitches before third marker, k2, and slip marker; end k1, yo, k2, sl1-k2tog-psso, k2, yo, k1
Row 6: yo, knit until first marker, yo, slip marker, k9, slip marker, yo, knit until third marker, yo, slip marker, k9
Row 7: k4, * yo, k1, k2tog * until you're three stitches before first marker, k3, and slip marker; then, k1, yo, k2, sl1-k2tog-psso, k2, yo, k1, slip next marker, k4, * yo, k1, k2tog * until you're three stitches before third marker, k3, and slip marker; end k1, yo, k2, sl1-k2tog-psso, k2, yo, k1
Row 8: knit, slipping extra markers when you come to them
Row 9: k4, * k2tog, yo, k1 * until you're three stitches before first marker, k3, and slip marker; then, k1, yo, k2, sl1-k2tog-psso, k2, yo, k1, slip next marker, k4, * k2tog, yo, k1 * until you're three stitches before third marker, k3, and slip marker; end k1, yo, k2, sl1-k2tog-psso, k2, yo, k1
Row 10: yo, knit until first marker, yo, slip marker, k9, slip marker, yo, knit until third marker, yo, slip marker, k9
Row 11: k5, * yo, k1, k2tog * until you're four stitches before first marker, k4, and slip marker; then, k1, yo, k2, sl1-k2tog-psso, k2, yo, k1, slip next marker, k5, * yo, k1, k2tog * until you're four stitches before third marker, k4, and slip marker; end k1, yo, k2, sl1-k2tog-psso, k2, yo, k1
Row 12: knit, slipping extra markers when you come to them
Knit rows 1 - 12 three times (four times for the larger size). Then, purl four rows around and bind off loosely. Tuck in ends and, if desired, stitch purled edge in place where it naturally curls, for the border.