Knitted Vest Poncho
Imagine a cozy, stylish garment that combines the best of both worlds - the warmth of a knitted vest and the flowy silhouette of a poncho. This unique piece, known as a Knitted Vest Poncho, is a versatile addition to any wardrobe. It can be worn over a long-sleeved shirt for a casual look or dressed up with a belt for a more polished ensemble. The knitted fabric provides comfort and insulation, while the poncho design adds a touch of bohemian flair. The Knitted Vest Poncho is a must-have for those who appreciate fashion that is both practical and chic. Whether you're running errands on a chilly day or attending a fall festival, this garment will keep you warm and stylish. With its relaxed fit and trendy design, the Knitted Vest Poncho is sure to become a staple in your closet.
ADULT SIZES
FINISHED MEASUREMENTS
Color codes are the same as in the written pattern.
S: Length 22’’ (56 cm). Width: 23.5’’ (60 cm)
M: Length 22’’ (56 cm). Width: 25.25’’ (64 cm)
L: Length 22.75’’ (58 cm). Width: 26.75’’ (68 cm)
XL: Length 22.75’’ (58 cm). Width: 28.25’’ (72 cm)
XXL: Length 23.5’’ (60 cm). Width: 30.25’’ (77 cm)
XXXL: Length 24.5’’ (62 cm). Width: 33’’ (84 cm)
MATERIALS
1 straight needle US 13 (9 mm) for Cast On and Bind Off sts.
1 pair of straight needles US 11 (8 mm)
Super Chunky / Super Bulky weighted yarn: approx. 480 yd (439 m) / 510 yd (466 m) / 560 yd (512 m) / 610 yd (558 m) / 700 yd (640 m) / 800 yd (732 m).Or worsted / aran yarn used double (double the yardage)
4 or 6 large buttons
tapestry needle to sew and weave in yarn ends, and scissors.
GAUGE / TENSION
12.5 sts x 15 rows in stocking stitch with US 11 (8 mm) needles = 4” x 4” (10 cm x 10 cm)
ABBREVIATIONS
CO: cast on
RS: right side / WS: wrong side
st: stitch
k: knit
p: purl
yo: yarn over
k2pyo: k 2 sts and pass the previous yo over them.
INSTRUCTIONS
A) FRONT
1. CO 78 (82, 88, 94, 100, 108) sts with US 13 (9 mm) needles.
I always cast on and bind off stitches with larger needles than I use for the main work. This prevent my cast on and bind off rows from being too tight.
2. With US 11 (8 mm) knit 1 row.
Slip first stitch on every row as if you were to knit it, but without knitting it (except on the first row). It will form a nicer border and will allow you to make a quick and neat seam when you need to.
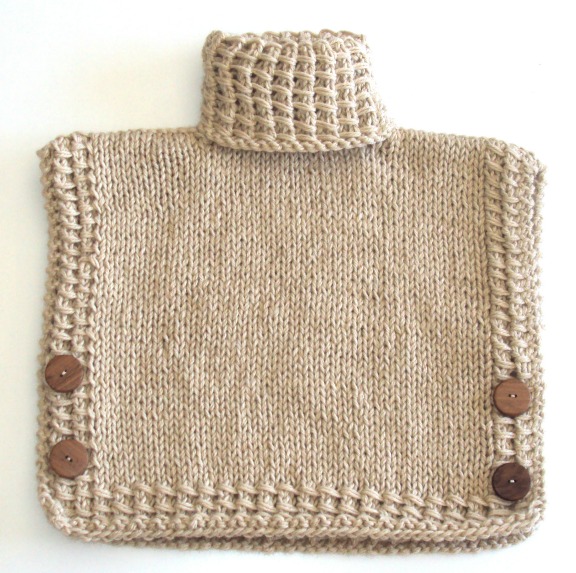
3. Work 10 (10, 10, 12, 12, 12) rows as follows (see stitch glossary at the end of this pattern): 2 garter sts, bamboo stitch until 2 sts remain on needle, 2 garter sts.
4. Continue as follows from RS: 2 garter sts, 4 bamboo sts, stocking st until 6 sts remain, 4 bamboo sts, 2 garter sts.
5. When your piece has a total length of 21.25’’ (21.25’’, 22’’, 22’’, 22.75’’, 23.5’’) [54 cm (54 cm, 56 cm, 56 cm, 58 cm, 60 cm)], follow the instructions below according to the size you are working.
PLEASE NOTE that you won’t be making any buttonhole since the bamboo stitch provides a texture open enough to pass buttons through it
Feel free to increase the length if you desire a longer poncho.
S, M and L sizes
– When you reach your desired length, start shaping the neck as follows:
Next row (RS): work the first 29 (30, 33) sts as before, slip the next 20 (22, 22) sts on a stitch holder, join new yarn and work the remaining 29 (30, 33) sts as before.
Next row (WS): bind off 1 st at the beginning of the second piece, from mid front. All other sts are worked normally.
Next row (RS): bind off 1 st at the beginning of the second piece, from mid front. All other sts are worked normally.
– Repeat the last 2 rows.
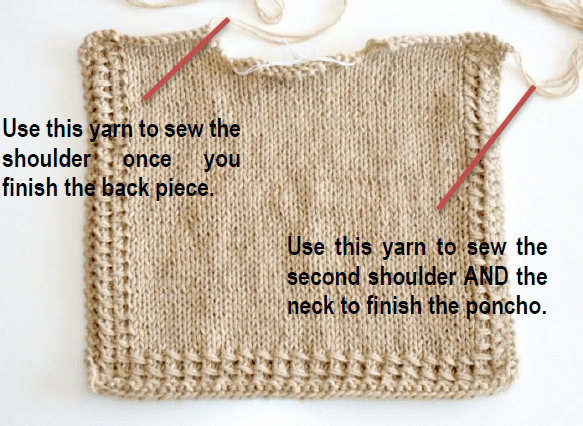
– Bind off loosely with US 13 (9 mm) needle. Leave long tails of yarn to sew. Your front piece will look like this:
XL, XXL and XXXL sizes
– When you reach your desired length, start shaping the neck as follows:
Next row (RS): work the first 36 (38, 42) sts as before, slip the next 22 (24, 24) sts on a stitch holder, join new yarn and work the remaining 36 (38, 42) sts as before.
Next row (WS): bind off 2 sts at the beginning of the second piece, from mid front. All other sts are worked normally.
Next row (RS): bind off 2 sts at the beginning of the second piece, from mid front. All other sts are worked normally.
Next row (WS): bind off 1 st at the beginning of the second piece, from mid front. All other sts are worked normally.
Next row (RS): bind off 1 st at the beginning of the second piece, from mid front. All other sts are worked normally.
– Bind off loosely with US 13 (9 mm) needle. Leave long tails of yarn to sew. Your front piece will look like this:
B) BACK
– Follow the instructions from the FRONT until your desired length, BEFORE starting shaping the neck.
– Work normally 5 more rows (that is, follow the pattern of 2 garter sts, 4 bamboo sts, etc.)
Next row (WS): bind off the first 27 (28, 31, 33, 35, 39) sts, p the next 24 (26, 26, 28, 30, 30) sts, and bind off the remaining 27 (28, 31, 33, 35, 39) sts.
– Cut yarn and slip the remaining sts (back neck sts) on a stitch holder (or scrap yarn, as you prefer
C) NECK AND FINISHING
– Join the front and back pieces by sewing the right shoulder. You should end up with something like this:
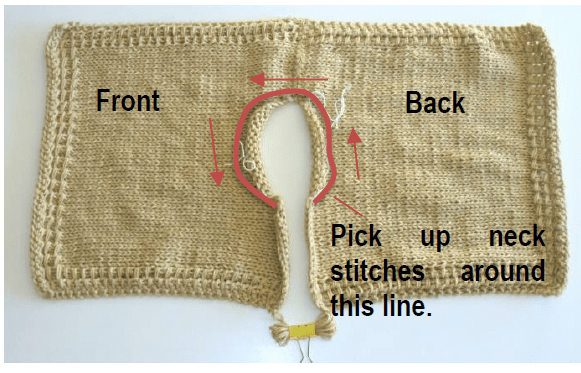
With US 11 (8 mm) needles pick up from the RS 48 (48, 52, 52, 58, 58) sts around the neckline.
– Work in bamboo stitch with 1 garter stitch at each side until the neck measures 7.75’’ or your desired length.
PLEASE NOTE that the RS of the neck corresponds to the WS of the main part of the poncho. This is so because the neck is folded in the finished garment, revealing the RS of the bamboo stitch.
– Bind off loosely with US 13 (9 mm) needles.
– Sew the second shoulder and neck and weave in yarn ends.
– Sew 2 or 3 buttons at each side, in the WS of the back.