Knitted Three Little Mice
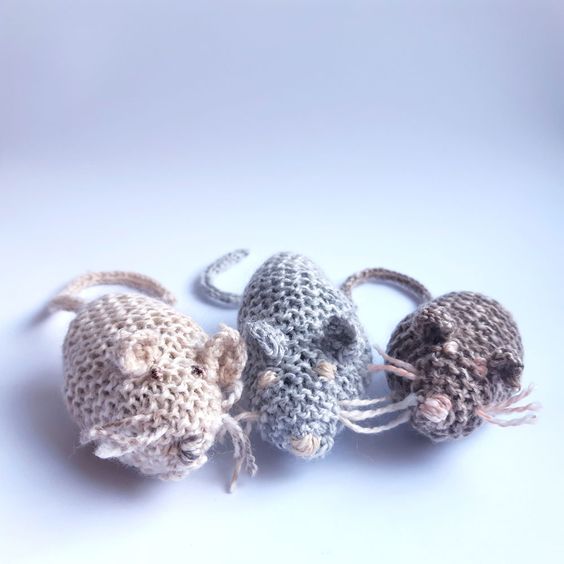
Crafted with care and attention to detail, a trio of tiny mice emerged from the skilled hands of the artisan. Each mouse was meticulously knitted using soft yarn in various shades of gray and white, giving them a lifelike appearance. The delicate stitches created a sense of texture, making the mice look fluffy and cuddly. These adorable creatures were not just ordinary toys, but rather works of art that showcased the talent and creativity of the maker. The intricate patterns on their bodies added a touch of whimsy, while their tiny whiskers and beady eyes brought them to life. Whether displayed on a shelf or used as playthings, the knitted three little mice were sure to bring joy and delight to anyone who laid eyes on them.
Materials & Tools
- Yarn: Any colors of The Mineral Series merino wool (fingering weight)
- Needles: 2.5 mm
- Toy stuffing
Here we have used Golden Ochre, Graphite and Burnt Umber
Abbreviations
- K: knit
- Inc: increase by knitting into the front and back of stitch
- Sl1k: slip 1 stitch knit wise
- Psso: pass slip stitch over
- K2tog: knit2 together
The Directions
Body
Cast on 12 stitches
Row1: K into the back of all stitches
Row2: K1, Inc into next stitich, k to last 2 stitches, Inc into next stitch, K1 (14 stitches)
Row 3: K
Row 4: As row 2 (16 stitches)
Row 5: As row 3
Repeat rows 2 and 3 until 30 stitches have been achieved.
Continue without further shaping for another 11 rows.
Shape the head
Row 1: k1, sl1k, k1, psso, knit to last 3 stitches, k2tog, k1
Continue decreasing in this way on every row until 4 stitches remain
Next row: K2tog, k2tog
Next row: k2tog
Bind off last remaining stitch
Ear
Both alike. Ears are knit from top to bottom
Cast on 8 stitches
Row 1: Knit into the back of all stitches
Row2: K1, slk1, psso, knit to last 3 stitches, k2tog, k1
Row 3: As row 2
Row 4: k2tog, k2tog
Row 5: k2tog bind off last stitch
Tail
Using 2.5 mm double sided needles
Cast on 3 stitches
Row 1: Knit into the back of each stitch
Instead of turning a row, slide stitches to opposite end of the needle and pass the yarn behind the work from left to right, knit another row to roll the stitches into a tube. Continue in this way for every following row until the tail measures 13 cm. Cast off.
To make up
At the back end of the body using the cast on thread, join together the original 12 stitches to form a small circle. Insert the tail into the circle and secure inside the body.
Place the stuffing and cat nip into the lower part of the body and close up the first three centimetres. Push stuffing well in and overlap flaps to form the body shape of your mouse. Stitch close.
Stuff the head section and close moving the stuffing up with your fingers to achieve the correct mouse shape.
Fixing the ears
Sow in the thread at the top of the ear.
Pinch the ear together at the base and secure to shape the ear. Sow each ear to the back of the head, approx. 3 cm from the point of the nose.
With contrasting yarn, sow on eyes somewhere between the ears and the nose at the point of the head.
Pass three threads through between the eyes and nose to form the whickers.