Knitted Triangular Ribboned Shawl
Step into the world of fashion with our stunning Knitted Triangular Ribboned Shawl. This exquisite accessory is a true masterpiece, designed to elevate your style and keep you cozy all year round. Crafted with meticulous attention to detail, this shawl showcases the perfect blend of elegance and comfort. The triangular shape allows for versatile styling options, whether you prefer to drape it over your shoulders or wrap it around your neck for a chic and cozy look. Adorned with delicate ribbons, this shawl exudes femininity and adds a touch of whimsy to any outfit. Whether you're attending a formal event or simply want to elevate your everyday style, our Knitted Triangular Ribboned Shawl is the perfect accessory to make a statement.
Requirements:
1 pair of long length 4mm Needles (this pattern uses a lot if stitches so may be worth considering circular needles)
5 x 100g Double Knitting Yarn.
6 mm Crochet hook
0.6m of 1cm wide ribbon in a complementary colour
Pattern:
Abbreviation and Meaning
sts Stitches
[ ] Repeat instructions in brackets as detailed after it.
K Knit (number after it refers to how many stitches to knit)
M1 Knit into the front and back of next stitch, thus making 1 stitch
C Chain (number after it refers to number of chains to make)
SC Single Crochet
DC Double Crochet
TC Triple Crochet
To make shawl:
Using 4mm needles, cast on 1 stitch
Row 1: M1 (2 sts)
Row 2: M1, M1 (4 sts)
Row 3: M1, K2, M1 (6 sts)
Row 4: M1, K4, M1 (8 sts)
Continue in garter stitch, making 1 stitch at each end of every row until there are 240 stitches present.
Cast Off
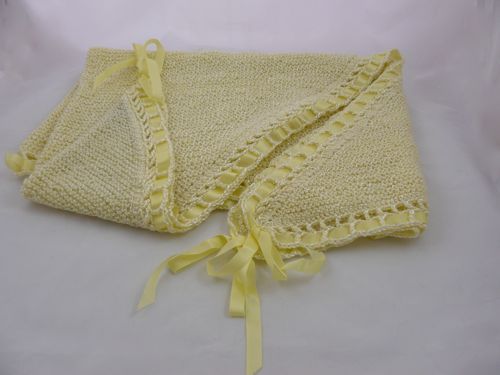
Border:
Row 1: With right side facing and using the crochet hook rejoin the yarn. C2. Work around the edge of the shawl making double crochets at equal intervals. In the example shown I have added a double crochet into every knitted row or stitch along the lengths of the shawl. To crochet around the corners of the triangle it is necessary to crochet additional stitches into each end stitch, the example shown has 6 DCs added to the bottom of the triangle and 8 DCs added to complete the top corners. Once back to the starting point close the circle with a single stitch between the last stitch and the top of the first chain.
Row 2: With right side facing, C5. [TC into every alternate stitch from row 1, C1] repeat this along each long side. To work around the corners, [TC, C1] into each stitch as required. Once back to the starting point close the circle with a single stitch between the last stitch and the 4th loop in the original chain.
Row 3: With right side facing, C6. [TC into top of each previous TC from Row 2, C2] repeat this along each long side. To work the corners, [C5, SC into central stitch C5]. Once back to the starting point close the circle with a single stitch between the last stitch and the 4th loop in the original chain.
To make Up:
Secure the ends of the wool. Cut the ribbon into three pieces, approximately 40cm longer than each of the three sides of the shawl. Thread the ribbon through the sides of the scarf, weaving the ribbon in and out of the third row of crochet. Position the ribbon so it lies flat without pulling and that there is an equal length of ribbon on each side. Once all three pieces are in position tie the adjacent pieces of ribbon into place with a bow and trim the edges of the ribbon accordingly.