Knitted Grand Picot Eyelet Cowl
Introducing the Knitted Grand Picot Eyelet Cowl, a stunning accessory that combines the warmth of a cozy cowl with the delicate beauty of intricate eyelet patterns. Crafted with love and care, this hand-knitted masterpiece is a true testament to the artistry of knitting. The grand picot edging adds a touch of elegance, creating a unique and eye-catching design that is sure to turn heads wherever you go. Whether you're dressing up for a special occasion or simply adding a touch of sophistication to your everyday look, this cowl is a versatile piece that will elevate any outfit. Handcrafted with the utmost attention to detail, the Knitted Grand Picot Eyelet Cowl is a must-have accessory for any fashion enthusiast.
Yarn: Lily Sugar 'n Cream (100% Cotton; 95 yards [86 meters]/56.7 grams); color #00178 Potpourri Ombre - 2 skeins
Needles: Straight needles in size 7, two double pointed needles (dpns) in size 7 (for the i-cord), cable needle (cn) or dpn for cabling
Notions: Tapestry needle, two stitch markers
Gauge: 20 stitches = 4 inches
To begin, we'll cast on 24 stitches. Knit 11, place first marker, k2, place your second marker, and then knit until the end of the round. Then, for the main pattern, we'll be incorporating Grand Picot Eyelet from page 182 of Barbara G. Walker's A Treasury of Knitting Patterns, and we'll working increases until we can begin the braid. So let's proceed as follows:
Row 1 (wrong side): k2, * sl1-k2tog-psso, (yo) twice; rep from * until you reach first marker, slip marker, purl until you reach second marker, slip marker, * sl1-k2tog-psso, (yo) twice * until you're two stitches from the end of the row, k2
Row 2: k2, * (p1, k1) into double yo, p1 * until you reach first marker, slip marker, m1r, knit until next marker, slip marker, * (p1, k1) into double yo, p1 * until you're two stitches from the end of the row, k2
Row 3: knit until first marker, slip marker, purl until second marker, slip marker, knit until end of row
Row 4: k2, * sl1-k2tog-psso, (yo) twice * until you reach first marker, slip marker, knit until you reach second marker, slip marker, * sl1-k2tog-psso, (yo) twice * until you're two stitches from the end of the row, k2
Row 5: k2, * (p1, k1) into double yo, p1 * until you reach first marker, slip marker, purl until next marker, slip marker, * (p1, k1) into double yo, p1 * until you're two stitches from the end of the row, k2
Row 6: knit across, slipping markers when you come to them
Knit rows 1 - 6 seven times and then knit rows 1 - 3 once more, omitting the m1r in your final row 2*. At this point, you should have nine stitches between your two markers, and it's time to switch up the pattern to add the braid. So let's proceed as follows:
Row 1 (right side): k2, * sl1-k2tog-psso, (yo) twice * until you reach first marker, slip marker, k3, slip next three stitches to cn and hold in back, k3, k3 from cn, slip marker, * sl1-k2tog-psso, (yo) twice * until you're two stitches from the end of the row, k2
Row 2: k2, * (p1, k1) into double yo, p1 * until you reach first marker, slip marker, purl until next marker, slip marker, * (p1, k1) into double yo, p1 * until you're two stitches from the end of the row, k2
Row 3: knit across, slipping markers when you come to them
Row 4: k2, * sl1-k2tog-psso, (yo) twice * until you reach first marker, slip marker, purl until you reach second marker, slip marker, * sl1-k2tog-psso, (yo) twice * until you're two stitches from the end of the row, k2
Row 5: k2, * (p1, k1) into double yo, p1 * until you reach first marker, slip marker, knit until next marker, slip marker, * (p1, k1) into double yo, p1 * until you're two stitches from the end of the row, k2
Row 6: knit until first marker, slip marker, purl until second marker, slip marker, knit until end of row
Row 7: k2, * sl1-k2tog-psso, (yo) twice * until you reach first marker, slip marker, slip next three stitches to cn and hold in front, k3, k3 from cn, k3, slip marker, * sl1-k2tog-psso, (yo) twice * until you're two stitches from the end of the row, k2
Rows 8 - 12: same as rows 2 - 6
Knit rows 1 - 12 nine times. Then we'll knit a few transition rows before moving to the last portion of our pattern. So first, knit these:
Transition Row 1: k2, * sl1-k2tog-psso, (yo) twice * until you reach first marker, remove marker, sl1-k2tog-psso, (yo) twice once more, (m1r, k1) three times, sl1-k2tog-psso, (yo) twice, remove marker, * sl1-k2tog-psso, (yo) twice * until you're two stitches from the end of the row, k2
Transition Row 2: k2, * (p1, k1) into double yo, p1 * four times, p6, * (p1, k1) into double yo, p1 * until you're two stitches from the end of the row, k2
Transition Row 3: knit
And now that that's done, let's move on to our final pattern before the ruffle, which is just the Grand Picot Eyelet, a three-row pattern as follows:
Row 1: k2, * sl1-k2tog-psso, (yo) twice * until you're two stitches from the end of the row, k2
Row 2: k1, * (p1, k1) into double yo, p1 * until you're two stitches from the end of the row, k2
Row 3: knit
Knit rows 1 - 3 nine times, at which point you should be beginning a right side row. Then, we'll work the ruffle as follows:
Ruffle Row 1 (right side): k2, * k2, p2 * until you're four stitches from the end of the row, k4
Ruffle Row 2: k2, * p2, m1r, k2 * until you're four stitches from the end of the row, p2, k2
Ruffle Row 3: k2, * m1r, k2, p3 * until you're four stitches from the end of the row, m1r, k4
Ruffle Row 4: k2, * p3, k3 * until you're five stitches from the end of the row, p3, k2
Ruffle Row 5: k2, * m1r, k3, p3 * until you're until you're five stitches from the end of the row, m1r, k5
Ruffle Row 6: k2, * p4, k3 * until you're six stitches from the end of the row, p4, k2
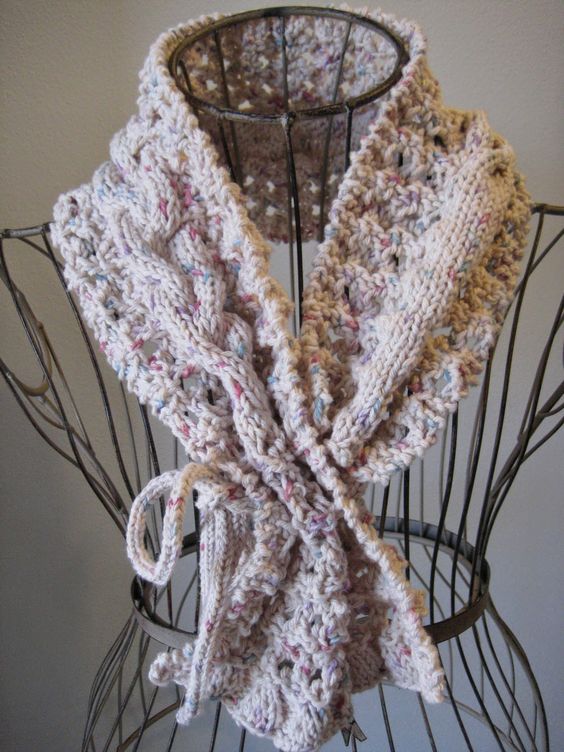
Bind off loosely, knitting the knit stitches and purling the purls. Last but not least, use your dpns to work a three-stitch i-cord that measures roughly 36". Tuck in ends, and style piece as desired. Below you'll find pictures of how I tied this bad boy together, as an example.