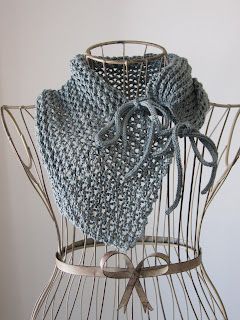
Knitted Tie-Closure Lace Trellis Cowl
Introducing the Knitted Tie-Closure Lace Trellis Cowl, a unique and stylish accessory that will add a touch of elegance to any outfit. This beautifully crafted cowl features a delicate lace trellis pattern, intricately knitted to create a stunning visual effect. The tie-closure adds a functional and fashionable element, allowing you to adjust the fit and style of the cowl to suit your preference. The tie-closure not only adds a unique twist to the design but also allows you to wear the cowl in different ways, giving you the freedom to experiment with various styles. Whether you choose to wear it loosely draped around your neck or tied snugly for extra warmth, this cowl is sure to make a statement wherever you go. So why settle for ordinary when you can embrace the extraordinary with the Knitted Tie-Closure Lace Trellis Cowl?
Yarn: Cascade Yarns Ultra Pima (100% Pima Cotton; 220 yards [200 meters]/100 grams); #3721 Ginseng - just one skein needed.
Needles: Straight or circular needle(s) in size 6, one set double pointed needles (dpn) in size 6 (I used 5's, but hey, that's what I've got!)
Notions: Tapestry needle
Gauge: 22 stitches = 4 inches in stockinette (this will have a much looser gauge)
This cowl is knit in the Vertical Lace Trellis pattern from Barbara G. Walker's A Treasury of Knitting Patterns. However, as a note, I've written this pattern to add stitches to the work, which will change the appearance of the trellis slightly. You will probably notice the change when you stop increasing, just fyi. But let's get started!
Using straight or circular needles (either way you're knitting back and forth), cast on 3 stitches.
Set-up row: purl
Row 1 (right side): k1, yo, k2tog
Rows 2 & 4: pfb, purl until you have 1 stitch left in row; end pfb
Row 3: * ssk, yo; rep from *, end k1
Repeat rows 1 - 4 until there are 39 stitches on your needle. From now on, stop increasing, or in other words, change to:
Row 1 (right side): k1, * yo, k2tog *
Rows 2 & 4: purl
Row 3: * ssk, yo; rep from *, end k1
Then, once your piece measures roughly 18" in length, it's time to begin increasing again, but a little bit less aggressively (also, if you want your piece to fit a little more loosely around the neck, here's the place to add an inch or two). Once again, your pattern will change, this time from a lattice look to a diagonal look, like so:
Either way, you'll be knitting in this pattern now:
Row 1 (right side): k1, yo, k2tog
Row 2: pfb, p until last stitch, pfb
Row 3: * ssk, yo; rep from *, end k1
Row 4: purl
Isn't this fun? Continue in pattern until piece measures roughly 26" (I have 65 stitches on my needle at this point). On your next right side row, knit the decreases in the pattern while omitting the yarn over stitches in order to gather the fabric and pretty much halve the number of stitches on your needle. Bind off on the purl row. Tuck in ends. Your finished piece will be kind of weird looking, but it will get a lot better once you make the ties!

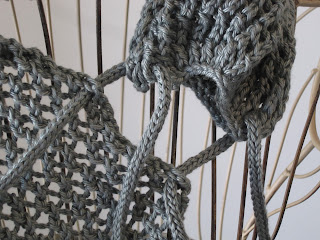
Now that we're done with the body of the cowl, cast on 3 stitches to your double pointed needles and work 25 inches in I-cord. Bind off, tuck in ends. Make another I-cord just like the first. And now the knitting part is over!
The only thing left to do is attractively position the cowl, which I did by folding the bound-off end in half and then looping one of my ties through the two corners, and the other one through the folded middle, and then looping both ties through the corresponding positions on the other end of the cowl like so:
And now you just need to tie 'er up, and you're done!