Vertical Drop-Stitch Scarf
Introducing the Vertical Drop-Stitch Scarf, a unique and stylish accessory that is sure to turn heads wherever you go. This scarf is unlike any other, with its intricate design and eye-catching vertical drop-stitch pattern. Crafted with precision and attention to detail, this scarf is a true work of art. The Vertical Drop-Stitch Scarf is not just a fashion statement, but also a versatile piece that can be worn in various ways. Its lightweight and breathable fabric make it perfect for all seasons, whether you want to wrap it around your neck for added warmth in the winter or drape it loosely over your shoulders for a chic summer look. The vertical drop-stitch pattern adds a touch of elegance and sophistication to any outfit, making it suitable for both casual and formal occasions. The scarf's length allows for endless styling possibilities - wear it long and flowing for a bohemian vibe, or wrap it multiple times for a cozy and snug fit. No matter how you choose to wear it, the Vertical Drop-Stitch Scarf is guaranteed to elevate your style and make a statement.
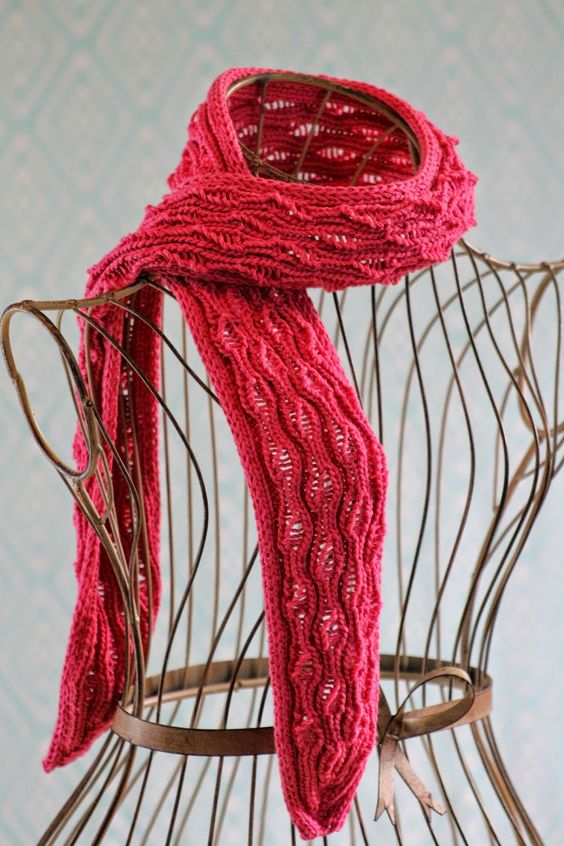
Yarn: Berroco Weekend DK (75% Acrylic, 25% Peruvian Cotton; 268 yards [247 meters]/100 grams); #2924 Rhubarb - one skein
Needles: Size 6 straight needles
Notions: Tapestry needle
Gauge: 22 stitches = 4 inches
Okie-dokie-o, let's get started! As I've mentioned, we will be working this scarf with I-cord edgings, and as you can probably tell from the pictures, we will be tapering the ends for the prettiness factor. So, before we get to the main pattern, we will cast on 8 stitches and then work the following set-up rows. Your I-cord edgings will consist of 3 stitches on either edge of the piece, and if you want a tutorial about the process, please go here. Basically, we will be slipping these stitches on the right sides and purling them on the wrongs; that's really all you need to do to create what looks like an I-cord. Anyway, did you get those 8 stitches cast on? Good, then let's continue like so:
Set-up Row 1 (wrong side): p3, k2, p3
Set-up Row 2: slip 3 wyib (with yarn in back), m1r, p2, m1l, slip 3 wyib
Set-up Row 3: p4, k2, p4
A Second Treasury of Knitting Patterns. We'll work it into our piece like so:
Rows 1, 3, & 5 (wrong side): p4, (k2, p2, k2, p3) twice, k2, p4
Rows 2 & 4: slip 3 wyib, k1, (p2, k3, p2, k2) twice, p2, k1, slip 3 wyib
Row 6: slip 3 wyib, k1, (p2, k1, drop next stitch off needle and unravel down to yo 6 rows below, k1, p2, k1, yo, k1) twice, p2, k1, slip 3 wyib
Rows 7, 9, & 11 (wrong side): p4, (k2, p3, k2, p2) twice, k2, p4
Rows 8 & 10: slip 3 wyib, k1, (p2, k2, p2, k3) twice, p2, k1, slip 3 wyib
Row 12: slip 3 wyib, k1, (p2, k1, yo, k1, p2, k1, drop next stitch off needle and unravel down to yo 6 rows below, k1) twice, p2, k1, slip 3 wyib
Knit rows 1 - 12 until piece measures roughly 46" (or you're about 1.5" from desired finished length) and you've just finished row 11 of the pattern. Now it's time to finish the sucker, with the following rows:
End Row 1 (right side): slip 3 wyib, k1, (p2, k2, p2, k1, drop next stitch off needle and unravel down to yo 6 rows below, k1) twice, p2, k1, slip 3 wyib
End Row 2: p4, k2, (p2, k2) four times, p4
End Row 3: slip 3 wyib, k1, p2, k2, p2, ssk, p2, k2tog, p2, k2, p2, k1, slip 3 wyib
End Row 4: p4, k2, p2, k2, p1, k2, p1, k2, p2, k2, p4
End Row 5: slip 3 wyib, k1, p2, k2, p1, p2tog, p2, p2tog, p1, k2, p2, k1, slip 3 wyib
End Row 6: p4, k2, p2, k6, p2, k2, p4
End Row 7: slip 3 wyib, k1, p2, k2, p2tog, p2, p2tog, k2, p2, k1, slip 3 wyib
End Row 8: p4, k2, p2, k4, p2, k2, p4
End Row 9: slip 3 wyib, k1, p2, k1, p2tog, p2, p2tog, k1, p2, k1, slip 3 wyib
End Row 10: p4, k2, p1, k4, p1, k2, p4
End Row 11: slip 3 wyib, k1, p2, p2tog, p2, p2tog, p2, k1, slip 3 wyib
End Row 12: p4, k8, p4
End Row 13: slip 3 wyib, k1, p1, p2tog, p2, p2tog, p1, k1, slip 3 wyib
End Row 14: p4, k6, p4
End Row 15: slip 3 wyib, k1, p2tog, p2, p2tog, k1, slip 3 wyib
End Row 16: p4, k4, p4
End Row 17: slip 3 wyib, p2tog, p2, p2tog, slip 3 wyib
End Row 18: p3, k4, p3
End Row 19: slip 3 wyib, p2tog, p2tog, slip 3 wyib
End Row 20: p3, k2, p3
Bind off loosely, knitting the knit stitches and purling the purls, and tuck in ends. Block, because this bad boy will be curlier than something really curly.