Knitted Ribbon Cable Socks
Step into a world of comfort and fashion with our exquisite Knitted Ribbon Cable Socks. These socks are not your ordinary footwear; they are a statement piece that combines functionality with a touch of elegance. Crafted with love and care, these socks are designed to keep your feet warm and cozy, while adding a unique and fashionable twist to your outfit. Made from high-quality materials, our Knitted Ribbon Cable Socks are not only stylish but also durable. The careful craftsmanship ensures that these socks will withstand the test of time, providing you with long-lasting comfort and style. So why settle for ordinary socks when you can step into a world of luxury with our Knitted Ribbon Cable Socks? Treat your feet to the ultimate comfort and style today!
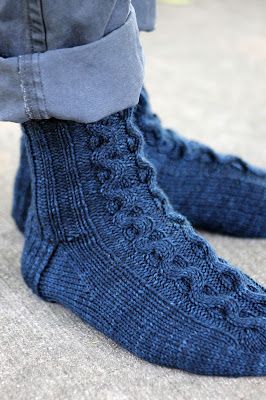
Sizes: adult small (adult medium; adult large) (for the record, small corresponds to the following US shoe sizes: women's 5 - 7 and men's 4 - 6, medium corresponds to women's 8 - 10 and men's 7 - 9, and large corresponds to women's 11 - 14 and men's 10 - 13)
Yarn: Malabrigo Arroyo (100% Superwash Merino Wool; 335 yards [305 meters]/100 grams); #046 Prussia Blue - one skein
Needles: One set of double pointed needles in size US 4, cable needle (cn) or dpn for cabling
Notions: Tapestry needle, stitch holder or scrap of yarn for holding stitches
Gauge: 24 stitches = 4 inches in stockinette
So let's make some socks! Of course, before we get to that, I should mention that I'm using Ann Budd's delightful Getting Started Knitting Socks (Getting Started series) for the sizing and basic design elements of these socks, as well as a couple of Ribbon Stitch cables from page 245 of Barbara G. Walker's A Treasury of Knitting Patterns for the stitch pattern. And now that that's covered, let's actually make those socks!
First, then, using a Long-Tail or an Old Norwegian Cast-On (for stretch) and your dpns, cast on 48 (52; 56) stitches, divide between 3 dpns as follows: 15, 18, 15 ([17, 18, 17]; [19, 18, 19]), and join in round. And since we're getting straight to the pattern, we'll need the following notation:
fc (front cross): slip 3 stitches to cn and hold in front; k3, k3 from cn
bc (back cross): slip 3 stitches to cn and hold in back; k3, k3 from cn
Furthermore, as a note, our pattern rows will be the same for the small & large socks and slightly different for the medium. I will give the directions for the small and large first, and those for the medium size will appear just below them! As a note, I've given directions as if you're knitting on dpns; if you choose to use the Magic Loop or an eensy-weensy circular, just place markers where your needle ends would be.
For small and large:
Row 1: p1, k2, * p2, k2; rep from * until you reach end of first needle, (p2, k6) twice, p2, on second needle, * k2, p2; rep from * until you're three stitches before end of third needle, k2, p1
Row 2: p1, k2, * p2, k2; rep from * until you reach end of first needle, p2, bc, p2, fc, p2 on second needle, * k2, p2; rep from * until you're three stitches before end of third needle, k2, p1
Rows 3 - 7: p1, k2, * p2, k2; rep from * until you reach end of first needle, (p2, k6) twice, p2, on second needle, * k2, p2; rep from * until you're three stitches before end of third needle, k2, p1
Row 8: p1, k2, * p2, k2; rep from * until you reach end of first needle, p2, fc, p2, bc, p2 on second needle, * k2, p2; rep from * until you're three stitches before end of third needle, k2, p1
Rows 9 - 12: p1, k2, * p2, k2; rep from * until you reach end of first needle, (p2, k6) twice, p2, on second needle, * k2, p2; rep from * until you're three stitches before end of third needle, k2, p1
For medium:
Row 1: k1, * p2, k2; rep from * until you reach end of first needle, (p2, k6) twice, p2 on second needle, * k2, p2; rep from * until you're 1 stitch before end of third needle, k1
Row 2: k1, * p2, k2; rep from * until you reach end of first needle, p2, bc, p2, fc, p2 on second needle, * k2, p2; rep from * until you're one stitch before end of third needle, k1
Rows 3 - 7: k1, * p2, k2; rep from * until you reach end of first needle, (p2, k6) twice, p2 on second needle, * k2, p2; rep from * until you're 1 stitch before end of third needle, k1
Row 8: k1, * p2, k2; rep from * until you reach end of first needle, p2, fc, p2, bc, p2 on second needle, * k2, p2; rep from * until you're one stitch before end of third needle, k1
Rows 9 - 12: k1, * p2, k2; rep from * until you reach end of first needle, (p2, k6) twice, p2 on second needle, * k2, p2; rep from * until you're 1 stitch before end of third needle, k1
Knit rows 1 - 12 until sock measures roughly 4.5" (4.5"; 5") and you've just finished row 1 of the pattern (note: yes! You can totally make these little dudes longer! Or not, it's really up to you). Now, it's time to begin working the heel portion of the sock. With that in mind, k12 (k13; k14). Then, turn work around and, using the same needle, p24 (p26; p28). The 24 (26; 28) stitches you just worked are your heel stitches, so you can go ahead and transfer the other 24 (26; 28) stitches to a stitch holder or yarn scrap to work later. Continuing with your heel stitches, then, we'll knit like so:
Heel Row 1 (right side): * slip 1 stitch purlwise (slip 1) with yarn in back (wyib), k1; rep from *
Heel Row 2: slip 1 with yarn in front (wyif), purl to end of row
Knit heel rows 1 & 2 12 (13; 14) times. Then we'll begin our heel turn, which uses short rows for shaping. So we'll knit the following two transition rows:
Transition Row 1 (right side): k14 (k15; k16), ssk, k1, turn
Transition Row 2: slip 1 wyif, p5, p2tog, p1, turn
And once those two bad boys are done, we'll continue the heel turn as follows. Note that you'll be bridging the gaps made by the turns with your ssk and p2tog stitches, and that wrapping & turning isn't necessary in this instance.
Turn Row 1: slip 1 wyib, knit to one stitch before gap from turn on previous row, ssk, k1, turn
Turn Row 2: slip 1 wyif, purl to one stitch before gap from turn on previous row, p2tog, p1, turn
Knit turn rows 1 & 2 until you've worked all of your heel stitches. If you're knitting the small or the large size, on your final repeat of turn row 1, you will omit the final k1, and on your final repeat of turn row 2, you will omit the final p1. When you're done with this section, you will have (14, 16, 16) stitches remaining on your heel, and it will be time to begin the gusset. With that in mind, we'll knit the gusset set-up row as follows:
Gusset Set-up Row (right side - they're all right side from here on out again!): with first needle, knit across all heel stitches. Then, pick up and 13 (14; 15) stitches along edge of heel flap, placing each stitch in one of your slipped edge stitches, and placing the final picked-up stitch in the corner where the heel meets the top of the sock. With your second dpn, k3 (k4; k5), p2, bc, p2, fc, p2, k3 (k4; k5) across instep. Then, with 3rd dpn, pick up 13 (14; 15) stitches along other edge of heel flap, placing first picked-up stitch in the corner where the heel meets to the top of the sock, and then knit across first 7 (8; 8) stitches from first dpn, so that the round once again begins at the center back of the heel. You should now have 20 (22, 23) stitches on your first needle (or before your first row marker), 24 (26; 28) stitches on your second needle, and 20 (22; 23) on your third.
Complete the gusset set-up row. Now we're ready to work on the gusset, as follows. Make sure to read the directions below the rows carefully, as they will be specific for your size.
Gusset Rows 1, 3, 5, 7, 9, & 11: knit until you have 3 stitches left on your first needle, k2tog, k1; k3 (k4; k5), (p2, k6) twice, p2, k3 (k4; k5) on second needle; k1, ssk, knit until end of third needle
Gusset Rows 2, 4, 8, & 10: knit across first needle; k3 (k4; k5), (p2, k6) twice, p2, k3 (k4; k5) on second needle; knit across third needle
Gusset Row 6: knit across first needle; k3 (k4; k5), p2, fc, p2, bc, p2, k3 (k4; k5) on second needle; knit across third needle
Gusset Row 12: knit across first needle; k3 (k4; k5), p2, bc, p2, fc, p2, k3 (k4; k5) on second needle; knit across third needle
Size small: knit gusset rows 1 - 12, and then knit gusset rows 1 - 4 again. You should now have 12 stitches left on each of your first and third needles
Size medium: knit gusset rows 1 - 12, and then knit gusset rows 1 - 6 again. You should now have 13 stitches left on each of your first and third needles
Size large: knit gusset rows 1 - 12, and then knit gusset rows 1 - 6 again. You should now have 14 stitches left on each of your first and third needles
Complete the gusset rows indicated for the size sock you're knitting. Now we'll continue without decreases, but in the same pattern we've been using, which I'll give again below. Note that you'll begin knitting on row 3 rather than row 1 if you're knitting the medium or large socks.
Body Rows 1, 3 - 7, and 9 - 12: knit across first needle, k3 (k4; k5), (p2, k6) twice, p2, k3 (k4; k5) on second needle, knit across third needle
Body Row 2: knit across first needle, k3 (k4; k5), p2, fc, p2, bc, p2, k3 (k4; k5) on second needle, knit across third needle
Body Row 8: knit across first needle, k3 (k4; k5), p2, bc, p2, fc, p2, k3 (k4; k5) on second needle, k1, ssk, knit across third needle
Knit body rows 1 - 12 (beginning on row 3 if you're knitting the medium or large size) until piece measures roughly 7.5" (8"; 8.75") from the back of the heel, or until you're at about 2" (2.25"; 2.25") from your desired finished length. It doesn't so much matter where you are on the pattern, although I finished right after a cable row. Anyway, now it's time to work on the toe decreases, and finish with our pattern. With that in mind, we'll continue like so:
Toe Row 1: knit until 3 stitches remain on first needle, k2tog, k2; on second needle, k1, ssk, knit until 3 stitches remain on second needle, k2tog, k1; on third needle, k1, ssk, knit until end of needle
Toe Row 2: knit
Knit rows 1 & 2 until 24 (28; 28) stitches remain in sock. Then we'll work Toe Row 1 only (no toe row 2!) until only 8 stitches remain for every size. Knit stitches from needle 1 onto needle 3, so that there are only 4 stitches on each of two needles. Use the Kitchener stitch to graft final 8 stitches. Then, tuck in ends, and block. Oh, and make another, if you like your feet to match. :)