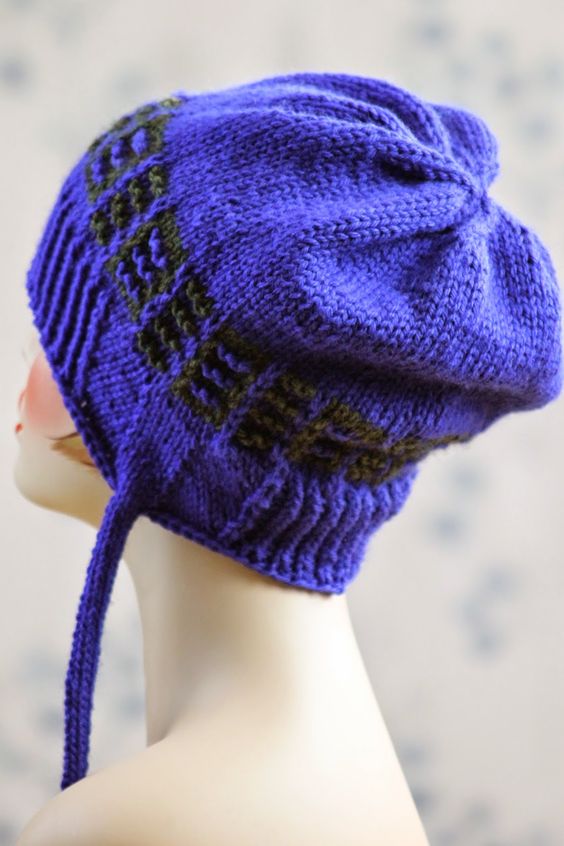
Knitted Little Ridges Fauxflap Hat
Introducing the Cozy Ridge Knit Fauxflap Hat! This adorable hat combines the warmth of a knitted design with a touch of whimsy. The hat features charming little ridges that add texture and visual interest, giving it a unique and stylish look. The fauxflap detail adds a playful twist, making it a fun accessory for any outfit. Get ready to turn heads with the Knitted Little Ridges Fauxflap Hat! This hat is the perfect blend of fashion and functionality. The knitted design not only keeps you warm and cozy during chilly days, but also adds a trendy touch to your winter wardrobe. The little ridges give the hat a delightful texture, making it stand out from the crowd. And let's not forget about the fauxflap detail, which adds a touch of whimsy and makes this hat truly one-of-a-kind. Whether you're strolling through the city or hitting the slopes, this hat is sure to keep you looking stylish and feeling comfortable all season long.
Sizes: Child (Teen/Small Adult; Large Adult)
Yarn: Berroco Vintage (52% Acrylic, 40% Wool, 8% Nylon; 218 yards [200 meters]/100 grams); #5160 Wild Blueberry (color A) – one skein &
#5177 Douglas Fir – one skein (color B)
Needles: one 16" circular needle in size US 7, and one set of double-pointed needles (dpns) in size US 7, plus one size US 9 or larger 16" circular needle for provisional cast on
Notions: Tapestry needle, five stitch markers
Gauge: 18 stitches = 4 inches on size 7 needles
So let's get started! Using your largest needle and your color A yarn, cast on 80 (90; 100) stitches provisionally (instructions for this cast on can be found here). Transfer stitches to your size 7 needle, place marker, and join in round. Then knit the following set-up rows:
Set-up Rows 1 & 2: using color A, knit
And now it's time to move to our color pattern, which goes as follows:
Row 1: using color B yarn, * slip 1 stitch with yarn in back (wyib), k3, slip 1 wyib, k5; rep from *
Row 2: using color B yarn, * slip 1 wyib, p3, slip 1 wyib, k5 *
Row 3: using color A yarn, * k5, slip 1 wyib, k3, slip 1 wyib *
Row 4: using color A yarn, * k5, slip 1 wyib, p3, slip 1 wyib *
Knit rows 1 - 4 three times, and then knit rows 1 & 2 once more. Switch to your color A yarn and knit in stockinette until piece measures 5" (5.75"; 6.5"). Then it's time to begin the decreases, as follows. Remember to switch to your dpns once you hit 70 stitches. And yes, the decreases are the same for all sizes.
Decrease Row 1: * k8, k2tog * (72 stitches (81 stitches; 90 stitches))
Decrease Row 2: knit
Decrease Row 3: * k7, k2tog * (64 stitches (72 stitches; 80 stitches))
Decrease Row 4: * k6, k2tog * (56 stitches (63 stitches; 70 stitches))
Decrease Row 5: * k5, k2tog * (48 stitches (54 stitches; 60 stitches))
Decrease Row 6: * k4, k2tog * (40 stitches (45 stitches; 50 stitches))
Decrease Row 7: * k3, k2tog * (32 stitches (36 stitches; 40 stitches))
Decrease Row 8: * k2, k2tog * (24 stitches (27 stitches; 30 stitches))
Decrease Row 9: * k1, k2tog * (16 stitches (18 stitches; 20 stitches))
Decrease Row 10: * k2tog * (8 stitches (9 stitches; 10 stitches))
Clip yarn tail and thread through final 8 (9; 10) stitches. Pull tight, thread to inside of hat, and knot. And now that the top portion of the hat is done, it's time to do the bottom. So, using your size 7 circular needle, pick up stitches from provisional cast on and place row marker. Then we'll knit the following marker placement row. As you'll notice, these rows are different depending on which size hat you're knitting.
Child Marker Placement Row: k8, place marker, k15, place marker, k35, place marker, k15, place marker, knit until end of round
Small Adult Marker Placement Row: k10, place marker, k17, place marker, k37, place marker, k17, place marker, knit until end of round
Large Adult Marker Placement Row: k10, place marker, k19, place marker, k43, place marker, k19, place marker, knit until end of round
And then we'll begin our edging rows, which go as follows. Notice, again, the differences between sizes.
Child Edging Row 1: * k1 through back loop (k1-tbl), p1 * until you reach first marker, slip marker, ssk, k3, m1r, k5, m1l, k3, k2tog, slip marker, p1, * k1-tbl, p1 * until you reach next marker, slip marker, ssk, k3, m1r, k5, m1l, k3, k2tog, slip marker, p1, * k1-tbl, p1 * until end of round
Child Edging Row 2: * k1-tbl, p1 * until you reach first marker, slip marker, knit until you reach the next marker, slip marker, p1, * k1-tbl, p1 * until you reach next marker, slip marker, knit until you reach the next marker, slip marker, p1, * k1-tbl, p1 * until you reach end of round
Small Adult Edging Row 1: * k1 through back loop (k1-tbl), p1 * until you reach first marker, slip marker, ssk, k4, m1r, k5, m1l, k4, k2tog, slip marker, p1, * k1-tbl, p1 * until you reach next marker, slip marker, ssk, k4, m1r, k5, m1l, k4, k2tog, slip marker, p1, * k1-tbl, p1 * until end of round
Small Adult Edging Row 2: * k1-tbl, p1 * until you reach first marker, slip marker, knit until you reach the next marker, slip marker, p1, * k1-tbl, p1 * until you reach next marker, slip marker, knit until you reach the next marker, slip marker, p1, * k1-tbl, p1 * until you reach end of round
Large Adult Edging Row 1: * k1 through back loop (k1-tbl), p1 * until you reach first marker, slip marker, ssk, k5, m1r, k5, m1l, k5, k2tog, slip marker, p1, * k1-tbl, p1 * until you reach next marker, slip marker, ssk, k5, m1r, k5, m1l, k5, k2tog, slip marker, p1, * k1-tbl, p1 * until end of round
Large Adult Edging Row 2: * k1-tbl, p1 * until you reach first marker, slip marker, knit until you reach the next marker, slip marker, p1, * k1-tbl, p1 * until you reach next marker, slip marker, knit until you reach the next marker, slip marker, p1, * k1-tbl, p1 * until you reach end of round
Knit edging rows 1 & 2 four (four; five) times, and then knit row 1 once again. Then, it's time to move on to our bind-off row, which goes as follows:
Bind-off Row: bind off in pattern until you reach first marker; remove marker, then, bind off until you have 9 (10; 11) stitches left before your second marker, and one bind off stitch on your right hand needle. Knit 4, and transfer 5 stitches to a scrap of yarn to work later. Bind off until you reach second marker, remove marker, and bind off loosely in pattern until you reach your third extra marker. Repeat the same process you did for the other fauxflap, reserving the 5 middle stitches to work in an i-cord, and continuing your bind-off to the end of the round. Using your size 7 dpns, pick up one of the sets of your five stitches. To prettify this (since you already bound off around these stitches, and there will be a small gap at the end if you don't correct it), I worked as follows:
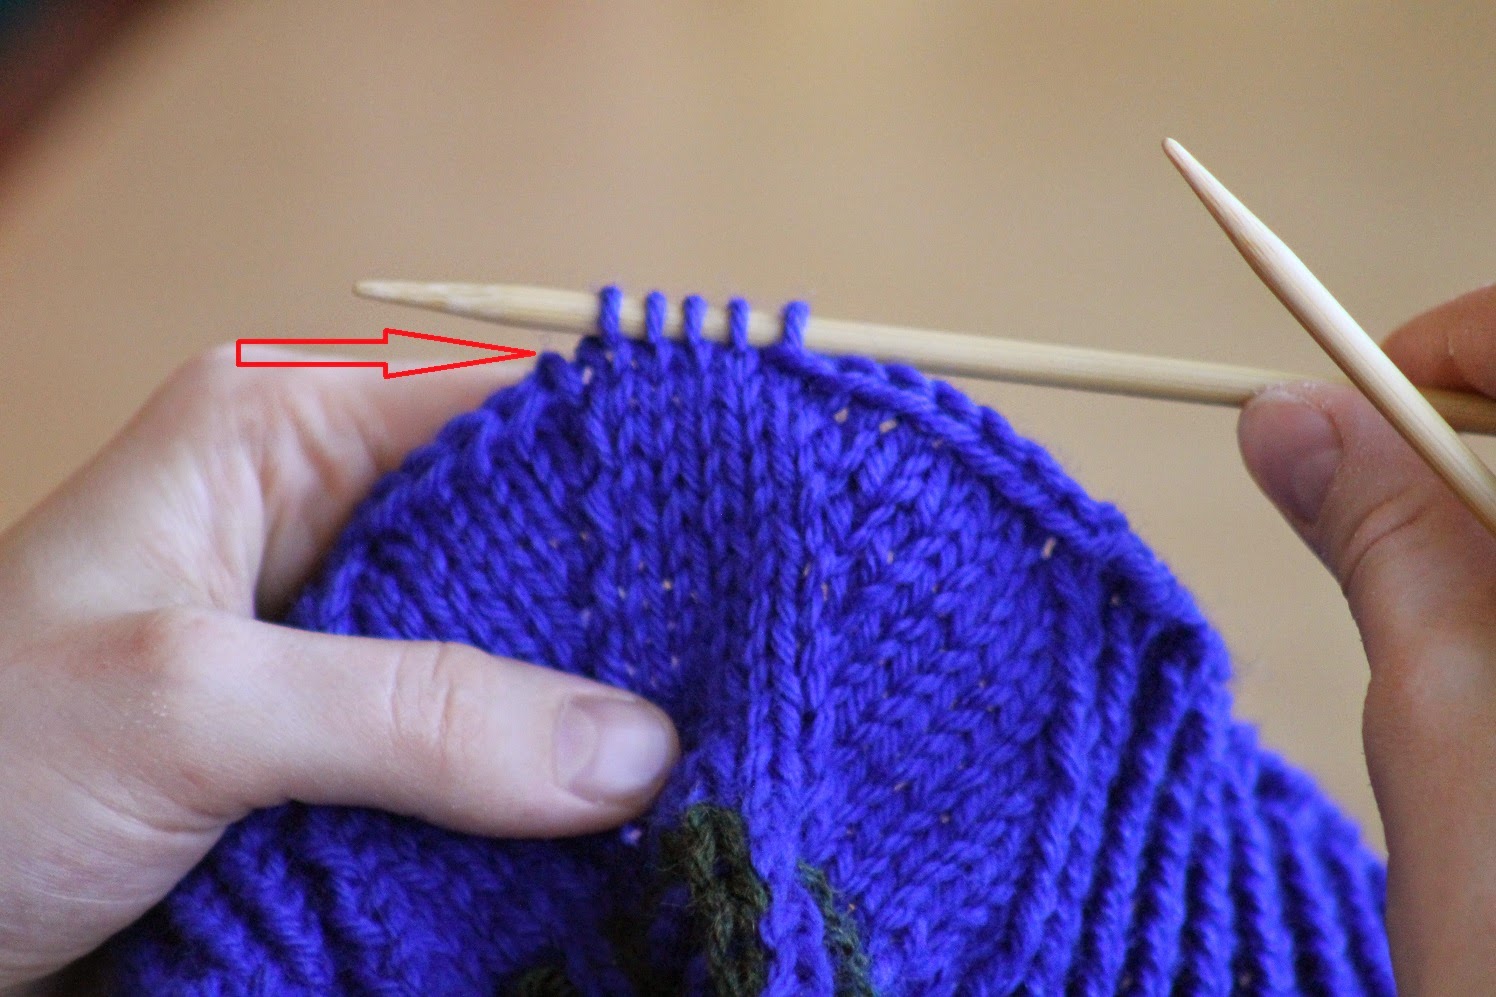
Here are my five stitches. The red arrow points to the stitch that I'm going to pick up on the end of my dpn.
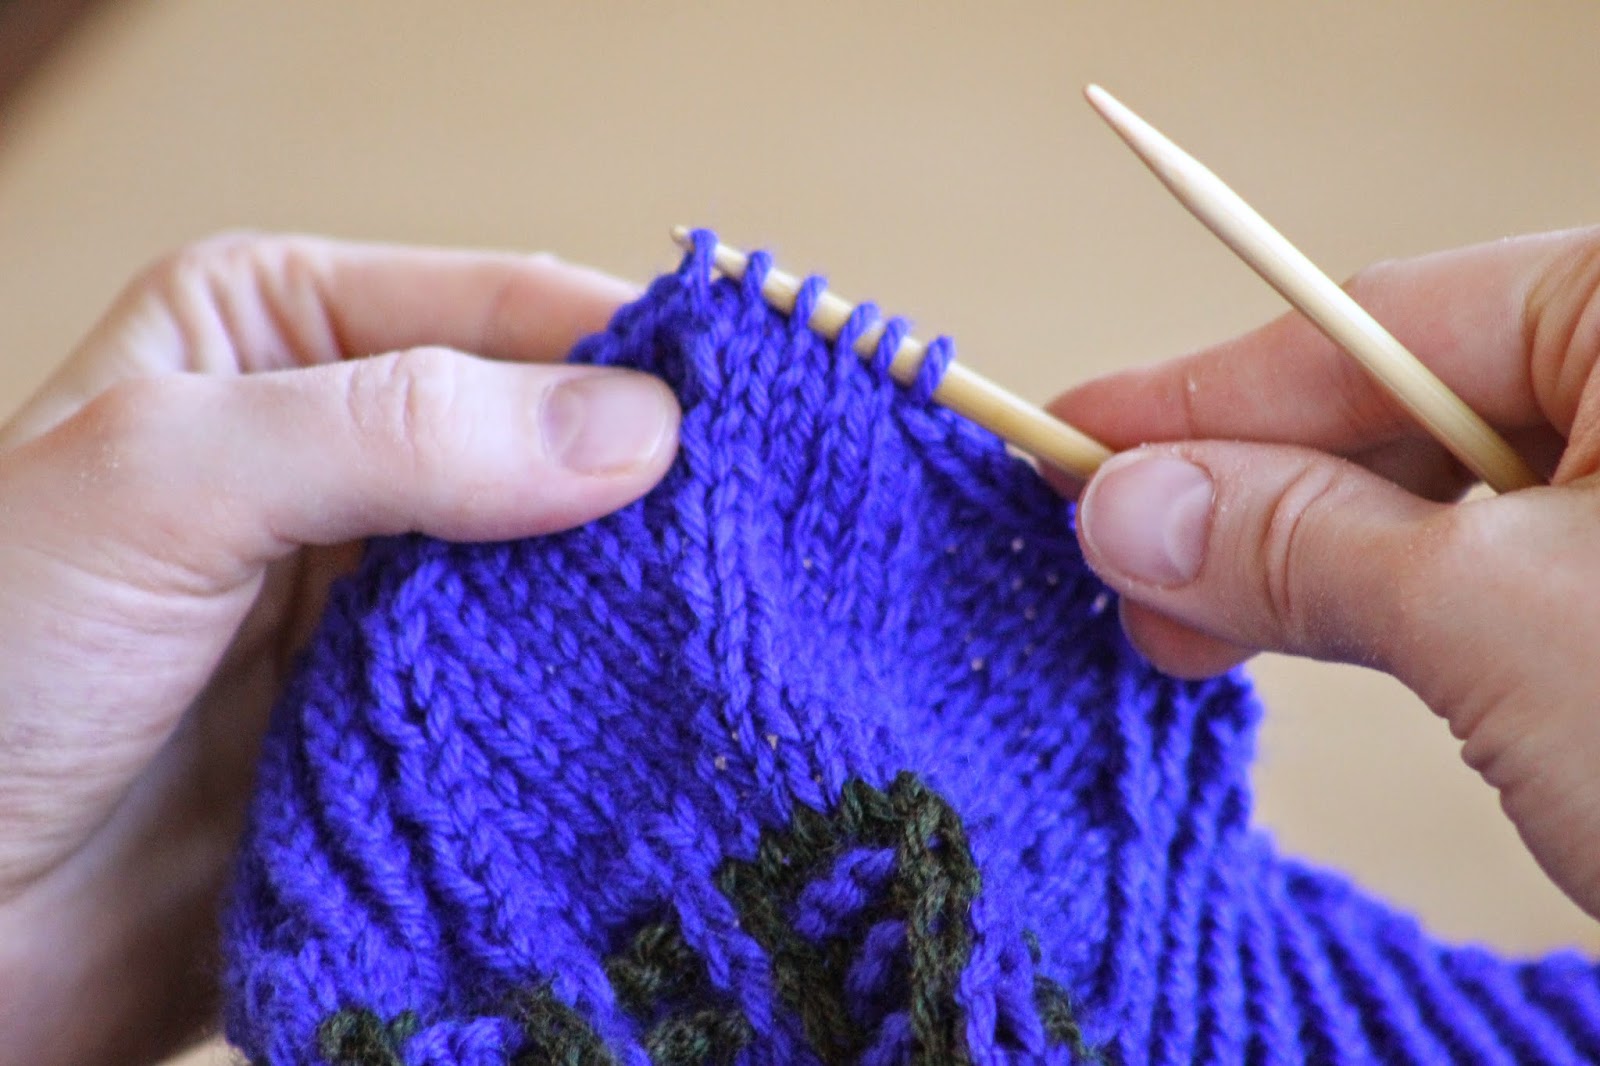
See? I picked it up, and then began knitting from the other end of my dpn.
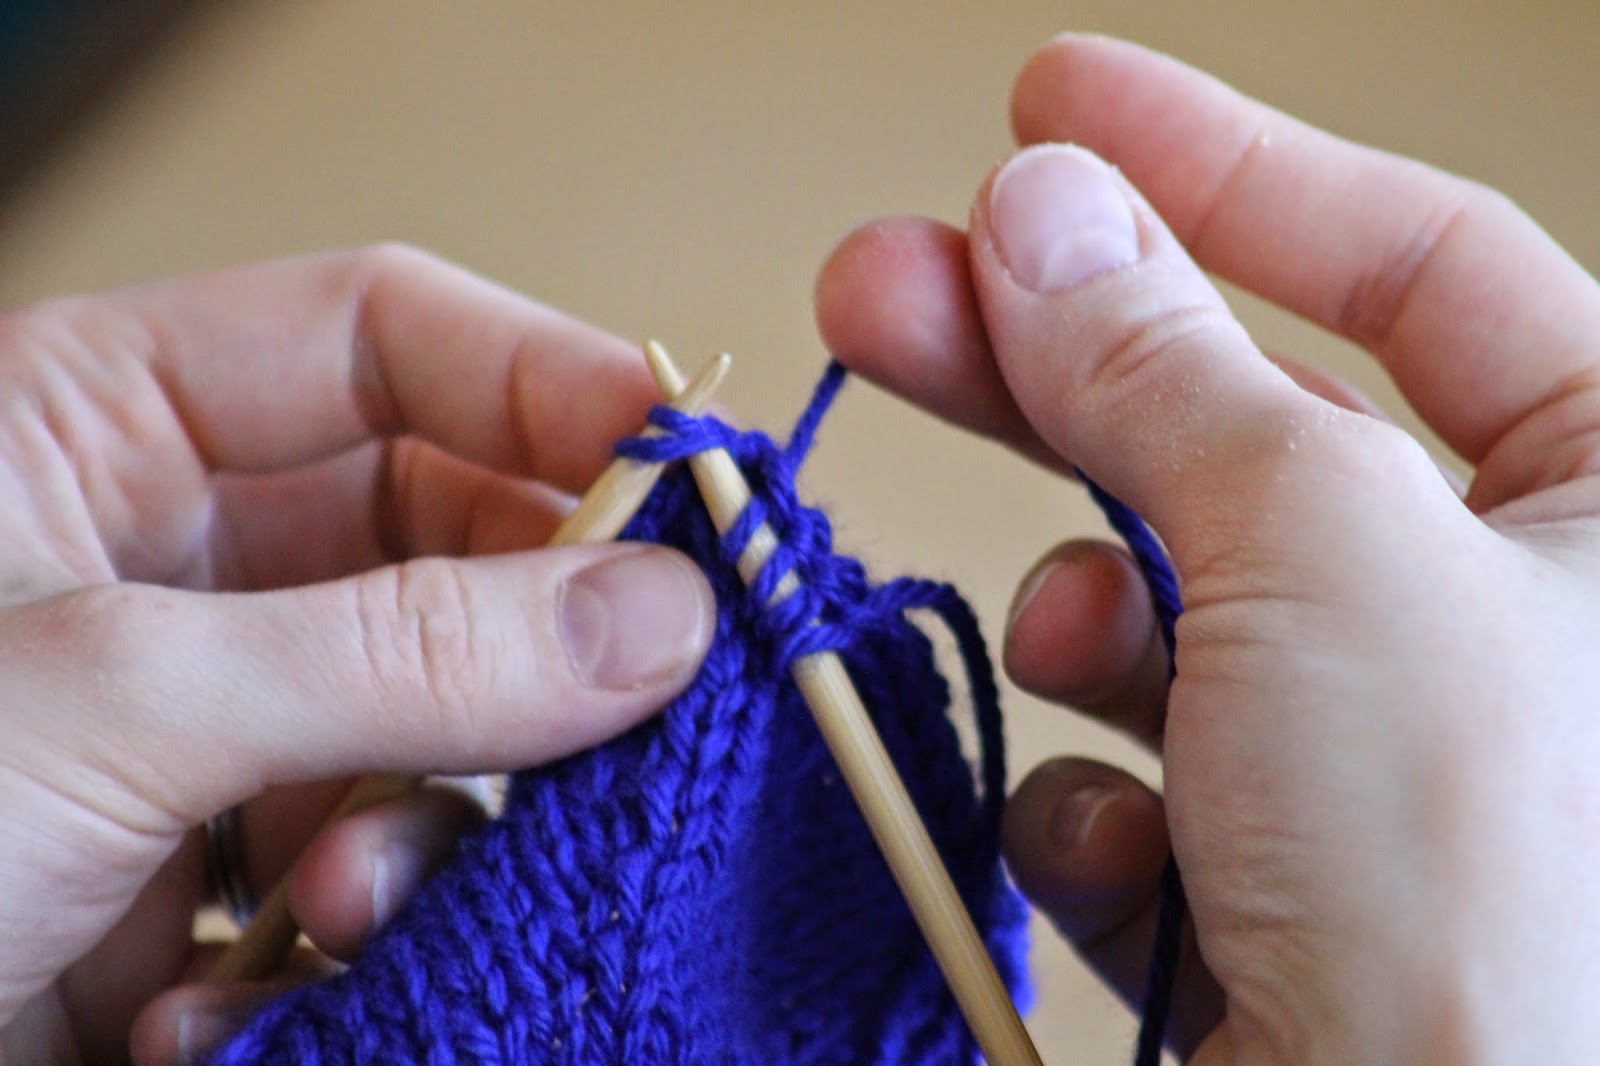
And when I reached those final two stitches (the 5th stitch and the picked up one), I knit them both together.
Anyway, work in a 5 stitch i-cord until cord measures 8" (9"; 10"); bind off loosely. Finally, repeat for other set of five reserved stitches. Tuck in ends.