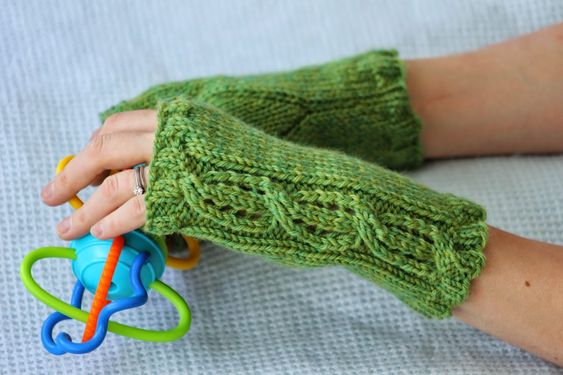
Knitted Lace Cable Fingerless Gloves
Imagine a pair of elegant fingerless gloves crafted from intricately knitted lace cables. These gloves are not only stylish but also functional, allowing you to keep your hands warm while still being able to use your fingers freely. The delicate lace pattern adds a touch of sophistication to any outfit, making these gloves a versatile accessory for any occasion. Whether you're dressing up for a special event or simply running errands on a chilly day, these knitted lace cable fingerless gloves are sure to make a statement. The fingerless style allows for easy movement and dexterity, making these gloves perfect for typing on your phone, driving, or any other activity that requires the use of your fingers. The timeless appeal of lace adds a classic touch to these gloves, making them a timeless accessory that you'll reach for season after season. Treat yourself to a pair of knitted lace cable fingerless gloves and add a touch of elegance to your winter wardrobe.
Sizes: small (medium; large) (the small will fit a hand roughly 7" - 8" in circumference at the base of the thumb, the medium a hand about 8" - 9", and the large 9"
Yarn: Cascade Yarns Cascade 220 Heathers (100% Peruvian Highland Wool; 220 yards [200 meters]/100 grams); #9461 Lime Heather - one skein
Needles: One set of needles in size US 7, one set of needles in size US 5, one cable needle (cn)
Notions: Tapestry needle, two stitch markers
Gauge: 20 stitches = 4 inches on size 7 needles
So let's get started! We're going to work our two gloves a teensy weensy bit differently (the cables will be reversed). So, for the first one, you'll start by using your size 5 needles, and casting on 38 (42; 46) stitches loosely. Then we'll work the following ribbing rows, which will be the same for all sizes:
Ribbing Row 1 (wrong side): p2, * k2, p2; rep from *
Charted Knitting Designs: A Third Treasury of Knitting Patterns. And it goes like so:
Row 1 and all odd rows (wrong side): purl until you reach first marker, slip marker, k2, p6, k2, slip second marker, purl until end of row
Row 2: knit until you reach first marker, slip marker, p2, slip 3 stitches to cn and hold in front, k3, k3 from cn, p2, slip marker, knit until end of row
Rows 4, 6, 8, 10, & 12: knit until you reach first marker, slip marker, p2, ssk, yo, k2, yo, k2tog, p2, slip marker, knit until end of row
Knit rows 1 - 12 three times, and then knit rows 1 - 3 again. Switch to your size 5 needles, removing extra markers when you do so, and knit the following ribbing rows:
Ribbing Rows 1 & 3 (right side): k2, * p2, k2 *
Ribbing Row 2: p2, * k2, p2 *
Knit ribbing rows 1 - 3 and then bind off loosely in pattern. And once this is done, we'll work the other glove, which is exactly the same except with the cable reversed. Of course I'll still spell it out for you, as follows:
So, for the second one, you'll start by using your size 5 needles, and casting on 38 (42; 46) stitches loosely. Then we'll work the following ribbing rows, which will be the same for all sizes:
Ribbing Row 1 (wrong side): p2, * k2, p2; rep from *
Ribbing Row 2: k2, * p2, k2 *
Ribbing Row 3: p2, * k2, p2 *
Knit ribbing rows 1 - 3, and then we'll knit the following marker placement row. Notice they are different for the different sizes.
Marker Placement Row - size small: k2, (p2, k2) 3 times, place marker, p2, (k2, p2) twice, place marker, k2, * p2, k2 * to end of row
Marker Placement Row - size medium: (k2, p2) 4 times, place marker, k2, (p2, k2) twice, place marker, * p2, k2 * to end of row
Marker Placement Row - size large: k2, (p2, k2) 4 times, place marker, p2, (k2, p2) twice, place marker, k2, * p2, k2 * to end of row
Complete marker placement row, and then switch to your size 7 needles. Now we'll begin the main pattern, like so:
Row 1 and all odd rows (wrong side): purl until you reach first marker, slip marker, k2, p6, k2, slip second marker, purl until end of row
Row 2: knit until you reach first marker, slip marker, p2, slip 3 stitches to cn and hold in back, k3, k3 from cn, p2, slip marker, knit until end of row
Rows 4, 6, 8, 10, & 12: knit until you reach first marker, slip marker, p2, ssk, yo, k2, yo, k2tog, p2, slip marker, knit until end of row
Knit rows 1 - 12 three times, and then knit rows 1 - 3 again. Switch to your size 5 needles, removing extra markers when you do so, and knit the following ribbing rows:
Ribbing Rows 1 & 3 (right side): k2, * p2, k2 *
Ribbing Row 2: p2, * k2, p2 *
Knit ribbing rows 1 - 3 and then bind off loosely in pattern. And now that the body of both gloves is complete, we'll work the thumbs. So let's proceed as follows.
Using your size 5 needles, cast on 15 (17; 19) stitches loosely. Then knit the following two edging rows:
Edging Row 1 (wrong side): purl
Edging Row 2: knit
And once these two rows are done, switch to your size 7 needles. Then we'll continue like so:
Row 1: purl
Row 2: knit
Row 3: purl
Knit rows 1 - 3, and then we'll begin the bind off rows at the bottom of the thumb. So let's work like so:
Bind Off Row 1 (right side): bind off one stitch, knit until end of row
Bind Off Row 2: bind off one stitch, purl until end of row
Work these two bind off rows until you have 3 stitches left on needle, at which point you should have just finished a wrong side row. Bind off on your next right side row. Then, make another!
And now that your mitts and thumbs are done, it's time to assemble these bad boys! First, seam the thumb along the edging and main body rows (so stop seaming once the decreases begin). Next, measure the raw edge of the thumb, so you know how big of a hole to leave when you seam the mitts. I recommend putting the bind-off edge of each mitt at the top/finger edge of the mitt, so seam from that top edge down to where you want the thumb to begin (my measurement recommendations: seam down to 1.75" (2"; 2.25")). Then leave the required gap for the thumb, and seam the bottom edge of the mitt. Finally, seam thumb to mitt, lining thumb seam up with top seam of mitt. Repeat for second mitt, and tuck in ends.