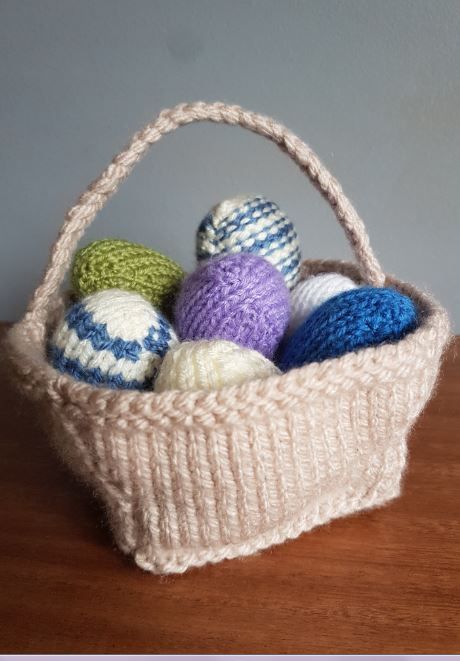
Knitted Adorable Basket
Crafted with love and care, the Knitted Adorable Basket is a true testament to the artistry of knitting. Each stitch is meticulously woven together to create a charming and unique piece that is both functional and stylish. The soft and cozy texture of the basket adds a touch of warmth to any space, making it the perfect addition to your home decor. The Knitted Adorable Basket is a delightful blend of craftsmanship and cuteness. Hand-knitted with precision, this basket showcases the skill and dedication of the artisan behind it. The intricate patterns and attention to detail make it a truly special piece that stands out from the crowd. Whether you use it to store your favorite knick-knacks or as a decorative accent, this basket is sure to bring a smile to your face every time you see it.
How to Knit a Basket
Complete Size – 11cm width x 11cm depth x 8cm height (excluding handle)
What you will need...
Total time - 3 Hours 30 Minutes Each Knitted Basket
4mm knitting needles (UK 8, US 6)
Chunky Double knitting yarn - light brown
Sewing up needle
Scissors
Before You Start...
Abbreviations
K = Knit P = Purl St = Stitch Sts = Stitches
Cast On - I use the thumb method.
G-st = Garter stitch. Every row knit.
St-st = stocking stitch. Alternating a row of knit stitches (right side), with a row of purl stitches (wrong side).
Inc = Increase - by knitting into the front and the back of the same stitch, to make two stitches out of one.
Cast off - K wise unless otherwise stated. US - bind off.
TOP TIP
Chunky wool is recommended - This results in a more sturdy, stiffer basket, that is also a bit larger (less effort, more basket!) Stocking stitch also adds extra strength.
How to Make it...
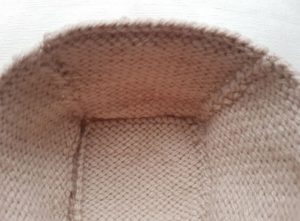
Made up four knitted side pieces, a bottom piece and a finger-knitted handle. All pieces sewn together to form a basket, to fill with your choice of favourite things!
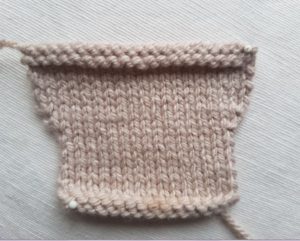
Side Piece
Make 4
Time - 30 Minutes Each
Size 8 cm
Needles 4mm
Yarn Colour Light Brown
Cast on 16sts
Next row P (for detailing at the bottom of the basket)
Beginning with a P row St-st 9 rows
Continue in st-st working 5 more rows, Inc into the first and last stitch of each K row (20sts)
St-st 5 further rows
Next row K (this adds the detailing at top of basket)
Cast off P-wise
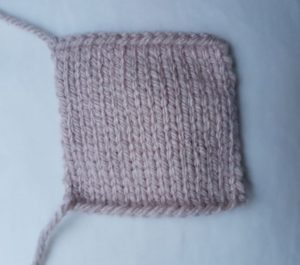
Bottom Piece
Make 1
Time - 30 Minutes Each
Size 8 cm
Needles 4mm
Yarn Colour of your Choice
Cast on 16sts
Beginning with a P row, st-st 19 rows
Cast off
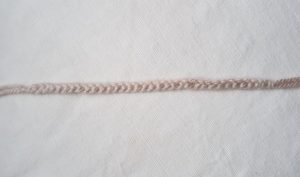
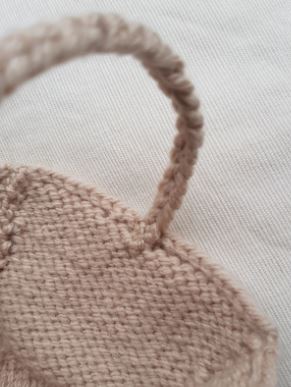
Basket Handle
Make 1
Time - 10 Minutes
Size 22cm
Place two lengths of chunky wool together to make a thicker more sturdy handle. Over a metre of this will be needed to make this short length, depending on your tension.
Finger Knit a length as desired - the basket pictured was a length of 22 cm.
Piece it Together...
Sewing-Up Time - 50 Minutes
Oversew row ends of the four knitted side pieces with right side of st-st on the outside.
Sew on bottom piece, also with right side of st-st on the outside.
Sew on basket handle centrally to the top of two opposite side pieces.
Make it Different!
Using garter stitch may be easier for children or those who are learning. This will still result in a good basket, but won't be as sturdy.
Instead of chunky yarn you could use two strands of regular yarn, and if doing so, using two different colours can also have a nice two-tone basket effect.
Make your basket even bigger by adding extra rows to the side pieces before the Inc section. (Keeping it an odd number to remain in sync with the st-st pattern).
Make the detailing bigger or add further striped detailing by doing a P row when on the R side of st-st, or K on the wrong side (i.e. do the opposite that you should be doing.) Maybe try a pattern of colours such as alternating two-row stripes.
Make some of the knitted eggs to go in your completed knitted basket!