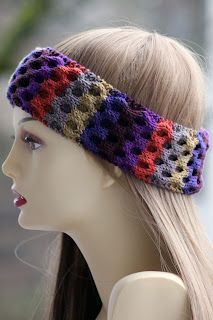
Knitted Honeycomb Headband
Introducing the Honeycomb Headband, a stylish accessory that combines fashion and functionality. This intricately knitted headband is designed to keep you warm and cozy during the colder months while adding a touch of elegance to your outfit. The honeycomb pattern adds a unique texture and visual appeal, making it a standout piece in your wardrobe. The Knitted Honeycomb Headband is not only a fashionable accessory but also a practical one. It provides an extra layer of warmth to protect your ears from the chilly winds, making it perfect for outdoor activities like hiking, skiing, or simply taking a stroll in the park. Its lightweight design allows for easy portability, so you can conveniently carry it in your bag and put it on whenever you need that extra warmth. Upgrade your winter wardrobe with the Knitted Honeycomb Headband and embrace both style and comfort in one accessory.
Yarn: Debbie Bliss Rialto DK Print (100% Merino Superwash Wool; 114 yards [105 meters]/50 grams); #47008 Roma - one skein
Needles: One pair of US 6 needles, one US 7 needle for provisional cast on, and a cable needle (cn) or double pointed needle for cabling
Notions: Tapestry needle
Gauge: 22 stitches = 4 inches in stockinette
So let's make a headband! Using your larger needle, cast on 28 stitches provisionally. Transfer cast on to your size 6 needles. Then, we'll begin our main pattern and some garter edging, for which we'll need the following notation. Oh, and this pattern is an excellent choice if you're ready to cable without a cable needle as well.
back cross (bc): slip next two stitches to cn and hold in back; k2, k2 from cn
front cross (fc): slip next two stitches to cn and hold in front; k2, k2 from cn
And now that we've got that down, we'll continue like so:
Row 1 (wrong side): k2, p24, k2
Row 2: k2, (bc, fc) 3 times, k2
Row 3: k2, p24, k2
Row 4: knit
Row 5: k2, p24, k2
Row 6: k2, (fc, bc) 3 times, k2
Row 7: k2, p24, k2
Row 8: knit
Knit rows 1 - 8 until piece measures roughly 21" - 23" and you've just finished row 7 of the pattern (size tips: you're going to want it at least an inch shorter than your head size, and if you're guessing it's probably better to aim smaller rather than larger). Block flat, if you'd like, and then graft the two ends of the headband together using the Kitchener stitch. Finally, tuck in ends!