Knitted Brain Hat Knitting
Get ready to show off your unique style with the Knitted Brain Hat! This one-of-a-kind accessory is perfect for those who want to make a bold statement while staying warm and cozy. The intricate knitting pattern creates a realistic brain design that is sure to turn heads wherever you go. Made from high-quality yarn, this hat is not only fashionable but also comfortable to wear. Whether you're heading out for a winter stroll or attending a costume party, the Knitted Brain Hat is the perfect conversation starter. It's a fun and quirky way to express your individuality and showcase your love for all things creative.
Basic Knitting Supplies for Hat
Knitting needle size- 10 Number or 3.25 MM Straight Needles
Knitting yarn – 70 gram 8 Ply wool or DK Yarn
Knitting Abbreviations
SL – Slip
K – Knit
P – Purl
STS – Stitches
K2tog – Knit 2 sts together
P2tog – Purl 2 sts together
T3B – Twist 3 sts from back (Slip 2 sts onto cable needle and hold behind work then P1 from left-hand needle then K2 from Cable needle).
T3F – Twist 3 sts from front (Slip 2 sts onto cable needle and hold in front work then P1 from left-hand needle then K2 from Cable needle).
Knit a Stylish Hat with Straight Needles
Below, you’ll find the complete pattern for this brain hat, and you can easily adjust it to knit a hat of any size. Let’s dive into the process of knitting this beautiful hat.
Skill – Intermediate
Knitting Rib Stitch Border
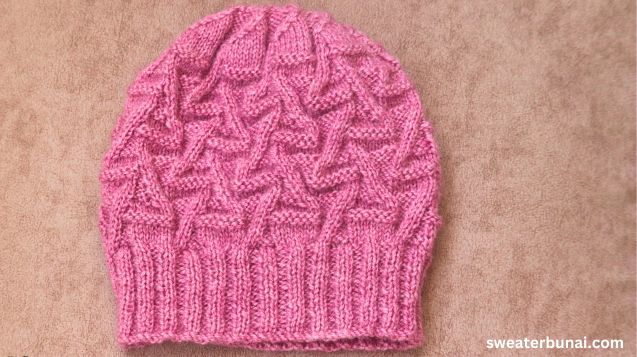
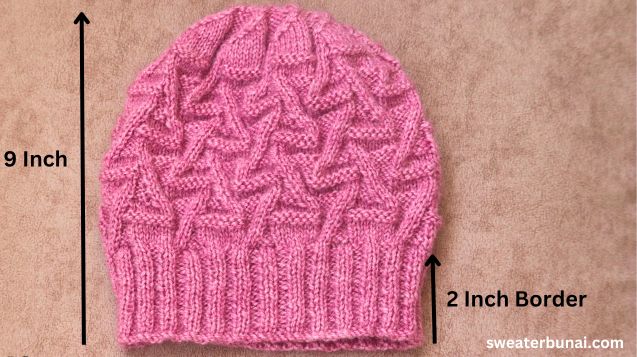
This hat I’ve made for adults. To knit this cap, I cast on 110 stitches with double thread. First, we will knit the cap’s border. I knit the border using simple 2×2 rib stitches.
Row 1 ( Right Side ) – * K2, P2 * repeat from * to * till the end of the row
Row 2 ( Wrong Side ) – Knit in knit & Purl in purl
I knit a 2-inch ( 20 Rows ) long border, but you can adjust the length as per your preference.
Wrong Side – Purl all stitches and increase by 20 stitches across the entire row.
After completing the border, stitches have been added from the wrong side. In this cap, I’ve added 20 stitches in total. Now I have 130 stitches on my needle.
Free Knitting Pattern for Hat on Straight Needles
Now we will add a design to the cap. In this hat pattern, we knit the number 7 from both the right and wrong sides. But after finishing the hat, the pattern looks like a brain. So, we call it the brain hat knit pattern.
This is a very important part of the cap. The design you choose will make your cap look attractive. Here, I’ve added a beautiful pattern that completes in 20 rows, and you need to take stitches in multiples of 14 to knit it.
We have 130 stitches here, so to adjust your design, you’ll need to place 2-2 stitches on both edges. So, let’s start adding the pattern to the cap.
Row 1 – SL1, K1, * K7, P4, T3B * repeat from * to * …………. last 2 sts K2
Row 2 – SL1, P1, * K1, P2, K4, P7 * repeat from * to * ………………. last 2 sts P2 ( Knit in knit & Purl in purl, All wrong side apply same rule )
Row 3 – SL1, K1, * K7, P3, T3B, P1 * repeat from * to * ………….. last 2 sts K2
Row 4 – SL1, P1, * K2, P2, K3, P7 * repeat from * to * …………. last 2 sts P2
Row 5 – SL1, K1, * P9, T3B, P2 * repeat from * to * ……………. last 2 sts K2
Row 6 – SL1, P1, * K3, P2, K9 * repeat from * to * …………… last 2 sts P2
Row 7 – SL1, K1, * K7, P1, T3B, P3 * repeat from * to * …………. last 2 sts K2
Row 8 – SL1, P1, * K4, P2, K1, P7 * repeat from * to * ………….. last 2 sts P2
Row 9 – SL1, K1, * K7, T3B, P4 * repeat from * to * …………….. last 2 sts K2
Row 10 – SL1, P1, * K5, P9 * repeat from * to * …………. last 2 sts P2
Row 11 – SL1, K1, * T3F, P4, K7 * repeat from * to * ……………. last 2 sts K2
Row 12 – SL1, P1, * P7, K4, P2, K1 * repeat from * to * ……………. last 2 sts P2
Row 13 – SL1, K1, * P1, T3F, P3, K7 * repeat from * to * ………… last 2 sts K2
Row 14 – SL1, P1, * P7, K3, P2, K2 * repeat from * to * …………… last 2 sts P2
Row 15 – SL1, K1, * P2, T3F, P9 * repeat from * to * ……………… last 2 sts K2
Row 16 – SL1, P1, * K9, P2, K3 * repeat from * to * …………… last 2 sts P2
Row 17 – SL1, K1, * P3, T3F, P1, K7 * repeat from * to * ……….. last 2 sts K2
Row 18 – SL1, P1, * P7, K1, P2, K4 * repeat from * to * …………… last 2 sts P2
Row 19 – SL1, K1, * P4, T3F, K7 * repeat from * to * ……… last 2 sts K2
Row 20 – SL1, P1, * P9, K5 * repeat from * to * ……………… last 2 sts P2
Repeat rows 1 to 20 two and a half times or the length you require. I have knit 50 rows.
Bind off Knitting Pattern for Hat
The hat’s length is complete, and now we need to bind off it. I’ve already bind off the hat from both sides, and it took me 15 rows to do it.
When we bind off, the hat’s length will increase by about 2 inches, so remember that while working on the hat. Get below the bind-off knitting pattern.
Right Side – K2tog, * K7, K2tog, P5 * repeat from * to * …………….. last 2 sts K2tog
Wrong Side – SL1, * K5, P2tog, P6 * repeat from * to * ………….. last sts P1
Right Side – SL1, * K5, K2tog, P5 * repeat from * to * ……………… last sts P1
Wrong Side – SL1, * K5, P2tog, P4 * repeat from * to * ……………. last sts P1
Right Side – SL1, * K3, K2tog, P5 * repeat from * to * …………… last sts P1
Wrong Side – SL1, * K5, P2tog, P2 * repeat from * to * …………… last sts P1
Right Side – SL1, * K1, K2tog, P5 * repeat from * to * ……………. last sts P1
Wrong Side – SL1, * K5, P2tog * repeat from * to * ……………… last sts P1
Right Side – SL1, K1, * P4, K2tog * repeat from * to *
Wrong Side – * P2tog, K3 * repeat from * to * ………… last 2 sts P2
Right Side – SL1, K1, * P2, K2tog * repeat from * to *
Wrong Side – * P2tog, K1 * repeat from * to * ……………. last 2 sts P2
Right Side – K2tog, K2tog, K2tog ………………
Now I have only 10 stitches left on my needle.
Wrong Side – Purl all sts
Right Side – Remove all stitches over the first stitch.
Then secure it and sew the hat from the wrong side.