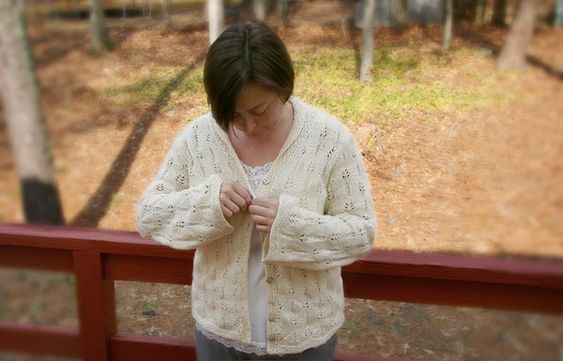
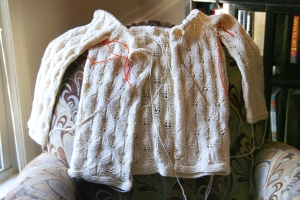
Knitted Tullia Sweater
The Tullia Sweater is a beautifully crafted piece made from knitted fabric, showcasing intricate details and a cozy design. This sweater is perfect for adding a touch of elegance to any outfit, whether you're dressing up for a special occasion or simply looking to stay warm and stylish on a casual day out. The knitted texture of the Tullia Sweater adds a unique charm to the garment, making it a versatile piece that can be dressed up or down depending on the occasion. Whether you pair it with jeans for a laid-back look or dress it up with a skirt and heels, the Tullia Sweater is sure to become a staple in your closet. Upgrade your style with this chic and sophisticated knitted sweater that exudes charm and comfort in equal measure.
Skill Level- Intermediate. Sweater is worked flat, sleeves are worked in the round then joined to the body at underarm.
Finished Measurements (Chest) in inches–
32 (35, 38, 41, 44, 47)
Materials- 867 (961, 1047, 1127, 1228, 1287) yds FibraNatura Heaven or other yarn that meets gauge.
Gauge- 4.25 stitches per inch and 6.15 rows per inch in pattern on size 5 -7 needles
Directions:
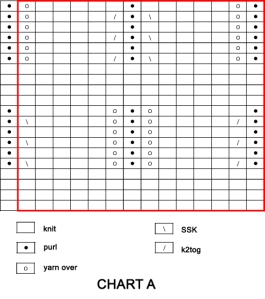
Note: In this sweater, it is important that you can recognize how each yarn over is paired together with a k2tog or SSK in the stitch pattern to keep stitch counts even throughout the fabric. When working a decrease in the sleeve or body that eats into the stitch pattern in a way that a yarn over is omitted, you must omit the corresponding k2tog or SSK in order to keep proper sweater shaping. Conversely, if you work a decrease in the sleeve or body that eats into the stitch pattern in a way that a k2tog or SSK is omitted, you must omit the corresponding yarn over. If not, you may end up with strange sweater shaping.
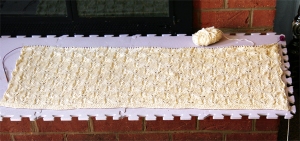
BODY
The body is worked flat to the arm pits
CO 135 (147, 161, 169, 183, 191) sts. Work in garter stitch for 6 rows (knit across every row).
Set Up: k 4 (3, 4, 7, 7, 4), pm, begin Chart A and work in pattern for 31 (33, 36, 37, 41, 42) sts, pm to mark center side, continue working in pattern for 69 (75, 83, 87, 93, 97) sts, pm to mark center side, continue working in pattern until 4 (3, 4, 7, 7, 4) sts remain, pm, k to end of needle. Turn work.
Even Row (WS): p 4 (3, 4, 7, 7, 4), sm, work pattern (slipping side center markers) until last marker, sm, p to end of needle. Turn work.
Even Row (RS): k 4 (3, 4, 7, 7, 4), sm, work pattern (slipping side center markers) until last marker, sm, k to end of needle. Turn work.
Repeat these 2 rows until you have completed 4 (4.5, 4.5, 4.5, 4.5, 4.5) repeats of the pattern or 80 (90, 90, 90, 90, 90) rows from garter stitch edge.
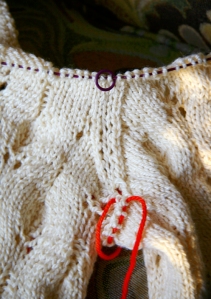
Set Up for Join Round: On next row work in pattern until 2 (3, 3, 4, 4, 5) sts before first side center marker. Slip next 4 (6, 6, 8, 8, 10) sts onto waste yarn. Break yarn leaving 18-inch tail to be used to graft underarm seam.
Note: You may add or subtract rows for length, but it will mean that when you join the arms, the arms and body will not be on the row in Chart A. If you add or subtract rows, take note of where you are in the stitch pattern so you can continue when the arms are added.
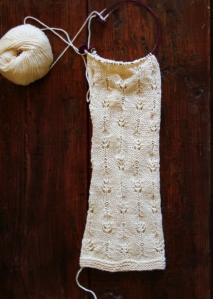
SLEEVES
Make two. Sleeves are worked in the round to the arm pits and have subtle bell shaping.
CO 51 (53, 57, 61, 67, 67) and join in the round, being careful not to twist.
Knit in garter stitch for 6 rounds. (knit one round, purl one round)
Set Up Round: k 4 (5, 7, 9, 5, 5), pm, begin Chart A and repeat pattern 3 (3, 3, 3, 4, 4) total times across 43 (43, 43, 43, 57, 57) sts, pm, k 4 (5, 7, 9, 5, 5)
Even Round: k to marker, sm, work in established pattern until next marker, sm, k to end of needle.
Work even round 8 (6, 6, 6, 6, 6) more times
SLEEVE SHAPING
Decrease Round: k2tog, k to marker, sm, work in established pattern until next marker, sm, k until 2 sts remain, SSK.
Work Even Round 9 (7, 7, 7, 7, 7) times.
Work one decrease round followed by 9 (7, 7, 7, 7, 7) even rounds. Repeat these 10 (8, 8, 8, 8, 8) rounds 1 (2, 2, 2, 2, 2) more times. 45 (45, 49, 53, 59, 20) sts.
Work even round for 29 (37, 37, 37, 37, 37) rounds.
Increase Round: k1, m1, k to marker, sm, work in established pattern until next marker, sm, k until 1 st remains, m1, k1.
Even Round: k to marker, sm, work in established pattern until next marker, sm, k to end of needle.
Work even round 8 (6, 6, 6, 6, 6) more times.
Work an increase round.
Work an even round 9 (7, 7, 7, 7, 7) times followed by an increase round. Repeat these 10 (8, 8, 8, 8, 8) rounds 0 (1, 1, 1, 1, 1) more times.
Work even round 10 (8, 8, 8, 8, 8) times, 51 (53, 57, 61, 67, 67) sts. Slip next 4 (4, 4, 6, 6, 8) sts onto waste yarn. Break yarn leaving 18-inch tail to be used to graft underarm seam.
NECK SHAPING
Neck Shaping: At the same time you are working the sleeve and body decreases, you will be working the neck decreases as follows:
Using the Yoke Set Up Row as Row 1, start neck shaping at Row 9 (5, 5, 5, 3, 5) by working a decrease at each side of the sweater and then again every 4th row 4 (4, 6, 6, 8, 8) more times. The first decrease uses the first three sts as follows: k1, k2tog. The second decrease uses the last three sts as follows: SSK, k1.
YOKE
You will join the sleeves to the body and work as one piece.
Note: You should be on row 1 (11, 11, 11, 11, 11) of Chart A unless you have lengthened or shortened the sleeves or body from pattern. You will begin Neck Shaping at the same time you begin shaping the sleeve.
Set Up (RS& Row 1): With working yarn from body of the sweater, pm for sleeve seam, work sleeve sts in pattern, pm for sleeve seam, work body sts in pattern until 2 (3, 3, 4, 4, 5) sts before first side center marker. Slip next 4 (6, 6, 8, 8, 10) sts onto waste yarn, pm for sleeve seam, work sleeve sts in pattern, pm for sleeve seam, work in pattern across body until last marker, k to end of needle. Turn work. 221 (229, 251, 259, 285, 285) sts.
ARMHOLE SHAPING
Decrease Row (WS): p to marker, sm, work in pattern until 3 sts before marker, SSP tbl, k1, sm, p2tog, k in pattern until 2 sts before marker, SSP tbl, sm, k1, p2tog, k in pattern until 3 sts before next marker, SSP tbl, k1, sm, p2tog, k in pattern until 2 sts before next marker, SSP tbl, sm, k1, p2tog, k in pattern until next marker, sm, k to end of needle.
Decrease Row (RS): p to marker, sm, work in pattern until 3 sts before marker, k2tog tbl, k1, sm, SSK, k in pattern until 2 sts before marker, k2tog, sm, k1, SSK, k in pattern until 3 sts before next marker, k2tog, k1, sm, SSK, k in pattern until 2 sts before next marker, k2tog, sm, k1, SSK, k in pattern until next marker, sm, k to end of needle.
Repeat these 2 rows 1 (2, 3, 4, 4, 5) more times.
SLEEVE CAP SHAPING
Even Row (WS): Work in established pattern across needle, slipping markers as you encounter them, until end of needle. Turn work.
Decrease Row Sleeve Only (RS): p to marker, sm, work in pattern until 3 sts before marker, k2tog tbl, k1, sm, SSK, k in pattern until 2 sts before marker, k2tog, sm, k1, SSK, work in pattern until 3 sts before next marker, k2tog, k1, sm, SSK, k in pattern until 2 sts before next marker, k2tog, sm, k1, SSK, work in pattern until next marker, sm, k to end of needle.
Repeat these 2 rows 4 (4, 5, 4, 5, 7) more times.
Decrease Row- Sleeve Only (WS): p to marker, sm, work in pattern until mext marker, sm, p2tog, k in pattern until 2 sts before marker, SSP tbl, sm, k in pattern until next marker, sm, p2tog, k in pattern until 2 sts before next marker, SSP tbl, sm, k in pattern until next last marker, sm, k to end of needle.
Decrease Row- Sleeve Only (RS): p to marker, sm, work in pattern until next marker, sm, SSK, k in pattern until 2 sts before marker, k2tog, sm, k in pattern until next marker, sm, SSK, work in pattern until 2 sts before next marker, k2tog, sm, work in pattern until last marker, sm, k to end of needle.
Repeat these 2 rows 5 (4, 3, 4, 3, 1) more times.
Shoulder Cap Bind Off: On the next row (WS), Work across front in pattern, bind off shoulder sts, work across back in pattern, bind off shoulder sts, work across front in pattern. Move each front and back to its own needle as they will be worked separately.
SHOULDER SHAPING
Each front and the back are worked independently before being joined with a 3 needle bindoff. The shoulder cap is then sewn to them.
Right Front: (Starting on RS)- Work 5 rows in pattern (remember to continue neck shaping).
(Starting on WS) – Work in pattern until 4 sts remain, w&t. (RS)- Work in pattern back to end of needle.
(WS)- Work in pattern until 4 sts remain until last wrapped st. w&t. (RS)- Work in pattern to end of needle.
Repeat previous 2 rows until there less than 4 sts remain.
(WS)- P across needle, picking up wraps and knitting them together with their respective stitches.
Left Front: (Starting on WS)- Work 5 rows in pattern (remember to continue neck shaping).
(Starting on RS) – Work in pattern until 4 sts remain, w&t. (RS)- Work in pattern back to end of needle.
(RS)- Work in pattern until 4 sts remain until last wrapped st. w&t. (WS)- Work in pattern to end of needle.
Repeat previous 2 rows until there less than 4 sts remain.
(RS)- K across needle, picking up wraps and knitting them together with their respective stitches.
Back: (Starting on RS) – Work 4 rows in pattern.
(Starting on RS) – Work in pattern until 4 sts remain, w&t. (WS)- work in pattern until 4 sts remain, w&t.
(RS)- Work in pattern until 4 sts remain until last wrapped st, w&t. (WS) – work in pattern until 4 sts remain until last wrapped st, w&t.
Repeat previous 2 rows until you cannot wrap any more sts without eating into the 58 (60, 62, 62, 64, 64) center shoulder sts.
(RS)- k across to end, picking up wraps and knitting them together with their respective stitches. (WS) – p across to end, picking up wraps and purling them together with their respective stitches.
Shoulder Seam:
Using the three-needle bind off, bind off the right front with the right back shoulder sts. Using the three-needle bind off, bind off the left front with the left back shoulder sts.
Should Cap:
Using an invisible stitch, sew the shoulder cap to the shoulder.
BUTTON BAND AND COLLAR
Pick up 3 of every 4 sts up the left front, every sts around the back neck (placing a marker to note the center back), and 3 of every 4 sts down the right front.
Working in garter stitch, k 9 (10, 11, 11, 12, 12) sts past the center back, w&t,
K back past the center back 9 (10, 11, 11, 12, 12) sts, w&t
K back, picking up the wrap and knitting together with its respective st, k1 w&t.
Repeat this row until you have reached the point where neck shaping starts on both sides.
K back, picking up the wrap and knitting together with its respective st, k until end.
K back, picking up the wrap and knitting together with its respective st, k until end.
Mark where you want your buttons and buttonholes. K across, working button holes where and as you desire. K across 2 more rows and then bind off loosely.
Weave in ends and block.