Knitted Marathon Beanie
Imagine a cozy and stylish beanie that is perfect for keeping you warm during those chilly morning runs or outdoor activities. This knitted marathon beanie is not only functional but also fashionable, with its intricate knit design and snug fit. Made from high-quality yarn, this beanie is soft to the touch and comfortable to wear for long periods of time. Whether you're training for a marathon or simply running errands around town, this beanie is a versatile accessory that will elevate your look while providing the warmth you need. Its durable construction ensures that it will last through many wears and washes, making it a reliable accessory for all your outdoor adventures. With its classic design and neutral color options, this beanie is easy to pair with any outfit, making it a versatile addition to your wardrobe. Stay warm and fashionable with the knitted marathon beanie, the perfect accessory for all your outdoor activities.

What you’ll need:
- 2 skeins of Merino Baby in color 4, by Katia Yarns
- 2.75mm knitting needles
- Darning needle for seaming / weaving in ends
Abbreviations:
- CO: Cast on (we used the classic long-tail cast on)
- k: knit
- p: purl
- we: work even, which means you knit the knit stitches and purl the purl stitches.
- cdd: center double decrease
- p2tog: purl 2 stitches together
Gauge:
You can knit a swatch in either stockinette stitch (faster) or in 1×1 rib (most accurate).
- 1×1 rib stitch (unstretched): 42 stitches = 10cm on 2.75mm needles.
- Stockinette stitch: 23 stitches = 10cm using 2.75mm needles.
Sizes:
- This pattern is available in two sizes: Adult Small/Medium, and Adult Large.
- The rib stitch is VERY stretchy, so the small/medium size will fit most adults.
- Follow the stitch numbers according to your chosen hat size: S/M [L].
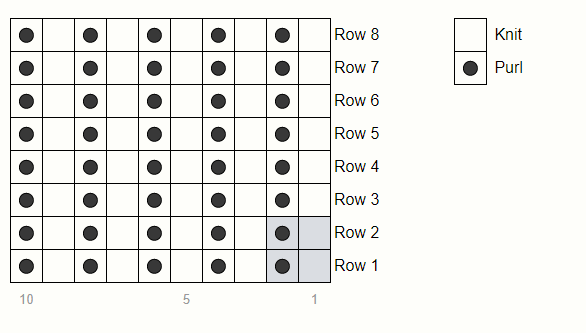
Chart:
Instructions for Knitting Flat
The Brim & Body
Cast on 158 [182] stitches (I used the classic long-tail cast on)
Row 1 (rs): *k1, p1, repeat from * to end of row
Row 2 (ws): *k1, p1, repeat from * to end of row
Continue working in the above 1×1 ribbing pattern until your hat measures 22cm (approx 8½ inches) from the cast on edge. You’ll need to attach the second ball of yarn partway through.
The Crown
In this section, we’ll begin a series of decreases to form the crown of the hat. Until this point the hat has been identical on both sides. Now we will designate a “right” side and a “wrong” side.
Don’t forget to refer to the abbreviations if you’re unsure how to perform certain stitches.
Size Large Only
(for size S/M, skip to row 5)
Row 1 (rs): we14, *cdd, we27, repeat from * until 18 stitches remain, then cdd, we15 (170 stitches)
Row 2 (ws): *k1, p1, repeat from * to end of row
Row 3: we13, *cdd, we25, repeat from * until 17 stitches remain, then cdd, we14 (158 stitches)
Row 4: (k1, p1)x7, *p2, (k1, p1)x12, repeat from * until 14 stitches remain, p2, (k1, p1)x6
All sizes
Row 5 (rs): we12, *cdd, we23, repeat from * until 16 stitches remain, cdd, we13 (146 stitches)
Row 6 (ws): *k1, p1, repeat from * to end of row
Row 7: we11, *cdd, we21, repeat from * until 15 stitches remain, cdd, we12 (134 stitches)
Row 8: (k1, p1)x6, *p2, (k1, p1)x10, repeat from * until 12 stitches remain, p2, (k1, p1)x5
Row 9: we10, *cdd, we19, repeat from * until 14 stitches remain, cdd, we11 (122 stitches)
Row 10: *k1, p1, repeat from * to end of row
Row 11: we9, *cdd, we17, repeat from * until 13 stitches remain, cdd, we10 (110 stitches)
Row 12: (k1, p1)x5, *p2, (k1, p1)x8, repeat from * until 10 stitches remain, p2, (k1, p1)x4
Row 13: we8, *cdd, we15, repeat from * until 12 stitches remain, cdd, we9 (98 stitches)
Row 14: *k1, p1, repeat from * to end of row
Row 15: we7, *cdd, we13, repeat from * until 11 stitches remain, cdd, we8 (86 stitches)
Row 16: (k1, p1)x4, *p2, (k1, p1)x6, repeat from * until 8 stitches remain, p2, (k1, p1)x3
Row 17: we6, *cdd, we11, repeat from * until 10 stitches remain, cdd, we7 (74 stitches)
Row 18: *k1, p1, repeat from * to end of row
Row 19: we5, *cdd, we9, repeat from * until 9 stitches remain, cdd, we6 (62 stitches)
Row 20: (k1, p1)x3, *p2, (k1, p1)x4, repeat from * until 6 stitches remain, p2, (k1, p1)x2
Row 21: we4, *cdd, we7, repeat from * until 8 stitches remain, cdd, we5 (50 stitches)
Row 22: *k1, p1, repeat from * to end of row
Row 23: k1, p1, k1, *cdd, we5, repeat from * until 7 stitches remain, cdd, we4 (38 stitches)
Row 24: *k1, p1, k1, p3, repeat from * until 2 stitches remain, k1, p1
Row 25: k1, p1, *cdd, p1, k1, p1, repeat from * until 6 stitches remain, cdd, p1, k1, p1 (26 stitches)
Row 26: *k1, p1, repeat from * to end of row
Row 27: k1, *cdd, k1, repeat from * until 5 stitches remain, cdd, k1, p1 (14 stitches)
Row 28: p2tog to end of row (7 times, which reduces the stitch count to 7 stitches).
Cut a long tail and weave through remaining stitches. Pull tight to close.
Finishing
Your hat is almost finished! All you need to do is block, seam up the side and, weave in any loose ends.