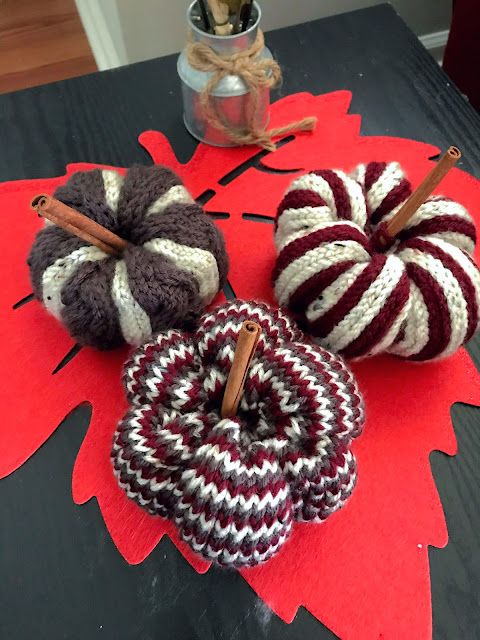
Knitted Trio of Pumpkins
A trio of pumpkins crafted from knitted material is a charming and unique addition to any fall decor. The intricate stitches and cozy texture of the knitted pumpkins add a warm and inviting touch to a room, perfect for the autumn season. Each pumpkin in the trio is carefully handmade, showcasing the skill and creativity of the artisan who crafted them. The varying sizes and colors of the pumpkins create a visually appealing display that can be placed on a mantel, shelf, or table to instantly elevate the ambiance of a space.
Materials
US 9/5.5mm 9" circular needles or (4) double-pointed needles
Any worsted weight yarn in any yardage depending on how large you want your pumpkin to be
Stitch markers
Darning Needle
Poly-fil
Cinnamon Sticks or desired material for stem
Abbreviations
K = Knit
*...* = repeat the pattern between "*"
C6F = slip 3 stitches onto another needle and hold in front while knitting the next three stitches and then knit the three stitches from the needle on hold
C6B = slip 3 stitches onto another needle and hold in back while knitting the next three stitches and then knit the three stitches from the needle on hold
Color A = Beige
Color B = Maroon
Color C = Graphite
Pumpkin #1 (Maroon & Beige Vertical Stripe)
Cast-on 60 stitches in either color (or any multiple of 4)
Row 1: *in color A K2, in color B K2*
Repeat Row 1 until work measures about 7 inches. Cut a very long tail about 2 feet (I like to make sure I have more than I need) and pull yarn through stitches. See below patterns for construction.
Pumpkin #2 (Beige & Graphite Cable)
Cast-on 72 stitches in either color (or any multiple of 12)
Row1-2: *in Color C K9, in Color A K3*
Row 3: *in Color C C6F, K3, in Color A K3*
Row 4-6: *in Color C K9, in Color A K3*
Row 7: *in Color C K3, C6B, in Color A K3*
Row 8: *in Color C K9, in Color A K3*
Repeat Rows 1-8 4 times or until piece measures about 7". Cut about 2 feet of yarn and pull through stitches and cinch. See construction instructions below.
Pumpkin #3 (Tri-color Helix)
Cast-on 63 stitches in any color (or any number of stitches divisible by the number of balls of yarn being used)
Because I used three colors, I cast-on a number of stitches that was divisible by three. I divided the stitches into thirds and placed stitch markers between each third (between each section of 21 stitches). I placed a different color marker where the row begins/ends as this is important to differentiate.
With the same color you casted-on with, knit the first group of stitches (21) and stop when you get to the first marker. Take the color you were knitting with, and move it to the right (it is important to keep your yarn in a line using the left most one when knitting and move it to the far right when done so that the yarn doesn't get tangled). Pick up your next color and knit the next group of stitches (21) and stop when you get to the next marker. Move this color to the right and continue with the next color. For me, this was my last group of stitches and I have completed one row. You continue with the same color that you ended the row with to do the first group of stitches on the next row. This is why it is important to differentiate where the row ends/begins so you know not to switch colors.
Continue knitting in the above pattern until piece measures about 7". Cut about 2 feet of yarn and pull through stiches. See below for construction instructions.
Construction
Let's pick up with pulling the yarn tail throught the stitches and cinching.
Next, fill pumpkin with poly-fil to reach desired fluffiness. I use about two-three handfuls because I like mine nice and full and puffy.
Next, thread yarn through the center of the pumpkin and through the poly-fil to cinch the other side of the pumpkin closed. At this point, your pumpkin should be a nice ball. If you want to give it that nice pumpkin shape, continue with the instructions. If you are happy with the shape it is, then stick in your stem and tie off your yarn to keep everything closed.
To continue making it into a pumpkin shape, take the yarn on the outside of the pumpkin and weave yarn back through the center of the pumpkin. Pull tight to give it a good hump and hide the yarn. Continue this process until you have the desired number of humps. Tie off yarn to hold everything in place and put your stem in the center.