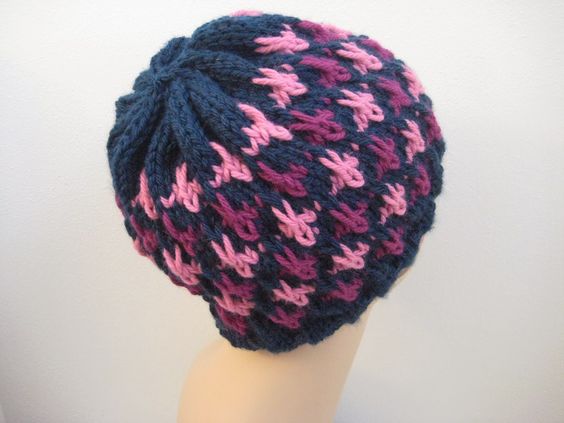
Knitted North Star Hat
Picture a cozy winter day, with snow falling gently outside and a warm fire crackling in the fireplace. Now imagine yourself wearing a beautifully crafted hat that features a unique design inspired by the North Star. This hat is not just any ordinary winter accessory - it is hand-knitted with care and attention to detail, making it a true work of art. The intricate pattern of the North Star on the hat adds a touch of elegance and sophistication to your winter wardrobe, making you stand out in a sea of generic winter hats. Whether you're out for a walk in the snow or simply running errands around town, the Knitted North Star Hat is the perfect accessory to keep you looking fashionable while staying cozy and snug. So why settle for a plain, boring winter hat when you can elevate your style with a beautifully crafted Knitted North Star Hat that combines fashion and function seamlessly?
Yarn: Berroco Vintage Chunky (50% Acrylic, 40% Wool, 10% Nylon; 130 yards [120 meters]/100 grams); #6185 Tide Pool - 1 skein, #6123 Blush - 1 skein, and #6167 Dewberry - 1 skein
Needles: One 16" circular needle in size 9, one 16" circular needle in size 10, and one set of double-pointed needles (dpns), also in size 10
Notions: Tapestry needle, stitch marker
Gauge: 14 stitches = 4 inches in stockinette
Using your size 9 circular needle and your main color yarn (which in our case is #6185 Tide Pool), cast on 84 stitches loosely, place marker, and join in round. Next, knit 4 rows in a k2, p2 ribbing, and then switch to your size 10 needles. Knit four rows around, and then it's time to begin the main pattern, which is the North Star Pattern from page 99 of Barbara G. Walker's A Second Treasury of Knitting Patterns. Please bear in mind that this is a slip stitch pattern, and yarn should be kept quite loose behind slipped stitches, especially when slipping multiple stitches together (this note goes double if you haven't knit many slip stitch patterns before - really, make it loose!). Oh, and before we get started, let's define the dip stitch as follows:
Dip stitch: Insert needle into middle front of stitch in the 3rd row below the next stitch, loop yarn around needle, and pull a loose loop through the stitch; next, slip the loop onto your left hand needle and k2 tog-b through your loop stitch and the next stitch on the needle
Row 1: Using your first accent color (for me, that's #6176 Dewberry), * k1, slip 3 stitches, k1, dip stitch; rep from *
Row 2: Still using your first accent color, * k2, slip 1, k3 *
Row 3: Using your main color, slip 1, * k3, slip 3 *, end slip 2
Rows 4 & 5: Using your main color, * k5, slip 1 *
Row 6: Using your main color, knit
Row 7: Using your second accent color, slip 1, * k1, dip stitch, k1, slip 3 *, end slip 2
Row 8: Using your second accent color, * k5, slip 1 *
Row 9: Using your main color, * k1, slip 3, k2 *
Rows 10 & 11: Using your main color, * k2, sl1, k3 *
Row 12: Using your main color, knit
Repeat rows 1 - 12 three times. Clip tails to both accent color yarns, as you're done with them. Complete two more knit rows in your main color, and then we'll begin the decreases, which go as follows:
Decrease Row 1: * k5, k2tog *
Row 2: * k4, k2tog *
You may want to switch to your dpns right about now...
Row 3: * k3, k2tog *
Row 4: * k2, k2tog *
Row 5: * k1, k2tog *
Rows 6 & 7: * k2tog *
Clip tail and thread through remaining 6 stitches. Pull tight, thread to inside of hat, and knot. Tuck in ends.