Knitted Arrow Hat
Picture a cozy winter day, with snow falling gently outside and a warm fire crackling in the fireplace. Now imagine yourself bundled up in your favorite sweater and scarf, but something is missing - a unique accessory to complete your winter look. That's where the Knitted Arrow Hat comes in. This stylish and trendy hat features a classic knit design with a twist - an arrow pattern that adds a touch of whimsy and charm. The Knitted Arrow Hat is not just a fashion statement, but also a practical choice for keeping your head warm and toasty during the cold winter months. Made from high-quality yarn, this hat is not only soft and comfortable to wear, but also durable and long-lasting. Whether you're out for a walk in the snow or simply running errands around town, the Knitted Arrow Hat is sure to turn heads and make you stand out from the crowd. So why settle for a boring old beanie when you can elevate your winter wardrobe with this fun and stylish accessory?
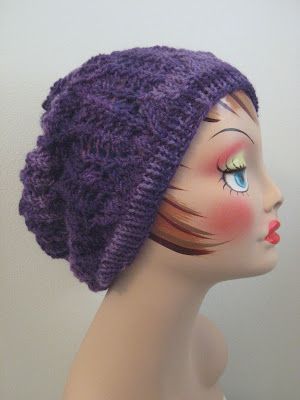
Yarn: Berroco Ultra Alpaca Tonal (50% Alpaca, 50% Wool; 215 yards [198 meters]/100 grams); #6321 (purple) - one skein
Needles: One 16" circular needle in size 8 (go to a size 7 if you want a tighter band), one 16" circular needle in size 10, and one set of double pointed needles (dpns) in size 10
Notions: Tapestry needle, stitch marker or yarn scrap to mark end of round
Gauge: 20 stitches = 4 inches on size 8 needles
So let's get started! Using the size 8 (or 7) circular needle, cast on 108 stitches loosely, place marker, and join in round. Next, knit in a k1, p1 ribbing for 1 inch, then switch to your size 10 circular needle and we'll move on to the main pattern, which is an adaptation of Arrow Pattern from page 273 of Barbara G. Walker's A Second Treasury of Knitting Patterns (I added a stitch, and rewrote it for the round). Anyway, it goes as follows:
Row 1 (and all other odd rows): knit
Row 2: * yo, ssk, k3, k2tog, yo, k2 *
Row 4: * k1, yo, ssk, k1, k2tog, yo, k3 *
Row 6: * k2, yo, sl1-k2tog-psso, yo, k2, p2 *
Rows 8, 10, 12, 14, and 16: * ssk, (k1, yo) twice, k1, k2tog, p2 *
Knit rows 1 - 16 twice through, and then knit rows 1 - 7 again, with the following modification: when you reach the last stitch in row 7, do not knit this stitch, but instead slip it, remove marker, slip stitch back to leading needle, and replace marker (so in effect, you've placed the marker between the two final stitches of row 7). Now it's time to begin the decreases, which we'll work as follows:
Row 1: * ssk, k5, k2tog, p1,ssk, (k1, yo) twice, k1, k2tog, p1 *
Row 2: knit
Row 3: * ssk, k3, k2tog, p1,ssk, (k1, yo) twice, k1, k2tog, p1 *
Row 4: knit
Row 5: * ssk, k1, k2tog, p1, ssk, (k1, yo) twice, k1, k2tog, p1 *
Row 6: knit
Now's the time you'll probably want to switch to your dpns, if you haven't already.
Row 7: * sl1-k2tog-psso, p1,ssk, (k1, yo) twice, k1, k2tog, p1 *
Row 8: * k1, p1, ssk, k3, k2tog, p1 *
Row 9: * k1, p1, ssk, k1, k2tog, p1 *
Row 10: * k1, p1, sl1-k2tog-psso, p1 *
Row 11: * k2tog *
Clip yarn, leaving 18" tail, and use tapestry needle to thread through remaining 12 stitches. Bring tail to inside of hat, knot, and tuck in ends. Finally, if you've looked at my other patterns, you may have noticed that I'm a lazy bastard who hates to block and finish. The nice thing about this pattern is that, if you choose not to block it, the pattern naturally gathers at the arrowhead bits, an effect which creates extra texture and slouch. See, being lazy is awesome!