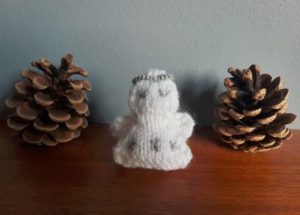
Knitted Little Angels
Crafted Heavenly Cherubs. Delicately woven by skilled hands, these miniature angels are a sight to behold. Each one unique in its design, these heavenly cherubs are made with love and care, bringing a touch of magic to any space they inhabit. The intricate details of their knitted wings and tiny halos make them a truly special addition to any collection. Whether displayed on a shelf or given as a thoughtful gift, these crafted heavenly cherubs are sure to bring joy and wonder to all who see them. Handmade Seraphic Figurines. These handcrafted seraphic figurines are a testament to the artistry and dedication of their creators. With their soft, knitted bodies and serene expressions, they exude a sense of peace and tranquility. Each one is a labor of love, meticulously crafted to perfection. Whether used as a decorative piece or as a symbol of hope and protection, these handmade seraphic figurines are a beautiful reminder of the power of art and creativity. Add a touch of whimsy and elegance to your home with these unique and charming creations.

How to Knit a Little Angel
Complete Size - 5cm width x 6cm height
What you will need...
Total time - 1 Hour 20 Minutes Each Knitted Angel
- 3.25mm knitting needles (UK 10, US 3)
- Double knitting yarn - White and sparkly silver
- Sewing up needle
- Scissors
- A small amount of toy filling/stuffing
- Optional pin badge or plain hairband to sew onto the back of your knitted angel
Before You Start...
Abbreviations
K = Knit P = Purl St = Stitch Sts = Stitches
Cast On - I use the thumb method.
St-st = stocking stitch. Alternating a row of knit stitches (right side), with a row of purl stitches (wrong side).
G-st = Garter stitch. Every row knit.
K2tog = Decrease by knitting two stitches together, making one stitch from two.
P2tog = Decrease by purling two stitches together, making one stitch from two.
Inc = Increase - by knitting into the front and the back of the same stitch, to make two stitches out of one.
Sl2tog - Slip two stitches together from the left needle to the right.
p2sso - pass two slipped stitches over (over the knitted stitch).
B&t tightly - Break off yarn and thread yarn through the remaining stitches on needle, pull up tightly and fasten off
TOP TIP
Sew up and add stitching in the suggested order to allow a neater finish when fastening off loose ends.
How to Make it...
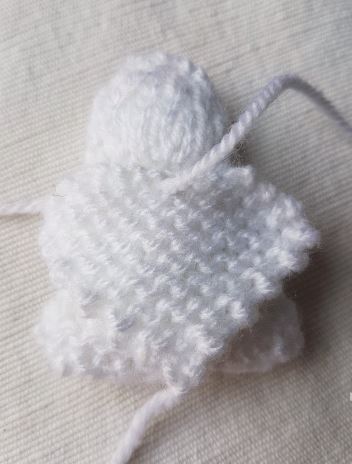
Made from two knitted main pieces, one knitted wing piece, and a finger-knitted piece to form the halo. All pieces are sewn together with added stitching for the facial features and stars at the base of her dress. Optional pin badge, hairband or finger-knitted loop to be sewn on your finished piece, to allow it to be used as an accessory.
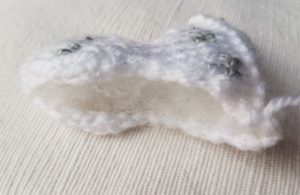
Main Piece
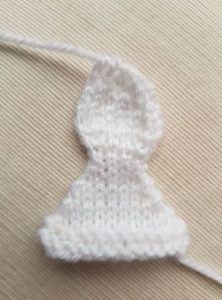
Make 2
Time - 15 Minutes each
Piece Size 5 cm x 6 cm
Needles 3.25 mm
Yarn White
Cast on 13sts
G-st 2 rows
Beginning with a K row st-st 8 rows, decreasing 1 st at the start of every row, by either K2tog or P2tog depending on whether it is a K row or P row respectively (5sts)
St-st 2 further rows to form the neck
K1, Inc Kwise, K1, inc Kwise, K1 (7sts)
P 1 row
K1, Inc Kwise , K1, inc Kwise, K1, inc Kwise, K1 (10sts)
Beginning with a P row st-st 3 rows
K1, K2tog, K1, K2tog, K1, K2tog, K1 (7sts)
P 1 row
K1, K2tog, K1, K2tog, K1 (5sts)
P 1 row
B&t tightly
Wings
Make 1
Time - 10 Minutes
Piece Size 5 cm x 4 cm
Needles 3.25 mm
Yarn White
Cast on 8sts
G-st four rows Inc 1 st at the start of every row (12sts)
G-st two further 2 rows
G-st 9 further rows, decreasing by K2tog at the start of every row until 3sts remain
Sl2tog, K1, p2sso
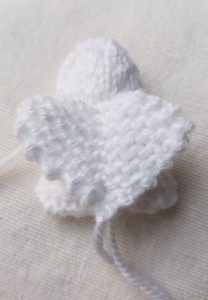
Halo
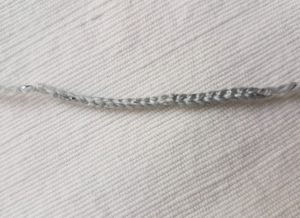
Make 1
Time - 5 Minutes
Size 1.5 cm x 4.5 cm
Needles 3.25 mm
Yarn Sparkly silver
Using a single length of yarn, finger-knit a length of approximately 5cm.
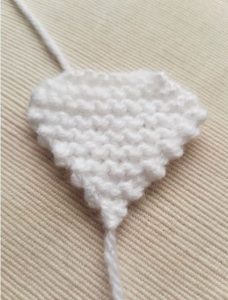
Piece it Together...
Stitching of Features - Total of 15 Minutes
Sewing-up time - Total of 20 Minutes

Facial Features
Using sparkly silver yarn, stitch two sleeping eyes, and some stars at the base of your angel main piece. Fasten and trim off loose ends so that they don't show through the finished piece.
Sewing Up
Main Piece - With right side of st-st on the outside, sew across row ends and cast on edge, leaving one side of row ends open. Stuff lightly and close gap in seam.
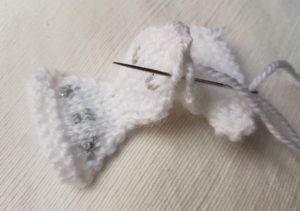
Stuffing Angel
Wings - Pin the wing piece centrally to the back of the angel, and sew into place by using backstitch down the centre. This should form a centre line and allow the wings to bend out slightly from the centre.
Halo - Place the halo around the top of the completed angel, sewing into place at the back and sewing through one stitch at the front to fix it into place.
Sewing Angel Wings
Either fasten off all loose ends, or leave a length of yarn at the centre back of the angel to be able to sew on a hairband or pin badge if desired.
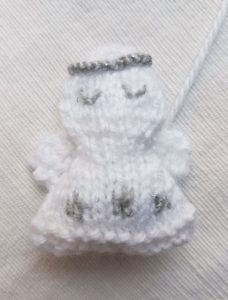
Front View
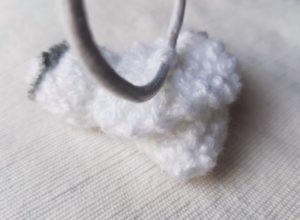
Angel Hairband
Making a Hairband
Sew the hairband so it lies horizontally across the back of the angel. This will allow the angel to rest in the upright position in the hair.
Oversew several times to give it strength and longevity. Ensure you sew the band into the main piece as well as the wings, so that the wings don't pull off with repeated use.
Knitted Angel
Make it Different...
This little angel makes a lovely little accessory. Due to the small size, she is great for putting in the hair, or hanging from a drawer, handle or window. And especially good for a handmade Christmas tree decoration!
As well as a 3D angel accessory as above, there is also the option of knitting an angel using a single main piece. This main piece may then be sewn onto something else, such as a stocking or cushion, to make other Christmassy things. You may also wish to use larger needles to make her a bit bigger without adding any extra time.
Experiment with some different facial features, or different colours for your stars and facial features to give them your own personal touch.