Knitted Naga Noda Hat
Introducing the exquisite Naga Noda Hat, a true masterpiece of craftsmanship! This hat is meticulously hand-knitted using the finest quality yarn, ensuring both warmth and style. The intricate design of the Naga Noda Hat showcases the rich cultural heritage of the Naga tribe, known for their exceptional weaving techniques. Crafted with utmost care and attention to detail, this hat is a testament to the skill and artistry of the talented artisans who bring it to life. The unique patterns and textures of the hat are a reflection of the Naga tribe's deep-rooted traditions and their connection to nature. With its cozy warmth and eye-catching design, the Knitted Naga Noda Hat is not just an accessory, but a symbol of cultural pride and timeless elegance.

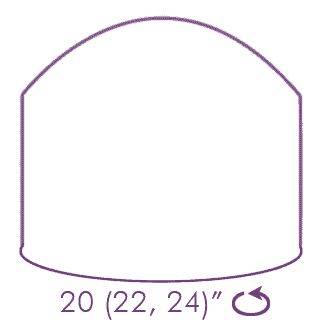
Size
Small (144 sts), Medium (162 sts) and Large (180 sts) for a head circumference of about 20 (22, 24)” or 51 (56, 61) cm
The head circumferences listed above take into account 1 to 2” or 2.5 to 5 cm of negative ease because lace stitches look their best when they are being slightly stretched
Shown in size Medium
Yarn
Lanitium ex Machina BFL Sock Twist (80% Wool 20% Nylon; 400 yards [366 meters]/100 grams): Destination St. Petersburg, 1 (1, 1) ball
added second size on March 28, 2020
Needles
Size US 1 and US 1 ½ (2.25 and 2.5 mm): dpns or 16” circular needles
Notions
8 to 10 stitch markers; cable needle; tapestry needle
Gauge
32 sts and 44 rows = 4” [10 cm] in St st with larger needles after wet blocking.
Pattern Notes
- When more than one number is given, the 1st applies to size Small, the 2nd to Medium, and the 3rd one to Large.
- Work the stitches as they appear means that you keep working in the established pattern: knit all the knits, purl all the purls, ktbl all the ktbl’s.
- When working the lace and cable chart your total stitch count changes in rnds 1-3 and 7-9. You will be back to your usual amount of stitches in rnds 4-6 and 10-12.
Charts
Chart A: Lace and cable pattern
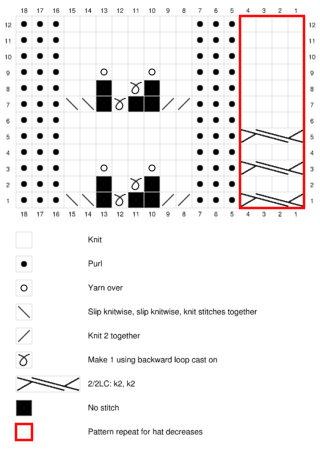
Chart A Written
Rnd 1: 2/2LC, p3, k2tog X 2, m1, ssk X 2, p3; 3 sts decreased.
Rnd 2: K4, p3, k2, m1, k1, k2, p3; 1 st increased.
Rnd 3: 2/2LC, p3, k2, yo, k2, yo, k2, p3; 2 sts increased.
Rnd 4: K4, p3, k8, p3
Rnd 5: 2/2LC, p3, k8, p3
Rnd 6: As Rnd 4
Rnd 7: As Rnd 1
Rnd 8: As Rnd 2
Rnd 9: K4, p3, k2, yo, k2, yo, k2, p3; 2 sts increased.
Rnds 10-12: As Rnd 4
Written instructions of pattern repeat in chart A:
Rnd 1: 2/2LC
Rnd 2: K4
Rnd 3: 2/2LC
Rnd 4: K4
Rnd 5: 2/2LC
Rnds 6-12: K4
Pattern
Brim
With smaller size needles, CO 144 (162, 180) sts using the stretchy cast on method of your choice and join for knitting in the round. Place BOR marker.
*Ktbl1, p2, ktbl1, p3, k3, p2, k3, p3, rep from * to BOR. Work this rnd a total of 12 times.
Hat body
Once the brim is finished, switch to larger size needles and continue with chart A. Chart A is repeated 8 (9, 10) times per round. Work rnds 1 to 12 a total of 3 (3, 4) times. Then work rnds 1 to 6 0 (1, 1) times more. Your hat should now measure approximately 4 ½ (5, 6)” or 11.5 (12.5, 15) cm from the brim. You can work additional rnds if required, as long as you end with either a rnd 6 or 12.
Hat Decreases
Note: From this point onwards, only work the pattern repeat of chart A as indicated by the red box.
If the last row you worked is row 12 of chart A: *Work the 4 sts of rnd 1 of pattern repeat in chart A, work next 5 sts as they appear, ssk, pm, k2tog, work next 5 sts as they appear, rep from * to BOR; 16 (18, 20) sts decreased.
The actual sts that you would work are:
* 2/2 LC, P3, K2, ssk, pm, k2tog, k2, p3, rep from * to BOR
If the last row you worked is row 6 of chart A: *Work the 4 sts of rnd 7 of pattern repeat in chart A, work next 5 sts as they appear, ssk, pm, k2tog, work next 5 sts as they appear, rep from * to BOR; 16 (18, 20) sts decreased.
The actual sts that you would work are:
* 2/2 LC, P3, K2, ssk, pm, k2tog, k2, p3, rep from * to BOR
You should now have 8 (9, 10) decrease markers and a BOR marker. There are 128 (144, 160) sts remaining, 16 between each decrease marker.
Start working decreases as follows:
Plain rnd: *Work next rnd of pattern repeat in chart A, work sts as they appear, sm, work sts as they appear until you reach the column worked according to chart A, rep from * to BOR. Work this rnd a total of 3 (4, 4) times.
Decrease rnd: *Work next rnd of pattern repeat in chart A, work to 2 sts before decrease marker, ssk, sm, k2tog, work sts as they appear until you reach the column worked according to chart A, rep from * to BOR; 16 (18, 20) sts decreased.
Work these 4 (5, 5) rnds a total of 5 (5, 5) times. There now are 48 (54, 60) sts remaining, 6 between each decrease marker.
Make sure to switch to dpns or magic loop method when necessary!
Remove BOR marker. Knit 2 sts. Place BOR marker.
Then continue the decreases as follows:
Plain rnd: *Work sts as they appear, rep from * to BOR. Work this rnd a total of 3 (4, 4) times.
Decrease rnd: *Work sts as they appear to 2 sts before decrease marker, ssk, sm, k2tog, rep from * to BOR; 16 (18, 20) sts decreased.
There now are 32 (36, 40) sts remaining, 4 between each decrease marker.
Then, work the 3 (4, 4) plain rnds once more. Work the last decrease round as follows: *k2tog, ssk, rep from * to BOR so that 2 sts are remaining between each decrease marker. Remove decrease markers. *k2tog, rep from * to BOR. There are 9 (9, 10) sts remaining.
Finishing
Cut yarn, leaving a tail of at least 6” or 15 cm. Using a tapestry needle, thread the yarn through the remaining sts at least twice and pull tightly.
Weave in ends. Soak the hat in lukewarm water for 15 minutes. Gently squeeze out excessive water and block into shape.