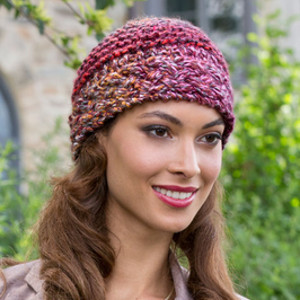
Knitted Berries Blast Beanie
Picture a cozy winter day, walking through the snow-covered streets with a stylish accessory keeping you warm - the Knitted Berries Blast Beanie. This unique beanie is not your average winter hat; it is handcrafted with intricate knitting techniques that create a beautiful texture resembling a blast of berries. The vibrant colors and playful design make it a fun and eye-catching addition to any winter outfit. Made with high-quality yarn, the Knitted Berries Blast Beanie is not only fashionable but also functional. The thick knit provides warmth and insulation against the cold, while the snug fit ensures a comfortable wear all day long. Whether you're hitting the slopes or simply running errands in the city, this beanie is the perfect blend of style and practicality. Stand out from the crowd and make a statement with the Knitted Berries Blast Beanie - a must-have accessory for the winter season.
Knitting Needle Size11 or 8 mm
Yarn Weight(5) Bulky/Chunky (12-15 stitches for 4 inches)
Gauge12 stitches, 20 rows, 4 inches. garter stitch
Materials:
- RED HEART® Medley™: 1 ball 940 Volcano (Art 824, available in 4oz (113 g), 99 yd (90 m) balls)
- Susan Bates® Knitting Needles: 8mm [US 11]
- Cable Needle
- Yarn needle
GAUGE: 12 sts = 4” and 20 rows = 4 inches in garter stitch. CHECK YOUR GAUGE. Use any size needle to obtain the gauge.
Finished Measurements
Head Circumference: 20” [51 cm]. Beanie stretches to fit 21-22” [53-56 cm].
Finished Length: 9” [23 cm]. Beanie fits most adults.
Abbreviations:
K = knit
cm = centimeters
mm = millimeters
P = purl
St st = Stockinette stitch (Knit on right side rows; Purl on wrong side rows.)
st(s) = stitch (es)
[ ] = work directions in brackets the number of times specified
* or ** = repeat whatever follows the * or ** as indicated
SPECIAL STITCHES
CB4 = Slip next 2 stitches to cable needle and hold in back, k2, k2 stitches from cable needle.
CF4 = Slip next 2 stitches to cable needle and hold in front, k2, k2 stitches from cable needle.
K2tog = Knit 2 stitches together (decrease)
PATTERN STITCHES
Cable Panel (panel of 13 sts)
Row 1 (Wrong Side): P1, k2, p8, k1, p1.
Row 2 (Right Side): K1, p1, CB4, twice, p1, k2.
Row 3: Repeat Row 1.
Row 4: K1, p1, k2, CF4, k2, p1, k2.
Repeat rows 1-4 for Cable Panel.
Garter Stitch
Row 1 (Right Side): Knit all sts.
Row 2 (Wrong Side): Knit all sts.
Repeat rows 1-2 for Garter Stitch.
CABLE PANEL HEADBAND
Cast on 13 stitches. Work in Cable Panel until Beanie band measures 20” [51 cm] from cast-on edge. Bind off all stitches.
BEANIE
With Right Side of Cable Panel facing, hold Cable Panel headband so that the k2 edge is on the bottom. From top edge, pick up 57 stitches evenly along edge. Work in Garter Stitch for 4 rows
Shape Crown:
Row 1 (Right Side) decrease row: K1, *k9, k2tog; repeat from * to last st, k1—52 sts
Row 2 (Wrong Side): P1, k to last st, P1.
Row 3 (Right Side) decrease row: K1, *k8, k2tog; repeat from * to last st, k1—47 sts.
Row 4 (Wrong Side): P1, k to last st, P1.
Row 5 (Right Side) decrease row: K1, *k7, k2tog; repeat from * to last st, k1—42 sts.
Row 6 (Wrong Side): P1, k to last st, P1.
Row 7 (Right Side) decrease row: K1, *k6, k2tog; repeat from * to last st, k1—37 sts.
Row 8 (Wrong Side): P1, k to last st, P1.
Row 9 (Right Side) decrease row: K1, *k5, k2tog; repeat from * to last st, k1—32 sts.
Row 10 (Wrong Side): P1, k to last st, P1.
Row 11 (Right Side) decrease row: K1, *k4, k2tog; repeat from * to last st, k1—27 sts.
Row 12 (Wrong Side): P1, k to last st, P1.
Row 13 (Right Side) decrease row: K1, *k3, k2tog; repeat from * to last st, k1—22 sts.
Row 14 (Wrong Side): P1, k to last st, P1.
Row 15 (Right Side) decrease row: K1, *k2, k2tog; repeat from * to last st, k1—17 sts.
Row 16 (Wrong Side): P1, k to last st, P1.
Row 17 (Right Side) decrease row: K1, *k1, k2tog; repeat from * to last st, k1—12 sts.
Row 18 (Wrong Side) decrease row: P1, k2tog, 5 times, p1—7 sts.
FINISHING
Cut yarn leaving a tail 15” [38 cm] long. With yarn needle, draw tail through remaining stitches twice and pull tightly. Using mattress stitch, sew back seam together. Weave in ends. Block lightly.